
Downloads
Apart from installing via tarball or git, rsyslog is also available in package form on some distributions. All packages currently maintained by Adiscon are listed below. For more detailed information about the packages and how to install rsyslog with them can be found at the specific package page.
- Ubuntu
- RHEL/CentOS
- Debian
rsyslog and ElasticSearch
by Micah Yoder, originally published on rackspace. Minor changes through Adiscon.
There is a clear benefit to being able to aggregate logs from various servers and services into one place and be able to search them for any sort of arbitrary event. Traditional syslog can aggregate logs, but aggregating events from them sometimes involves grep and convoluted regular expressions. Logging structured data to a database makes a lot of sense. rsyslog and ElasticSearch can do that, but figuring out how to get it to work from the rsyslog documentation can be difficult. Let’s start from the beginning.
First, you need the newest stable rsyslog, 7.4.x. The older 7.2 won’t cut it. You need the plug-ins mmnormalize and omelasticsearch, both of which are available from rsyslog’s yum repositories for RHEL/CentOS. mmnormalize requires some packages from EPEL so that will need to be added to the server as well.
Let’s walk through this from the beginning, starting with the most basic rsyslog configuration:
module(load="imuxsock") # provides support for local system logging (e.g. via logger command)
module(load="imklog")   # provides kernel logging support (previously done by rklogd)
$ActionFileDefaultTemplate RSYSLOG_TraditionalFileFormat
*.*     /var/log/messages
This simply loads the necessary modules for basic logging operation, sets the normal log format, and sends everything to /var/log/messages. With this if you issue this command:
# logger 'hello world!'
You get this in /var/log/messages:
Mar 27 14:16:47 micahsyslog root: hello world!
There are several parts here: the date/time, the hostname, the syslog tag or program (root), and the message. Another example:
# service sshd restart
yields:
Mar 27 14:19:27 micahsyslog sshd[23295]: Received signal 15; terminating.
Mar 27 14:19:27 micahsyslog sshd[16602]: Server listening on 0.0.0.0 port 22.
Mar 27 14:19:27 micahsyslog sshd[16602]: Server listening on :: port 22.
By the way, if we remove the ActionFileDefaultTemplate directive, we get the default line with an ISO time, which is nicer for automatic processing but a bit less readable for humans:
2013-03-27T21:51:29.139796+00:00 micahsyslog root: Hello world #2!
That is good to know, but actually irrelevant for putting data into ElasticSearch. If you also log to text files, you can decide whether to use the ISO time or the more human readable time.
Now let’s try to get it to normalize messages from the log! For this example we will need rsyslog running with ActionFileDefaultTemplate directive (keep it in for now, but you can remove it later if you want).
Create a rulebase file, which will be used by liblognorm. liblognorm is a library written by Rainer Gerhards, the author of rsyslog, which parses log messages according to a pattern and extracts variables from them. We can create the file as /etc/rsyslog.d/rules.rb and put in these contents:
prefix=%date:date-rfc3164% %hostname:word% %tag:word%
rule=user: new user: name=%user:char-to:,%, UID=%uid:number%, GID=%gid:number%, home=%home:char-to:,%, shell=%shell:word%
rule=test: Hello %x:number%
Now if we log something:
# logger “Hello 55”
We should be able to get something like this:
# lognormalizer -r rsyslog.d/rules.rb -t test < /var/log/messages
[cee@115 event.tags="test" x="55" tag="root:" hostname="micahsyslog" date="Mar 27 22:53:30"]
See what happened? The lognormalizer command, which uses liblognorm, was able to pull out the number in the log as variable “x” according to our “test” rule.
A short description of the rule base is in order. The prefix line contains a prefix that will be applied to all following rules. A rule is defined by a line beginning with the word “rule”, followed by an “=” sign, an optional tag, then a “:”. A space should then follow – but the space is actually part of the rule! There will be a space after the prefix, so it needs to be there.
Documentation on the rulebase file can be found here: http://www.liblognorm.com/files/manual/index.html Then navigate to How to use liblognorm → Rulebase. This will show you all the directives you can use.
Now we need to get the data into ElasticSearch. First we need to install it, which is very simple (at least for a single test node). Just extract its tarball, change into the base directory, and run:
# bin/elasticsearch -f
The -f causes it to run in the foreground so you can see what is going on.
We then add this to rsyslog.conf:
module(load="mmnormalize")
module(load="omelasticsearch")

template(name="test" type="subtree" subtree="$!")

set $!fac = $syslogfacility;
set $!host = $hostname;
set $!sev = $syslogseverity;
set $!time = $timereported;
set $!tgen = $timegenerated;
set $!tag = $syslogtag;
set $!prog = $programname;

action(type="omelasticsearch" server="localhost" template="test")
So what is all this? First we load the modules to normalize the log messages and for export to ElasticSearch. These should be placed near the top of your rsyslog.conf file with any other includes.
The template statement tells which part of the CEE data should be sent to ElasticSearch. Here a brief explanation of the data structure is necessary.
JSON (the format for CEE logging data and the native format for ElasticSearch) is a hierarchical data structure. The root of the data structure in rsyslog is $! – something like the ‘{}’ in a JSON document. Assigning to $!data1 would put a value into the “data1” top level JSON element {“data”: “…”}. Trees can be built. If you assign to $!tree1!child1, you will get a JSON document like this: {“tree1: {“child1”: “…”}}
This rsyslog document lists the available properties that you can use to populate these CEE variables.
As of version 7.5.8, 7.6.0 and 8.1.4, not only the standard rsyslog properties and constants can be assigned to these variables. There is now a way to assign the result of an rsyslog template, which allows more complex values. That is what you need to put a sortable timestamp into the document. More information can be found in the guide to use “set variable and exec_template“.
As this was not available at the time of writing I needed to get around this limitation (sort of), so I created an ElasticSearch index with a timestamp. Here is the command I used:
curl -XPUT http://elasticsearch.hostname:9200/logs -d '{"mappings":{"events":{"_timestamp":{"enabled": true, "store": "yes"},"prog":{"store":"yes"},"host":{"store":"yes"}}}}'
This also “stores” the host and prog syslog fields, which should help with querying based on the host or program. This will create an index called “logs”. ElasticSearch by default inserts events into the “system” index so you will want to specify the index name in your omelasticsearch line in rsyslog.conf (or one of its includes):
action(type="omelasticsearch" server="elasticsearch.hostname" template="cee_template_name" searchIndex="logs" bulkmode="on")
We also enabled bulk mode, which allows rsyslog to send many events at once to ElasticSearch. This will greatly improve performance.
Now you can query it!
curl 'http://elasticsearch.hostname:9200/logs/_search?pretty=1&fields=_source,_timestamp&size=100' -d '{"sort":{"_timestamp": "desc"}}' | less
The “pretty=1” and piping it to less are simply there to pretty print the JSON result and make it easy for you to browse the data set. A real search program, of course, would not turn on pretty mode and the code would directly consume the JSON.
You can add parameters after the ‘size=100’ (which, of course, says to return the 100 most recent results).
- &q=word will search the logs for that word in any field.
- &q=prog:name will search for ‘name’ in the syslog program field. Examples: postfix, sudo, crontab
- &q=host:hostname will find events for that hostname. Just use the base hostname, not a FQDN.
And that should get you started! Hopefully this is helpful.
Parsing JSON (CEE) Logs and Sending them to Elasticsearch
Original post: Structured Logging with rsyslog and Elasticsearch via @sematext
When your applications generate a lot of logs, you’d probably want to make some sense of them through searches and statistics. Here’s when structured logging comes in handy, and I would like to share some thoughts and configuration examples of how you could use a popular syslog daemon like rsyslog to handle both structured and unstructured logs. Then I’ll show you how to:
- take a JSON from a syslog message and index it in Elasticsearch (which eats JSON documents)
- append other syslog properties (like the date) to the existing JSON to make a bigger JSON document that would be indexed in Elasticsearch. This is how we set up rsyslog to handle CEE-formatted messages in our log analytics tool, Logsene
On structured logging
If we take an unstructured log message, like:
Joe bought 2 apples
And compare it with a similar one in JSON, like:
{“name”: “Joe”, “action”: “bought”, “item”: “apples”, “quantity”: 2}
We can immediately spot a good and a bad point of structured logging: if we index these logs, it will be faster and more precise to search for “apples” in the “item” field, rather than in the whole document. At the same time, the structured log will take up more space than the unstructured one.
But in most use-cases there will be more applications that would log the same subset of fields. So if you want to search for the same user across those applications, it’s nice to be able to pinpoint the “name” field everywhere. And when you add statistics, like who’s the user buying most of our apples, that’s when structured logging really becomes useful.
Finally, it helps to have a structure when it comes to maintenance. If a new version of the application adds a new field, and your log becomes:
Joe bought 2 red apples
it might break some log-parsing, while structured logs rarely suffer from the same problem.
Enter CEE and Lumberjack: structured logging with syslog
With syslog, as defined by RFC3164, there is already a structure in the sense that there’s a priority value (severity*8 + facility), a header (timestamp and hostname) and a message. But this usually isn’t the structure we’re looking for.
CEE and Lumberjack are efforts to introduce structured logging to syslog in a backwards-compatible way. The process is quite simple: in the message part of the log, one would start with a cookie string “@cee:”, followed by an optional space and then a JSON or XML. From this point on I will talk about JSON, since it’s the format that both rsyslog and Elasticsearch prefer. Here’s a sample CEE-enhanced syslog message:
@cee: {“foo”: “bar”}
This makes it quite easy to use CEE-enhanced syslog with existing syslog libraries, although there are specific libraries like liblumberlog, which make it even easier. They’ve also defined a list of standard fields, and applications should use those fields where they’re applicable – so that you get the same field names for all applications. But the schema is free, so you can add custom fields at will.
CEE-enhanced syslog with rsyslog
rsyslog has a module named mmjsonparse for handling CEE-enhanced syslog messages. It checks for the “CEE cookie” at the beginning of the message, and then tries to parse the following JSON. If all is well, the fields from that JSON are loaded and you can then use them in templates to extract whatever information seems important. Fields from your JSON can be accessed like this: $!field-name. An example of how they can be used is shown here.
To get started, you need to have at least rsyslog version 6.6.0, and I’d recommend using version 7 or higher. If you don’t already have that, check out the repositories for RHEL/CentOS and Ubuntu.
Also, mmjsonparse is not enabled by default. If you use the repositories, install the rsyslog-mmjsonparse package. If you compile rsyslog from sources, specify –enable-mmjsonparse when you run the configure script. In order for that to work you’d probably have to install libjson and liblognorm first, depending on your operating system.
For a proof of concept, we can take this config:
#load needed modules
module(load="imuxsock") # provides support for local system logging
module(load="imklog") # provides kernel logging support
module(load="mmjsonparse") #for parsing CEE-enhanced syslog messages

#try to parse structured logs
*.* :mmjsonparse:

#define a template to print field "foo"
template(name="justFoo" type="list") {
  property(name="$!foo")
  constant(value="\n") #we'll separate logs with a newline
}

#and now let's write the contents of field "foo" in a file
*.* action(type="omfile"
           template="justFoo"
           file="/var/log/foo")
To see things, better, you can start rsyslog in foreground and in debug mode:
rsyslogd -dn
And in another terminal, you can send a structured log, then see the value in your file:
# logger ‘@cee: {“foo”:”bar”}’
# cat /var/log/foo
bar
If we send an unstructured log, or an invalid JSON, nothing will be added
# logger ‘test’
# logger ‘@cee: test2’
# cat /var/log/foo
bar
But you can see in the debug output of rsyslog why:
mmjsonparse: no JSON cookie: ‘test’
[…]
mmjsonparse: toParse: ‘ test2’
mmjsonparse: Error parsing JSON ‘ test2’: boolean expected
Indexing logs in Elasticsearch
To index our logs in Elasticsearch, we will use an output module of rsyslog called omelasticsearch. Like mmjsonparse, it’s not compiled by default, so you will have to add the –enable-elasticsearch parameter to the configure script to get it built when you run make. If you use the repositories, you can simply install the rsyslog-elasticsearch package.
omelasticsearch expects a valid JSON from your template, to send it via HTTP to Elasticsearch. You can select individual fields, like we did in the previous scenario, but you can also select the JSON part of the message via the $!all-json property. That would produce the message part of the log, without the “CEE cookie”.
The configuration below should be good for inserting the syslog message to an Elasticsearch instance running on localhost:9200, under the index “system” and type “events“.
#load needed modules
module(load="imuxsock") # provides support for local system logging
module(load="imklog") # provides kernel logging support
module(load="mmjsonparse") #for parsing CEE-enhanced syslog messages
module(load="omelasticsearch") #for indexing to Elasticsearch

#try to parse a structured log
*.* :mmjsonparse:

#define a template to print all fields of the message
template(name="messageToES" type="list") {
  property(name="$!all-json")
}

#write the JSON message to the local ES node
*.* action(type="omelasticsearch"
           template="messageToES")
After restarting rsyslog, you can see your JSON will be indexed:
# logger ‘@cee: {“foo”: “bar”, “foo2”: “bar2″}’
# curl -XPOST localhost:9200/system/events/_search?q=foo2:bar2 2>/dev/null | sed s/.*_source//
” : { “foo”: “bar”, “foo2”: “bar2” }}]}}
As for unstructured logs, $!all-json will produce a JSON with a field named “msg”, having the message as a value:
# logger test
# curl -XPOST localhost:9200/system/events/_search?q=test 2>/dev/null | sed s/.*_source//
” : { “msg”: “test” }}]}}
It’s “msg” because that’s rsyslog’s property name for the syslog message.
Including other properties
But the message isn’t the only interesting property. I would assume most would want to index other information, like the timestamp, severity, or host which generated that message.
To do that, one needs to play with templates and properties. In the future it might be made easier, but at the time of this writing (rsyslog 7.2.3), you need to manually craft a valid JSON to pass it to omelasticsearch. For example, if we want to add the timestamp and the syslogtag, a working template might look like this:
template(name="customTemplate"
   type="list") {
#- open the curly brackets,
#- add the timestamp field surrounded with quotes
#- add the colon which separates field from value
#- open the quotes for the timestamp itself
   constant(value="{\"timestamp\":\"")
#- add the timestamp from the log,
# format it in RFC-3339, so that ES detects it by default
   property(name="timereported" dateFormat="rfc3339")
#- close the quotes for timestamp,
#- add a comma, then the syslogtag field in the same manner
   constant(value="\",\"syslogtag\":\"")
#- now the syslogtag field itself
# and format="json" will ensure special characters
# are escaped so they won't break our JSON
   property(name="syslogtag" format="json")
#- close the quotes for syslogtag
#- add a comma
#- then add our JSON-formatted syslog message,
# but start from the 2nd position to omit the left
# curly bracket
   constant(value="\",")
   property(name="$!all-json" position.from="2")
}
Summary
If you’re interested in searching or analyzing lots of logs, structured logging might help. And you can do it with the existing syslog libraries, via CEE-enhanced syslog. If you use a newer version of rsyslog, you can parse these logs with mmjsonparse and index them in Elasticsearch with omelasticsearch. If you are interested in indexing/searching logs in general, check out other Sematext logging posts or follow @sematext.
Changelog for 7.4.5 (v7-stable)
Version 7.4.5 [v7.4-stable] 2013-10-22
- mmanon: removed the check for specific “terminator characters” after
last octet. As it turned out, this didn’t work in practice as there
was an enormous set of potential terminator chars — so removing
them was the best thing to do. Note that this may change behaviour of
existing installations. Yet, we still consider this an important
bugfix, that should be applied to the stable branch.
closes: http://bugzilla.adiscon.com/show_bug.cgi?id=477
Thanks to Muri Cicanor for initiating the discussion - now requires libestr 0.1.8 as early versions had a nasty bug in
string comparisons - omelasticsearch: add failed.httprequests stats counter
- bugfix: invalid property filter was not properly disabled in ruleset
Note that this bugfix introduces a very slight memory leak, which is
cosmetic, as it just holds data until termination that is no longer
needed. It is just the part of the config that was invalid. We will
“fix” this “issue” in the devel version first, as the fix is a bit
too intrusive to do without hard need in the stable version. - bugfix: segfault if re_extract() function was used and no match found
- bugfix: potential misadressing on startup if property-filter was used
This could happen if the property name was longer than 127 chars, a case
that would not happen in practice. - bugfix: omelasticsearch: correct failed.http stats counter
- bugfix: omelasticsearch: did not correctly initialize stats counters
- bugfix: omelasticsearch: failed.es counter was only maintained in bulk mode
This usually did not lead to any problems, because they are in static
memory, which is initialized to zero by the OS when the plugin is
loaded. But it may cause problems especially on systems that do not
support atomic instructions – in this case the associated mutexes also
did not get properly initialized. - bugfix: mmanon did not detect all IP addresses in rewrite mode
The problem occured if two IPs were close to each other and the first one
was shrunk.
closes: http://bugzilla.adiscon.com/show_bug.cgi?id=485
Thanks to micah-at-riseup.net for reporting this bug - bugfix: mmanon sometimes used invalid replacement char in simple mode
depending on configuration sequence, the replacement character was set
to ‘s’ instead of the correct value. Most importantly, it was set to
‘s’ if simple mode was selected and no replacement char set.
closes: http://bugzilla.adiscon.com/show_bug.cgi?id=484
Thanks to micah-at-riseup.net for reporting this bug - bugfix: memory leak in mmnormalize
- bugfix: array-based ==/!= comparisions lead to invalid results
This was a regression introduced in 7.3.5 bei the PRI optimizer - bugfix: omprog blocked signals to executed programs
The made it impossible to send signals to programs executed via
omprog.
Thanks to Risto Vaarandi for the analysis and a patch. - bugfix: doc: imuxsock legacy param $SystemLogSocketParseTrusted was
misspelled
Thanks to David Lang for alerting us - bugfix: imfile “facility” input parameter improperly handled
caused facility not to be set, and severity to be overwritten with
the facility value.
Thanks to forum user dmunny for reporting this bug. - bugfix: small memory leak in imfile when $ResetConfigVariables was used
Thanks to Grégory Nuyttens for reporting this bug and providig a fix - bugfix: segfault on startup if TLS was used but no CA cert set
- bugfix: segfault on startup if TCP TLS was used but no cert or key set
- bugfix: some more build problems with newer json-c versions
Thanks to Michael Biebl for mentioning the problem. - bugfix: build system: libgcrypt.h needed even if libgrcypt was disabled
Thanks to Jonny Törnbom for reporting this problem
Changelog for 7.5.5 (v7-devel)
Version 7.5.5 [devel] 2013-10-16
- imfile: permit to monitor an unlimited number of files
- imptcp: add “defaultTZ” input parameter
- imudp: support for multiple receiver threads added
- imudp: add “dfltTZ” input config parameter
- bugfix: memory leak in mmnormalize
- bugfix: mmutf8fix did not properly handle invalid UTF-8 at END of message if the very last character sequence was too long, this was not detected
Thanks to Risto Vaarandi for reporting this problem. - mmanon: removed the check for specific “terminator characters” after last octet. As it turned out, this didn’t work in practice as there was an enormous set of potential terminator chars — so removing them was the best thing to do. Note that this may change behaviour of existing installations. Yet, we still consider this an important bugfix, that should be applied to the stable branch.
closes: http://bugzilla.adiscon.com/show_bug.cgi?id=477
Thanks to Muri Cicanor for initiating the discussion - now requires libestr 0.1.7 as early versions had a nasty bug in string comparisons
- bugfix: mmanon did not detect all IP addresses in rewrite mode
The problem occured if two IPs were close to each other and the first one was shrunk.
closes: http://bugzilla.adiscon.com/show_bug.cgi?id=485
Thanks to micah-at-riseup.net for reporting this bug - bugfix: mmanon sometimes used invalid replacement char in simple mode depending on configuration sequence, the replacement character was set to ‘s’ instead of the correct value. Most importantly, it was set to ‘s’ if simple mode was selected and no replacement char set.
closes: http://bugzilla.adiscon.com/show_bug.cgi?id=484
Thanks to micah-at-riseup.net for reporting this bug - bugfix: memory leak in mmnormalize
- bugfix: array-based ==/!= comparisions lead to invalid results
This was a regression introduced in 7.3.5 bei the PRI optimizer
Debian Repository
We build debian packages via openSUSE Build Service (OBS).
Please visit the OBS download section for rsyslog packages and instructions on how to install them.
Please note: the obs packages are currently under development. Not every feature is already available. We are looking for contributors for this effort! The download section is currently in Rainer Gerhards private home project, because it seems to take some time to request an official repository.
How to obtain a specific Doc Version?
There are very many rsyslog versions out in the wild. Each of these versions have different capabilities and consequently there is also different documentation required to match an exact version.
The rsyslog site always contains documentation for the latest development version (sometimes even features that just reside in git). While chances are good that the online doc can be used to solve a specific question, this is not guaranteed. Most importantly, older versions may have quite different rsyslog.conf formats that they support. As such, folks tend to ask how they can obtain a version of the documentation that exactly matches their version.
The answer is quite straightforward: most of the doc on the site comes from rsyslog’s project doc set, and that doc set is contained in each release tarball. So if you have e.g. 5.8.10 installed and want it’s doc, simply go ahead and download the relevant tarball. The full doc is contained in the “./doc” subdirectory. It’s in HTML format, so all you need to do is to point your browser at ./doc/index.html.
In many distributions it is even simpler, as there is a package rsyslog-doc (or similarly named), which contains that exact doc folder.
Changelog for 7.5.3 (v7-devel)
Version 7.5.3 [devel] 2013-09-11
- imfile: support for escaping LF characters added embedded LF in syslog messages cause a lot of trouble. imfile now has the capability to escape them to “#012″ (just like the regular control character escape option). This requires new-style input statements to be used. If legacy configuration statements are used, LF escaping is always turned off to preserve compatibility.
NOTE: if input() statements were already used, there is a CHANGE OF BEHAVIOUR: starting with this version, escaping is enabled by default. So if you do not want it, you need to add escapeLF=”off” to the input statement. Given the trouble LFs cause and the fact that the majority of installations still use legacy config, we considered this behaviour change acceptable and useful.
see also: http://blog.gerhards.net/2013/09/imfile-multi-line-messages. html - add support for global and local variables
- bugfix: queue file size was not correctly processed
this could lead to using one queue file per message for sizes >2GiB
Thanks to Tomas Heinrich for the patch. - add main_queue() configuration object to configure main message queue
- bugfix: stream compression in imptcp caused timestamp to be corrupted
- imudp: add ability to specify SO_RCVBUF size (rcvbufSize parameter)
- imudp: use inputname for statistics, if configured
- impstats: add process resource usage counters [via getrusage()]
- impstats: add paramter “resetCounters” to report delta values possible for most, but not all, counters. See doc for details.
- librelp 1.2.0 is now required
- make use of new librelp generic error reporting facility
This leads to more error messages being passed to the user and thus simplified troubleshooting. - bugfix: very small memory leak in imrelp
more or less cosmetic, a single memory block was not freed, but this only happens immediately before termination (when the OS automatically frees all memory). Still an annoyance e.g. in valgrind. - fix compile problem in debug build
- imported fixes from 7.4.4
Using TLS with RELP
In this guide, we want to describe how to setup rsyslog with a RELP connection which is to be secured with TLS. For this guide you need at least rsyslog 7.5.1 and librelp 1.1.3 as well as gnutls 2.10.0 or above. These need to be installed on the server as well on the clients. The guide will split up into 3 parts.
- Creating the certificates
- Client Configuration
- Server Configuration
Step 1 – Creating the certificates
1.1 Setting up the CA
The first step is to set up a certificate authority (CA). It must be maintained by a trustworthy person (or group) and approves the indentities of all machines. It does so by issuing their certificates. In a small setup, the administrator can provide the CA function. What is important is the the CA’s private key is well-protocted and machine certificates are only issued if it is know they are valid (in a single-admin case that means the admin should not issue certificates to anyone else except himself). The CA creates a so-called self-signed certificate. That is, it approves its own authenticy. This sounds useless, but the key point to understand is that every machine will be provided a copy of the CA’s certificate. Accepting this certificate is a matter of trust. So by configuring the CA certificate, the administrator tells rsyslog which certificates to trust. This is the root of all trust under this model. That is why the CA’s private key is so important – everyone getting hold of it is trusted by our rsyslog instances.
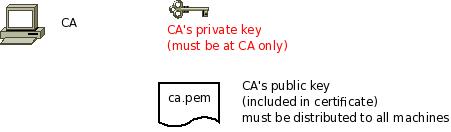
- generate the private key:
certtool --generate-privkey --outfile ca-key.pem
This takes a short while. Be sure to do some work on your workstation, it waits for radom input. Switching between windows is sufficient ;)
- now create the (self-signed) CA certificate itself:
certtool --generate-self-signed --load-privkey ca-key.pem --outfile ca.pem
This generates the CA certificate. This command queries you for a number of things. Use appropriate responses. When it comes to certificate validity, keep in mind that you need to recreate all certificates when this one expires. So it may be a good idea to use a long period, eg. 3650 days (roughly 10 years). You need to specify that the certificates belongs to an authority. The certificate is used to sign other certificates.
Sample Screen Session
Text in red is user input. Please note that for some questions, there is no user input given. This means the default was accepted by simply pressing the enter key.
[root@rgf9dev sample]# certtool --generate-privkey --outfile ca-key.pem --bits 2048
Generating a 2048 bit RSA private key...
[root@rgf9dev sample]# certtool --generate-self-signed --load-privkey ca-key.pem --outfile ca.pem
Generating a self signed certificate...
Please enter the details of the certificate's distinguished name. Just press enter to ignore a field.
Country name (2 chars): US
Organization name: SomeOrg
Organizational unit name: SomeOU
Locality name: Somewhere
State or province order research paper online name: CA
Common name: someName (not necessarily DNS!)
UID:
This field should not be used in new certificates.
E-mail: Enter the certificate's serial number (decimal):
Activation/Expiration time.
The certificate will expire in (days): 3650
Extensions.
Does the certificate belong to an authority? (Y/N): y
Path length constraint (decimal, -1 for no constraint):
Is this a TLS web client certificate? (Y/N):
Is this also a TLS web server certificate? (Y/N):
Enter the e-mail of the subject of the certificate: someone@example.net
Will the certificate be used to sign other certificates? (Y/N): y
Will the certificate be used to sign CRLs? (Y/N):
Will the certificate be used to sign code? (Y/N):
Will the certificate be used to sign OCSP requests? (Y/N):
Will the certificate be used for time stamping? (Y/N):
Enter the URI of the CRL distribution point:
X.509 Certificate Information:
Version: 3
Serial Number (hex): 485a365e
Validity:
Not Before: Thu Jun 19 10:35:12 UTC 2008
Not After: Sun Jun 17 10:35:25 UTC 2018
Subject: C=US,O=SomeOrg,OU=SomeOU,L=Somewhere,ST=CA,CN=someName (not necessarily DNS!)
Subject Public Key Algorithm:
RSA Modulus (bits 2048):
d9:9c:82:46:24:7f:34:8f:60:cf:05:77:71:82:61:66
05:13:28:06:7a:70:41:bf:32:85:12:5c:25:a7:1a:5a
28:11:02:1a:78:c1:da:34:ee:b4:7e:12:9b:81:24:70
ff:e4:89:88:ca:05:30:0a:3f:d7:58:0b:38:24:a9:b7
2e:a2:b6:8a:1d:60:53:2f:ec:e9:38:36:3b:9b:77:93
5d:64:76:31:07:30:a5:31:0c:e2:ec:e3:8d:5d:13:01
11:3d:0b:5e:3c:4a:32:d8:f3:b3:56:22:32:cb:de:7d
64:9a:2b:91:d9:f0:0b:82:c1:29:d4:15:2c:41:0b:97
Exponent:
01:00:01
Extensions:
Basic Constraints (critical):
Certificate Authority (CA): TRUE
Subject Alternative Name (not critical):
RFC822name: someone@example.net
Key Usage (critical):
Certificate signing.
Subject Key Identifier (not critical):
fbfe968d10a73ae5b70d7b434886c8f872997b89
Other Information:
Public Key Id:
fbfe968d10a73ae5b70d7b434886c8f872997b89
Is the above information ok? (Y/N): y
Signing certificate...
[root@rgf9dev sample]# chmod 400 ca-key.pem
[root@rgf9dev sample]# ls -l
total 8
-r-------- 1 root root 887 2008-06-19 12:33 ca-key.pem
-rw-r--r-- 1 root root 1029 2008-06-19 12:36 ca.pem
[root@rgf9dev sample]#
Be sure to safeguard ca-key.pem! Nobody except the CA itself needs to have it. If some third party obtains it, you security is broken!
1.2 Generating the machine certificate
In this step, we generate certificates for each of the machines. Please note that both clients and servers need certificates. The certificate identifies each machine to the remote peer. The DNSName specified inside the certificate can be specified inside the tls.PermittedPeer config statements. For now, we assume that a single person (or group) is responsible for the whole rsyslog system and thus it is OK if that single person is in posession of all machine’s private keys. This simplification permits us to use a somewhat less complicated way of generating the machine certificates. So, we generate both the private and public key on the CA (which is NOT a server!) and then copy them over to the respective machines. If the roles of machine and CA administrators are split, the private key must be generated by the machine administrator. This is done via a certificate request. This request is then sent to the CA admin, which in turn generates the certificate (containing the public key). The CA admin then sends back the certificate to the machine admin, who installs it. That way, the CA admin never get’s hold of the machine’s private key. Instructions for this mode will be given in a later revision of this document. In any case, it is vital that the machine’s private key is protected. Anybody able to obtain that private key can imporsonate as the machine to which it belongs, thus breaching your security.
Sample Screen Session Text in red is user input. Please note that for some questions, there is no user input given. This means the default was accepted by simply pressing the enter key. Please note: you need to substitute the names specified below with values that match your environment. Most importantly, machine.example.net must be replaced by the actual name of the machine that will be using this certificate. For example, if you generate a certificate for a machine named “server.example.com”, you need to use that name. If you generate a certificate for “client.example.com”, you need to use this name. Make sure that each machine certificate has a unique name. If not, you can not apply proper access control.
[root@rgf9dev sample]# certtool --generate-privkey --outfile key.pem --bits 2048
Generating a 2048 bit RSA private key...
[root@rgf9dev sample]# certtool --generate-request --load-privkey key.pem --outfile request.pem
Generating a PKCS #10 certificate request...
Country name (2 chars): US
Organization name: SomeOrg
Organizational unit name: SomeOU
Locality name: Somewhere
State or province name: CA
Common name: machine.example.net
UID: Enter a dnsName of the subject of the certificate:
Enter the IP address of the subject of the certificate:
Enter the e-mail of the subject of the certificate:
Enter a challange password:
Does the certificate belong to an authority? (y/N): n
Will the certificate be used for signing (DHE and RSA-EXPORT ciphersuites)? (y/N):
Will the certificate be used for encryption (RSA ciphersuites)? (y/N):
Is this a TLS web client certificate? (y/N): y
Is this also a TLS web server certificate? (y/N): y
[root@rgf9dev sample]# certtool --generate-certificate --load-request request.pem --outfile cert.pem --load-ca-certificate ca.pem --load-ca-privkey ca-key.pem
Generating a signed certificate...
Enter the certificate's serial number (decimal):


Activation/Expiration time.
The certificate will expire in (days): 1000


Extensions.
Do you want to honour the extensions from the request? (y/N):
Does the certificate belong to an authority? (Y/N): n
Is this a TLS web client certificate? (Y/N): y
Is this also a TLS web server certificate? (Y/N): y
Enter the dnsName of the subject of the certificate: machine.example.net {This is the name of the machine that will use the certificate}
Enter  the IP address of the subject of certificate:
Will the certificate be used for signing (DHE and RSA-EXPORT ciphersuites)? (Y/N):
Will the certificate be used for encryption (RSA ciphersuites)? (Y/N):
X.509 Certificate Information:
Version: 3 Serial Number (hex): 485a3819
Validity:
Not Before: Thu Jun 19 10:42:54 UTC 2008
Not After: Wed Mar 16 10:42:57 UTC 2011
Subject: C=US,O=SomeOrg,OU=SomeOU,L=Somewhere,ST=CA,CN=machine.example.net
Subject Public Key Algorithm: RSA
Modulus (bits 2048):
b2:4e:5b:a9:48:1e:ff:2e:73:a1:33:ee:d8:a2:af:ae
2f:23:76:91:b8:39:94:00:23:f2:6f:25:ad:c9:6a:ab
2d:e6:f3:62:d8:3e:6e:8a:d6:1e:3f:72:e5:d8:b9:e0
d0:79:c2:94:21:65:0b:10:53:66:b0:36:a6:a7:cd:46
1e:2c:6a:9b:79:c6:ee:c6:e2:ed:b0:a9:59:e2:49:da
c7:e3:f0:1c:e0:53:98:87:0d:d5:28:db:a4:82:36:ed
3a:1e:d1:5c:07:13:95:5d:b3:28:05:17:2a:2b:b6:8e
8e:78:d2:cf:ac:87:13:15:fc:17:43:6b:15:c3:7d:b9

Exponent: 01:00:01
Extensions:
Basic Constraints (critical):
Certificate Authority (CA): FALSE
Key Purpose (not critical):
TLS WWW Client. TLS WWW Server.
Subject Alternative Name (not critical):
DNSname: machine.example.net
Subject Key Identifier (not critical):
0ce1c3dbd19d31fa035b07afe2e0ef22d90b28ac
Authority Key Identifier (not critical):
fbfe968d10a73ae5b70d7b434886c8f872997b89
Other Information:
Public Key Id:
0ce1c3dbd19d31fa035b07afe2e0ef22d90b28ac

Is the above information ok? (Y/N): y
Signing certificate...
[root@rgf9dev sample]# rm -f request.pem
[root@rgf9dev sample]# ls -l
total 16
-r-------- 1 root root 887 2008-06-19 12:33 ca-key.pem
-rw-r--r-- 1 root root 1029 2008-06-19 12:36 ca.pem
-rw-r--r-- 1 root root 1074 2008-06-19 12:43 cert.pem
-rw-r--r-- 1 root root 887 2008-06-19 12:40 key.pem
[root@rgf9dev sample]# # it may be a good idea to rename the files to indicate where they belong to
[root@rgf9dev sample]# mv cert.pem machine-cert.pem
[root@rgf9dev sample]# mv key.pem machine-key.pem
[root@rgf9dev sample]#
Distributing Files Provide the machine with:
- a copy of ca.pem
- cert.pem
- key.pem
Never provide anyone with ca-key.pem! Also, make sure nobody but the machine in question gets hold of key.pem.
Step 2: Client Configuration
Usually, this is a rather simple matter. It is basically a configuration to forward messages via RELP, just with a few extra parameters. A configuration could look like this:
module(load="imuxsock")
module(load="omrelp")
module(load="imtcp")
input(type="imtcp" port="514")
action(type="omrelp" target="192.168.233.153" port="20514" tls="on" tls.caCert="/home/test/cert/ca.pem" tls.myCert="/home/test/cert/ubuntu1-cert.pem" tls.myPrivKey="/home/test/cert/ubuntu1-key.pem" tls.authmode="name" tls.permittedpeer=["ubuntu-server"] )
The configuration is basically made of 3 parts.
First we load the modules that we need. In this case it is imuxsock, omrelp and imtcp. While imtcp and imuxsock are input modules and thus basically server for “generating” log data, omrelp is a output module and server to forward messages to a server via RELP.
The second part is a input. While imuxsock is always listening when the module is loaded, imtcp needs to be configured as an extra item. This also holds the possibility to configure multiple TCP listeners which could listen to different ports or have different parameters.
The third part is the action. In our case, we simply take all messages and forward them via RELP to our central server. Basically for a RELP connection it would be sufficient to configure the target and the port to send on. For this case, we enable TLS transportation with tls=”on” and secure it with our certificates. As you can see, we need to load our three certificate files as mentioned in the first section. They are all three needed. Also, we define the authentication mode as “name”. By that, the certificate of the other machine will be checked against the hostname to ensure the right machine uses the certificate. Also we allow a certain peer with tls.permittedpeer to answer to this machine.
Step 3: Server Configuration
The server configuration is only a little more complicated than the client configuration. Here is the example.
module(load="imuxsock")
module(load="imrelp" ruleset="relp")
input(type="imrelp" port="20514"
tls="on"
tls.caCert="/home/test/cert/ca.pem"
tls.myCert="/home/test/cert/server-cert.pem"
tls.myPrivKey="/home/test/cert/server-key.pem"
tls.authMode="name"
tls.permittedpeer=["ubuntu-client1","ubuntu-client2","ubuntu-client3"] )
ruleset (name="relp") { action(type="omfile" file="/var/log/relp_log") }
Again, the configuration is made of 3 sections.
First we load the modules. In this case, we load imuxsock for local logging ability (though not further used here) and imrelp for receiving log messages via RELP. As you can see, the module has the ruleset parameter given. That means, that the whole module is bound to a ruleset. This means, that all configured listeners will automatically use the later configured ruleset. This is contrary to other modules where you can configure a separate ruleset for each listener, but this is not possible with imrelp.
The second portion is the input. For a basic configuration it would be sufficient to specify the port to listen on. But since we want to enable TLS-functionality, we need to use tls=”on” again. Also we need to configure the parameters for all the parts of the certificate. Please note, that except for the CA certificate (which is the same on all machines) the certificate and key need to be for this single machine. Also we configure the authentication mode to “name” and an array of permitted peers.
Finally, as third step, we configure the ruleset and the action. In this case, we simply use the omfile module. The functionality is automatically loaded through rsyslog and we do not need to configure the module explicitely at the beginning.
Verdict
One would agree, that setting up rsyslog to use TLS-secured RELP for transferring log messages is basically very easy. Though, creating and maintaing all the certificates can be a tedious amount of work. But, a secure log transmission sure is worth the effort. Also, despite what has been mentioned, a machine certificate could also be created for multiple machines at once, though this is not recommended by Adiscon.
Something that is also noteworthy concerns the authentication mode. There are two other options that can be used, but these are not as secure as authentication against the name. Anonymous authentication can be reached by simply using tls=”on”, but not setting any other parameters. This only secures transportation of log messages, but does not ensure, that no false log data can be injected by a compromised machine or a machine not belonging to your network. A different approach would be fingerprint authentication. This can be used by using the fingerprint of a machine certificate on the peer machine. The fingerprint can be either received by the error log of a machine and then copying and pasting it into tls.permittedpeer, or by using certtool to review certificate details. Please note, that this is not very secure as well as the peers only check for the fingerprint of the certificate and not the certificate itself.
Changelog for 7.4.0 (v7-stable)
Version 7.4.0 [v7.4-stable] 2013-06-06
This starts a new stable branch based on 7.3.15 plus the following changes:
- add –enable-cached-man-pages ./configure option
permits to build rsyslog on a system where rst2man is not installed. In that case, cached versions of the man pages are used (they were built during “make dist”, so they should be current for the version in question. - doc bugfix: ReadMode wrong in imfile doc, two values were swapped
Thanks to jokajak@gmail.com for mentioning this
closes: http://bugzilla.adiscon.com/show_bug.cgi?id=450 - imjournal: no longer do periodic wakeup
- bugfix: potential hang *in debug mode* on rsyslogd termination
This ONLY affected rsyslogd if it were running with debug output enabled. - bugfix: $template statement with multiple spaces lead to invalid tpl name
If multiple spaces were used in front of the template name, all but one of them became actually part of the template name. So $template a,”…” would be name ” a”, and as such “a” was not available, e.g. in
*.* /var/log/file;a
This is a legacy config problem. As it was unreported for many years, no backport of the fix to old versions will happen. This is a long-standing bug that was only recently reported by forum user mc-sim.
Reference: http://kb.monitorware.com/post23448.html - 0mq fixes; credits to Hongfei Cheng and Brian Knox