
TLS support for librelp
If you followed librelp’s git, you have probably already noticed that there is increased activity. This is due to the fact that TLS support is finally being added! Thanks to some unnamed sponsor, we could invest “a bit” of time to make this happen.
We have decided to base TLS support on GnuTLS, which has matured very much, is preferred by Debian and fully supported by Red Hat and has no licensing issues with GPL like openssl has (plus the sponsor also preferred it). We build TLS support directly into librelp, as we assume it will get very popular, so an abstraction layer would not make that much sense, especially given the fact the GnuTLS nowadays is almost already installed by default. And remember that an abstraction layer always adds code complexity and an (albeit limited) runtime overhead.
Librelp 1.1.0 will be the first version with basic TLS support. With “basic”, we mean that this is a full TLS implementation, but there are some useful additional features not yet present. Most importantly, this version will not support certifiates but rather work with anonymous Diffie-Hellmann key exchange. This means that while the integrity and privacy of the session can be guaranteed as far as the network is concerned, this version does not guard against man-in-the-middle attacks. The reason simply is that there is no way to mutually authenticate peers without certificates. We still think it makes a lot of sense to release that version, as it greatly improves the situation.
Obviously, we have plans to add certificate support in the very near future. And this also means we will add ways for mutual authentication, much like in rsyslog’s RFC 5425 implementation. It’s not finally decided if we will support all authentication options RFC 5425 offers (some may not be very relevant in practice), but that’s so far undecided. We currently strongly consider to start with fingerprint-based authentication, as this permits the ability to do mutual authentication without the need to setup a full-blown PKI. Also, most folks know fingerprint authentication: this is what ssh does when it connects to a remote machine.
So stay tuned to librelp development, many more exciting things are coming up. Please note that rsyslog 7.5.0 will be the first version to utilize the new librelp features – but that’s something for a different blog posting.
[This is a cross-post from Rainer Gerhards’ blog (main librelp author)]
Newbie guide to rsyslog
Written by Jan Gerhards
Here are some different guides for people, who never worked with rsyslog. First I’ll explain, how to install rsyslog. Besides, I will explain how to install some packages, which you will need to install rsyslog. There are two important ones and some minor ones. After that, I will show how to do some easy configurations. Questions like how can I configure a module? Or How can I configure the input? Will be answered. In the example I will configure rsyslog to receive messages, filter them for one specific IP and store only the messages in a file. In the end I’ll explain something about easy rulesets. In my example I will try the same like I did with the configuration, but I will work with rulesets.
Before you begin
Please note, there are many ways to distribute rsyslog. But, make sure that the platform you build rsyslog on is the same platform as where it should be used. You cannot build rsyslog on CentOS and use it on Ubuntu. The differences between the platforms are just to big. The same applies to different versions of the same platform. When building on a older platform and using it on a newer version, this may work, but with restrictions. Whereas building on a newer version and using it on a older version will probably not work at all. So, if you build rsyslog from Source and want to use it on another machine, make sure the platform is the same.
Preliminary actions
There are generally two very often needed packages, that you have to install before rsyslog: libestr and libee. These can be downloaded here:
Libestr: http://libestr.adiscon.com/download/
Libee: http://www.libee.org/download/
Both are being installed the same, so here is only one step-by-step instruction.
- Download the file
Just download libestr or libee and “cd” into the folder, where you want them. - “tar xzf” the file
after you “cd” to the folder, where the file is, type “tar xzf -name of file”. Your command line should look like this:tar xzf -name of file-
- “Cd” into the new folder
“cd” into the made directory. It will have the same name like the downloaded file. Your command line should look like this:cd -name of file-
- Run “./configure configure –libdir=/usr/lib –includedir=/usr/include”
After you “cd” into that file, just run ” ./configure –libdir=/usr/lib –includedir=/usr/include”. Your command line should look like this:./configure --libdir=/usr/lib --includedir=/usr/include
- Type “sudo make”
Just type this and let the Computer work. Your command line should look like this:sudo make
- Type “sudo make install”
This is the last step. Like with “sudo make”, just let the computer work. Your command line should look like thissudo make install
- The package should work now
Congratulation! You have installed the package! If it doesn’t work properly, you should check if you followed every step right and if you have, contact the support.
There might also be some other packages like libjson0-dev, uuid-dev, bison, flex, libz-dev or python-docutils. These you’ll have to install before installing rsyslog, too. This guide was made on Ubuntu, so if you use any other system, they might be named differently. You can install them with the command
sudo apt-get install -package name-
After you got all the packages, you can install rsyslog. Here is a How to for installing rsyslog.
How to install rsyslog
In this guide is explained how to install rsyslog with the download from the homepage.
- Download rsyslog
You can download rsyslog from the rsyslog webpage at http://www.rsyslog.com/download/ - “tar xzf” the file
Open a terminal. Then you “cd” to where you want the file and then type “tar xzf -name of downloaded file”. Your command line should look like this:tar xzf -name of downloaded file-
- “cd” into the new folder
Then “cd” into the made directory. The new directory will have the same name like the downloaded file. Your command line should look like this:cd -name of file-
- Type “./configure –prefix=/usr”
You just need to run “./configure –prefix=/usr”. There might be an Error that you need to install some packages to precede with installing. For two specific packages I’ve explained how to install them, because you will need them often. Your command line should look like this:./configure --prefix=/usr
- Run “sudo make”
it’s easy, just run “sudo make” and let the computer work. Your command line should look like this:sudo make
- Run “sudo make install”
Just like “sudo make”. Type it, press enter and let the Computer work. Again, there might be some missing packages. Just install them. Your command line should look like this:sudo make install
- Rsyslog should now be installed
Congratulation! You have installed rsyslog! You can check the version of rsyslog by typing: “rsyslogd -v”.
If it doesn’t work properly, you should check if you followed every step right and if you have, contact the support.
Now after you installed rsyslog, you have to configure it. How to do this is explained here.
Configure rsyslog
In this part I’ll explain some basic configuration steps for rsyslog. We configure rsyslog to recive UDP messages, to filter them depending on the IP of the host and to store them in a file.
- How to configure the module
The module has to be configured first. The general line for this configuration is: “module (load=”im-type of protocol-”). So in our example, where we want UDP, it will look like this:Module (load=”imudp”)
- How to configure the input for rsyslog
For the input, you have to give two different information to rsyslog. The first information needed is the protocol type of the input; in my example again UDP. Like in the first line there is an “im-” in front of the protocol-type. The other information is to configure a port for rsyslog, in my example 514. These two information are together in only one line. The line is: “Input (type=”-protocol of input-“port=”-number of port-“). This means for my example, the line has to beInput (type=”imudp” port=”514”)
- How to configure a filter for fromhost-IPs and store them in a file
A filter always has, like a normal conditional sentence, an “if…then” part. If you want to configure it to do something with all notes from a specific IP, between “if” and “then” will be the property “$fromhost-ip ==”-IP, you want to filter-”. After this stays a “then” and after the “then” follows an action in brackets, which I will explain later. In my example I want only the notes from the host with the IP 172.19.1.135. So the line will beIf $fromhost-ip == “172.19.1.135” then {After this we have to tell the computer, what to do if that case is given. In this example we want him to store these messages in the file “/var/log/network1.log”. This is an action with the type “omfile”. To configure the file where to store the messages, the action is “action (type=”omfile” File=”-filename-“). So in this example, it will look like this:
Action (type=”omfile” file=”/var/log/network1.log”)
}
All the lines together now are
Module (load=“imudp“)

Input (type=”imudp” port=”514”)
If $fromhost-ip == “172.19.1.135“ then {
Action (type=”omfile” File=”/var/log/network1.log”)
}
All in all it means: The input for rsyslog will listen to syslog via UDP on port 514. If the IP from the Computer, which sends the messages, is 172.19.1.135, then the action in the brackets will get activated for these. In the action the messages will be stored in the file /var/log/network1.log.
Rsyslog and rulesets
Rulesets are a bit more complicated. A ruleset is a set of rules, as the name implies. These are bound to an input. This works by adding an option to the input, namely “ruleset=”-rulesetname-“”. For example, if I want to bind a ruleset “rs1” to a input the line will look like this:
Input (type=”imudp” port=”514” ruleset=”rs1”)But you still have to define, what the ruleset should do. In this guide I will limit myself to explain, how to create a ruleset, which has one action: to store all the messages in a file. In my example I want to store the messages in the file /var/log/network1.log”.
You define a ruleset like the normal configuration. To define it, you first name it with ruleset (name=”-rulesetname-“). After this you write what it does, in my example the action action (type=”omfile” file=”/var/log/network1.log”). This action you write in these curly brackets: {}.
So my full example looks like this
Module (load=”imudp”)

Input (type=”imudp” port=”514” ruleset=”rs1”)

Ruleset (name=”rs1”) {
Action (type=”omfile” file=”/var/log/network1.log”)
}
In that second example for configurations you can see, how to store all messages from the input into a file by using a ruleset. A rulesset can consist of multiple rules, but without binding it to the input it is useless. It can be bound to an input multiple times or even other rulesets can be called.
Final Conclusion
In this guide I explained how to install rsyslog, how to configure it and how to use rulesets. After you read this guide you are able to do exactly this: you can install rsyslog, configure it and have basic knowlege about rulesets. If you want to learn more about rsyslog, how to configure it or about rulesets, you can find information in the other guides or in the documentation.
TLS secured syslog via RELP
This article will show you, how to use simple tls encryption with the RELP protocol for sending and receiving syslog messages.
We basically need two machines, both running at least rsyslog 7.3.16. In addition to rsyslog, we also need the most current version of librelp.
General information
When installing rsyslog, make sure to enable the RELP functionality by issuing the correct commands for the configure. The configure command should look like this:
./configure --prefix=/usr --enable-relp
This is the most basic command for our example. Please note, that you might need to enable other modules as well if you plan to use them.
Before you start to configure rsyslog on either machine, make sure you have librelp already installed. You might need to additionaly install the gnutls package.
Client Config
The configuration for the client is relatively simple. Basically, we can use as inputs whatever we like and simply use RELP with TLS encryption for forwarding the messages. The configuration could look like this:
module(load="imuxsock")
module(load="imudp")
module(load="omrelp")

input(type="imudp" port="514")

action(type="omrelp" target="192.168.233.144" port="2514" tls="on")
As you can see, we first load our modules. That is a generic step. We also load the output module “omrelp” which enables us later to forward messages via RELP.
In the second stage we configure our input. This example has the ability to receive syslog via imudp on port 514.
And the final step is our action. We use omrelp to forward all log messages to our central server via port 2514. Please note the option tls=”on” which directs the module to encrypt all messages via TLS.
Server Config
The server configuration looks a bit different and is one step more complicated.
module(load="imuxsock")
module(load="imrelp" ruleset="relp")

input(type="imrelp" port="2514" tls="on")

ruleset(name="relp") {
action(type="omfile" file="/var/log/relptls")
}
Again, we first configure the modules. Contrary to the Client configuration, we load “imrelp” and create the input with it in the second step.
The input with imrelp must listen to the same port, that the client sends its messages to. Also we must enable the TLS option as well. The reason might seem obvious, because without the option enabled, imrelp will push only garbage messages into the processing system. So we need TLS enabled to decrypt the messages. Please note, that I also bound the input to a ruleset.
The ruleset and action are again very basic. The ruleset (which is bound to the input) ensures, that only the messages that are received via RELP are processend by the enclosed actions. This is much easier, than creating filters to determine the source of the message (not only from a setup point of view, but also in regards of processing speed). The action in the ruleset will then write all messages that run into the ruleset into a single file. Please note: for imrelp, you can only bind the module to a ruleset. In consequence, all created listeners of this type are bound to this single ruleset.
Changelog for 7.3.14 (v7-beta)
Version 7.3.14 [beta] 2013-05-06
- bugfix: some man pages were not properly installed either rscryutil or rsgtutil man was installed, but not both Thanks to Marius Tomaschewski for the patch.
- bugfix: potential segfault on startup when builtin module was specified in module() statement. Thanks to Marius Tomaschewski for reporting the bug.
- bugfix: segfault due to invalid dynafile cache handling Accidently, the old-style cache size parameter was used when the dynafile cache was created in a RainerScript action. If the old-style size was lower than the one actually set, this lead to misadressing when the size was overrun, and that could lead to all kinds of “interesting things”, often in segfaults. closes: http://bugzilla.adiscon.com/
show_bug.cgi?id=440
[deprecated] How to sign log messages through signature provider Guardtime
Please note: This method is deprecated. Please refer to the new log signing method with KSI.
With rsyslog v7.3.9 we introduced the possibility to sign log messages through Guardtime, a signature provider. The process to enable this is relativey easy. And in the end you have your log files signed with a keyless signature that relies on hash functions through Guardtime. The signature functionality will be automatically loaded by omfile if so requested. It just requires that the signature provider itself is installed. For our RPMs and Ubuntu packages, it is available in the base packe. In the signature process a second file to your logfile will be created that has “.gtsig” as ending. This pair of files will later be needed to prove the integrity of your logfile.
In addition to rsyslog 7.3.9 or above you need “libgt”. The library is either available from Guardtime directly or from our git. If you installed rsyslog from our packages, libgt will be installed automatically.
When installing manually, you need to enable the signature function. The most basic configure command looks like this:
./configure --prefix=/usr --enable-guardtime
When rsyslog is installed, you can use the Guardtime signatures easily with a few additional configuration directives. For detailed information about the configuration directives, please review the manual. The correct action would look like this:
action(type="omfile" file="/var/log/logfile"
                sig.provider="gt"
                sig.timestampService="http://user:password@stamper.guardtime.net/gt-signingservice"
                # Please contact Guardtime for authentication details
                sig.keepTreeHashes="on"
                sig.keepRecordHashes="on")
The directive sig.provider determines the provider that will be used. Currently, only Guardtime (gt) is available, but other providers might be added in the future. The other two options control the granularity of signature hashes at the cost of disk space. Though, when trying to detect a security breach, it might come in handy as it enables you to spot the location of the security breach. You will receive two files, that share the same name, but have a different extension.
/var/log/logfile
/var/log/logfile.gtsig
When having rsyslog installed you get a new tool called “rsgtutil”. This will help you check the integrity of your logfile in conjunction with the signature file. By issuing
tools/rsgtutil --verify --show-verified /var/log/logfile
you can make an easy check if the logfile is matching the stored hash. If the check was successful you will see it directly. If not, you will be notified as well and further investigation will be necessary.
Please note:
The Guardtime KSI service has been upgraded to mitigate DOS attacks by adding user authentication. Please contact Guardtime for more information.
Log normalization for different formats
In this article we want to show you a very functional use-case. We want to use rsyslog in conjunction with log normalization to bring login events from several different log sources together into a readable format and get rid of all the useless information which we don’t need. The log sources will be windows, linux and snare. All of them create log messages in a very different and often hard to read format. After bringing the information into a format that suits us well, we will finally write the essence of the log messages into a file. For this example we will also show two different output formats.
What do we need?
We need several things to be installed. In brackets we will show the version we used for this guide.
- rsyslog (7.3.6)
- liblognorm (0.3.5)
- libee (0.4.1)
- libestr (0.1.4)
These are the current versions at the date of this guide and need to be considered the minimum to be installed.
What do the logs look like?
The log messages come in different formats as already explained. We differentiate between 3 different formats.
1. Windows
The Adiscon products for Windows are able to send syslog messages directly in @cee/lumberjack format. That means, that the message consists of the default syslog header, which is followed by all the message properties being filled into the @cee representation format.
2. Linux
The log messages from Linux are in no specific format. Therefore we need to make some effort to get the data we want.
3. Snare
Snare logs are somewhat special again. They are somewhat like csv, but it uses tabs as a delimiter.
Installation
You should install libee, libestr and liblognorm before installing rsyslog. This is simply, because you won’t be able to install rsyslog the other way round. For rsyslog you need to know, that we will need several additional modules. These are:
- imtcp
- mmjsonparse
- mmnormalize
You configure should then look simliar to this:
./configure --prefix=/usr --enable-imtcp --enable-mmjsonparse --enable-mmnormalize
This will be sufficient, since we do not want to use any more extra or special features.
Please note: There are many ways to distribute rsyslog. But, make sure that the platform you build rsyslog on is the same platform as where it should be used. You cannot build rsyslog on CentOS and use it on Ubuntu. The differences between the platforms are just to big. The same applies to different versions of the same platform. When building on a older platform and using it on a newer version, this may work, but with restrictions. Whereas building on a newer version and using it on a older version will probably not work at all. So, if you build rsyslog from Source and want to use it on another machine, make sure the platform is the same.
The Configuration
The configuration is quite extensive. Thus we will show it in several parts. You can download the complete configuration here.
1. Rulebase
Before we begin with the rsyslog configuration, we will set up our rulebase for later. The rulebase is needed for mmnormalize and is a separate file. Our rulebase consists of two parts. The first part will handle the linux login messages and the second part is for the login messages sent by Snare. For more information about how to create a rulebase, visit this link.
# SSH and Sudo logins
prefix=%rcvdat:date-rfc3164% %rcvdfrom:word%
rule=: sudo: pam_unix(sudo:session): session %type:word% for user root by %user:char-to:(%(uid=%-:number%)
rule=: sudo: pam_unix(sudo:session): session %type:word% for user %user:word%
rule=: sshd[%-:number%]: pam_unix(sshd:session): session %type:word% for user %user:word% by (uid=%-:number%)
rule=: sshd[%-:number%]: pam_unix(sshd:session): session %type:word% for user %user:word%
As you can see here, we have four rules. They are all lead by what is defined by the prefix. They represent the different log messages, but all variable parts that are needed for our final log will be put into properties. And in the case that some values might be different for each message, but not needed later, they will be parsed into a null property.
# Snare logins
prefix=
rule=:%rcvdat:date-rfc5424%#011%-:char-to:#%#011%-:char-to:#%#011%-:char-to:#%#011%-:char-to:#%#011%id:number%#011%-:char-to:#%#011%-:char-to:\%\%user:char-to:#%#011%-:char-to:#%#011%-:char-to:#%#011%rcvdfrom:char-to:#%#011%-:char-to:#%#011#011%-:char-to:#%#011%-:number%
The Snare format is way different than before. It is basically a tab delimited message format and rsyslog will by default replace all character codes into their ASCII values. Thus the message will look different and we have alle those character code replacements which are represented here as well. Most values from the Snare message are not needed and will be again filled into a null property. But the values we need, will be put into a real property, which we can use later.
2. Modules
In this first configuration step for the rsyslog configuration, we configure the modules that we will use.
module(load="imuxsock")
 module(load="imtcp")
 module(load="mmjsonparse")
 module(load="mmnormalize")
For this example we have basically four modules. Imuxsock will keep local logging activity, though we don’t really need it now. Imtcp will take care of syslog reception, so we can get the log messages via syslog from the various machines. Mmjsonparse and mmnormalize are message modification modules. The first will serve to parse messages in json format, the latter will parse messages according to a rulebase.
3. Inputs
Since we have three log sources, we will use three receivers.
input(type="imtcp" port="13514" Ruleset="windows")
input(type="imtcp" port="13515" Ruleset="linux")
input(type="imtcp" port="13516" Ruleset="snare")
As you can see, all three receivers are working on a different port and are directly bound to a ruleset. That way, there is no need to sort the messages per sender later with filters. The rulesets will be different for each receiver, since there are different needs of processing.
4. Templates
Now come the two format templates for the output.
template(name="csv" type="list") {
        property(name="$!usr!rcvdat" format="csv")
        constant(value=",")
        property(name="$!usr!rcvdfrom" format="csv")
        constant(value=",")
        property(name="$!usr!user" format="csv")
        constant(value=",")
        property(name="$!usr!type" format="csv")
        constant(value="\n")
}
template(name="cee" type="subtree" subtree="$!usr")
The first template is called csv. It will write our needed values in a comma-separated format. The second template is called cee. We can simply choose a subtree of values here which will automatically be put in @cee format. As you can see here, there is a huge difference concerning the effort needed for setting up the templates. In the end, the log messages look somewhat similar and will have the same values, but the format is different.
5. Rulesets
Now we get to the most interesting part. The rulesets. We will have three different rulesets which all serve their special purpose. As you will see later, we have 4 rulesets, indeed. But the forth ruleset holds the output and will be explained in step 6.
# Rulesets
ruleset(name="windows") {
       action(type="mmjsonparse")
       if $parsesuccess == "OK" then {
                if $!id == "4634" then
                        set $!usr!type = "logoff";
                else if $!id == "4624" then
                        set $!usr!type = "logon";
                set $!usr!rcvdfrom = $!source;
                set $!usr!rcvdat = $timereported;
                set $!usr!user = $!TargetUserName;
                call output
        }
}
The first ruleset will handle the log messages sent from Windows. Since they will be already sent in @cee-format, there is not much need for processing. First a action is called for all messages that run into this ruleset. Basically, the message will be parsed for their properties and values. If the message is successfully parsed (which only happens if the format is correct) then we go on and fill some user-defined variables in a special subtree of values. As you can see, it is checked whether the field “id” has a certain number and filles the variable $!usr!type with logoff or logon, which makes the final file more readable. After that we set a variable for the source system, timestamp of the log message and the user name that either logged on or off. Finally, we call our fourth ruleset for writing to disk.
ruleset(name="linux") {
        action(type="mmjsonparse")
        if $parsesuccess == "FAIL" then
        #/* only try normalization if non-lumberjack */
        action(type="mmnormalize" rulebase="/etc/rulebase.rb" userawmsg="on")
        if $!user != "" then {
                if $!type == "opened" then
                        set $!usr!type = "logon";
                else if $!type == "closed" then
                        set $!usr!type = "logoff";
                set $!usr!rcvdfrom = $!rcvdfrom;
                set $!usr!rcvdat = $!rcvdat;
                set $!usr!user = $!user;
                call output
        }
}
The second ruleset is for the linux log messages. Again we first check the log messages with mmjsonparse, but simply to verify that they are NOT in lumberjack format. If parsing the messages failed, which we want here, the log messages will be run through mmnormalize. This module uses the rulebase we created in the beginning and parses the messages according to this rulebase. If parsed successfully, processing continues. We check if the variable $!user isn’t empty. If that is the case, we set again our variables in the subtree and again we begin with the type of message (logon/logoff). Basically opened or closed would be sufficient enough for an experienced reader of logfiles, but we want to have all the log messages in the same format, thus this value will also be changed into logon and logoff. After that we alse set a variable for the source system, timestamp of the log message and the user name again. Finally, we call our fourth ruleset for writing to disk.
ruleset(name="snare") {
        action(type="mmjsonparse")
        if $parsesuccess == "FAIL" then
        #/* only try normalization if non-lumberjack */
        action(type="mmnormalize" rulebase="/etc/rulebase.rb" userawmsg="on")
        if $!user != "" then {
                if $!id == "4634" then
                        set $!usr!type = "logoff";
                else if $!id == "4624" then
                        set $!usr!type = "logon";
                set $!usr!rcvdfrom = $!rcvdfrom;
                set $!usr!rcvdat = $!rcvdat;
                set $!usr!user = $!user;
                call output
        }
}
The third ruleset is for the log messages from Snare. As with the linux messages, we check the messages if they are non-lumberjack by using mmjsonparse. And again we will use mmnormalize and the given rulebase to parse the messages. The rest is like for the linux messages. The only difference is, that we have basically Windows messages and need to use the Event ID to determine if the message represents a logon or a logoff. So you can consider this part as a combination from both rulesets. And of course finally, we call the ruleset for the output.
6. Output
As mentioned before, there is a fourth ruleset in the configuration, which just handles the output.
ruleset(name="outwriter") {
        action(type="omfile" file="/var/log/logfile.csv" template="csv")
        action(type="omfile" file="/var/log/logfile.cee" template="cee")
}
This final ruleset provides us with our two outputs. They are both writing to disk. The only difference is, that they are using different templates as per the templates we defined earlier. So one file will hold the data in csv format whilst the other file holds the data in @cee format.
Final Thoughts
We have now our rsyslog configuration and our rulebase. The log messages will be parsed for the specific data we want from the different login log messages according to their specific format. And here is what the result might look like.
First in csv-format:
"Feb  5 14:19:00","win7fr","fr-win","logon"
"Feb  5 14:19:00","win7fr","fr-win","logoff"
"Jan 16 09:28:33","linuxvm","fr-lin","logon"
"Jan 16 09:28:33","linuxvm","fr-lin","logoff"
And in @cee-format:
@cee: { "type": "logon", "rcvdfrom": "win7fr", "rcvdat": "Feb  5 14:19:00", "user": "fr-win" }
@cee: { "type": "logoff", "rcvdfrom": "win7fr", "rcvdat": "Feb  5 14:19:00", "user": "fr-win" }
@cee: { "type": "logon", "rcvdfrom": "linuxvm", "rcvdat": "Jan 16 09:28:33", "user": "fr-lin" }
@cee: { "type": "logoff", "rcvdfrom": "linuxvm", "rcvdat": "Jan 16 09:28:33", "user": "fr-lin" }
So we now have two different formats, holding basically the same information. As you can see, we have now only the really necessary information of those log messages, namely the type of log message, the source system, the timestamp of this occurence and the user associated to this event.
Using MongoDB with rsyslog and LogAnalyzer
In this scenario we want to receive cee-formatted messages from a different system with rsyslog, store the messages with MongoDB and then display the stored messages with Adiscon LogAnalyzer. This is a very common use-case. Please read through the complete guide before starting.
We will split this guide in 3 main parts. These parts can consist of several steps.
- Setting up rsyslog
- Setting up MongoDB
- Setting up LogAnalyzer
This guide has been created with rsyslog 7.3.6 on ubuntu 12.04 LTS and Adiscon LogAnalyzer 3.6.3. All additional packages, services or applications where the latest version at that time.
Before you begin
Please note, there are many ways to distribute rsyslog. But, make sure that the platform you build rsyslog on is the same platform as where it should be used. You cannot build rsyslog on CentOS and use it on Ubuntu. The differences between the platforms are just to big. The same applies to different versions of the same platform. When building on a older platform and using it on a newer version, this may work, but with restrictions. Whereas building on a newer version and using it on a older version will probably not work at all. So, if you build rsyslog from Source and want to use it on another machine, make sure the platform is the same.
Step 1 – Setting up rsyslog
We need to setup rsyslog first. Not only do we need the core functionality, but several additional modules. For this case we want to receive the syslog messages via TCP, thus we need imtcp. For processing we need first mmjsonparse and ommongodb. Your configure should look like this.
./configure --prefix=/usr --enable-imtcp --enable-mmjsonparse --enable-ommongodb
The module mmjsonparse will be needed to verify and parse the @cee messages. Ommongodb will be used to write into the MongoDB. After the configure and installation, we can create our config. The config for our case looks like this:
module(load="imtcp")
module(load="mmjsonparse")
module(load="ommongodb")
input(type="imtcp" port="13514" Ruleset="mongodb")
template(name="mongodball" type="subtree" subtree="$!")
ruleset(name="mongodb") {
        action(type="mmjsonparse")
        if $parsesuccess == "OK" then {
                set $!time = $timestamp;
                set $!sys = $hostname;
                set $!procid = $syslogtag;
                set $!syslog_fac = $syslogfacility;
                set $!syslog_sever = $syslogpriority;
                set $!pid = $procid;
                action(type="ommongodb" server="127.0.0.1" db="logs" collection="syslog" template="mongodball")
                }
        }
As always, we first load the modules. The next part is the input. We need to receive tcp via imtcp. Please note, that we directly bind the input to a ruleset. The third part of the configuration is a template. We need it later when writing to MongoDB. Since we will automatically transform our @cee-message into json, we can use a subtree template. The template itself is basically the root of the subtree.
The last and most important part is the ruleset. Here all of our work is done. First, all messages are run through the mmjsonparse module. This will not only verify if we received a valid json message, but also transforms all the values into a json subtree. If the parsing was successful, we need to set several variables for the subtree. Information that is delivered in the syslog header will not be parsed into the subtree by mmjsonparse automatically. Thus we have to set subtree variables with the values of some default properties like timestamp, hostname and so on. After that we have basically all information from the complete syslog message in the subtree format. Finally a last action is needed. We need to write our log messages to MongoDB. In this example, MongoDB is installed on the same machine. We want to use the db “logs” and as collection we want to use “syslog”. And we use our subtree template to define the format that is written to MongoDB. Thus, all our parsed variables are stored separately. If we do not use this template, the @cee message gets written as it is into the msg field in MongoDB. But this is not what we want. We want all variables to be available separately.
That is basically it for rsyslog. You can now save the configuration and restart rsyslog. Though it won’t be able to be useful yet. We still need to install MongoDB.
Step 2 – Install MongoDB
Making a basic install for MongoDB is rather easy. Simply install the following packages:
mongodb
mongodb-server
php-pecl-mongo
libmongo-client
libglib2.0-dev
Please note, that package names may vary for different distributions.
After we have installed the packages, the MongoDB Server is already ready. By default, it is not secured by a user or password. Refer to the MongoDB manual for more information. Databases and collections (equivalent to tables) are created by rsyslog and do not need to be defined with the mongo shell. We will stick with the default setup to keep it simple.
Step 3 – Installing Adiscon LogAnalyzer
To run Adiscon LogAnalyzer, you need a webserver with PHP. The easiest way is to use apache2 and php5. To be able to access the MongoDB, we need to install an additional package. Run the following command
sudo pecl install mongo
You might need to install the package php-pear first, if it hasn’t been installed already with PHP.
After that, we need to put the following line into the file php.ini.
extension=mongo.so
Remember to restart your webserver after making changes to the php.ini. Without a lot of configuration, this should aready work.
We can now install Adiscon LogAnalyzer. Download the latest version from the Adiscon LogAnalyzer Download page and install it as it is described in the documentation.
The only difference we need to make is when setting up the log source in step 4.5. You need to set at least the following as shown in the screenshot:
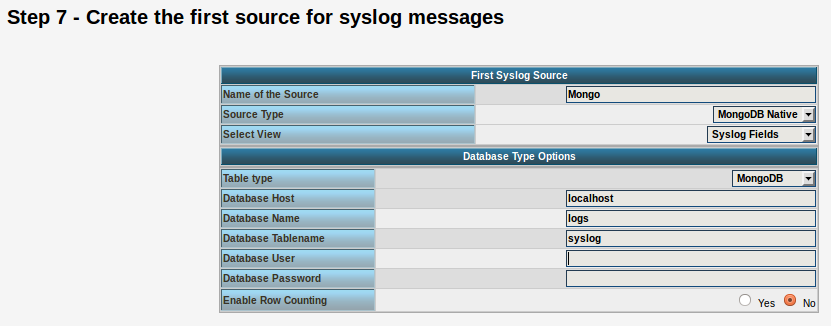
Source Type: MongoDB Native
Table Type: MongoDB
Database Name: logs
Database Tablename: syslog
Database user: <clear this field>
The User and Password is of course needed, if you set it in your MongoDB setup.
After you have finished the installation of Adiscon LogAnalyzer, you should now be seeing the LogAnalyzer overview and the log messages in a table view (if you have already stored them in MongoDB). Now if you click on a specific message, you get to see the detail view of the log message.
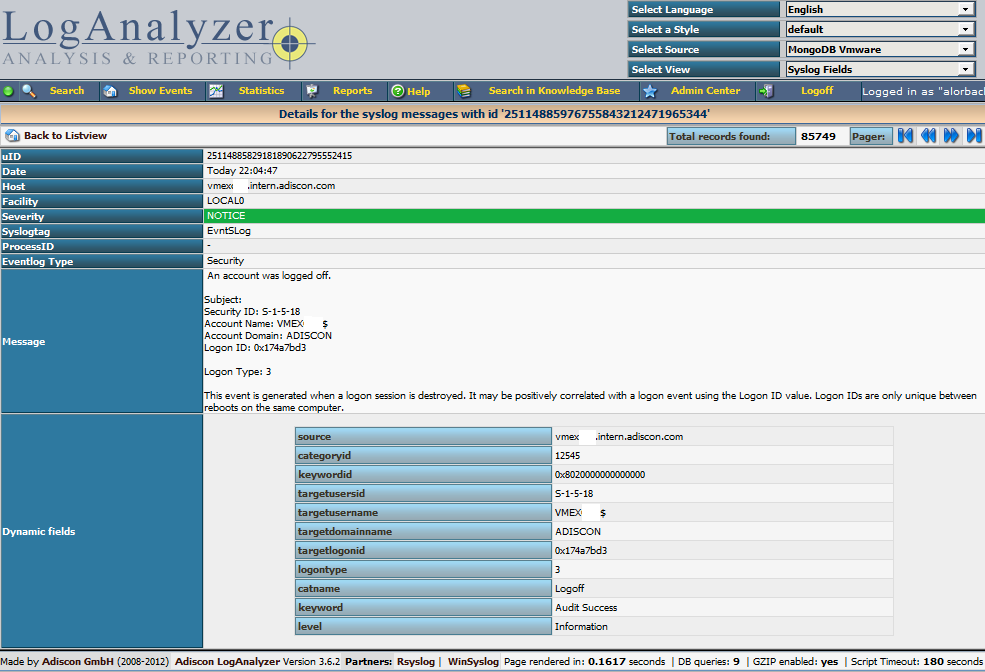
Click on the picture for a bigger size
As you can see, you get a list of dynamic fields. These fields where already sent in @cee format from the original source and were parsed by rsyslog and mmjsonparse and finally they were automatically filled into the MongoDB.
With this setup, you are independent of a fixed database structure. Fields are inserted dynamically into the database as they are available and they are dynamically display by Adiscon LogAnalyzer as well.
Rsyslog Windows Agent 2.0 Released
Adiscon is proud to announce the 2.0 release of RSyslog Windows Agent.
This new major release adds full Continue reading “Rsyslog Windows Agent 2.0 Released”
How to use the Ubuntu repository
The Adiscon Ubuntu Repository has been setup to provide support for the latest rsyslog versions on Ubuntu 12 including support for necessary third party packages. Please note that the Ubuntu Repository is open for testing at the moment, and contains only the latest version for v7-devel. The new packages are based in the original and latest Ubuntu 12 rsyslog packages, so in most cases an simple sudo apt-get update && sudo apt-get upgrade will be enough to update rsyslog. Please note that these packages are currently experimental. Use at your own risk.
To use our repository, follow these steps:
Install our PGP Key into your apt system
sudo apt-key adv --recv-keys --keyserver keyserver.ubuntu.com AEF0CF8E
Edit your /etc/apt/sources.list and add these lines to the end
# Adiscon repository
deb http://ubuntu.adiscon.com/v7-devel precise/
deb-src http://ubuntu.adiscon.com/v7-devel precise/
Once done perform these commands to update your apt cache and install the latest rsyslog version
sudo apt-get update && sudo apt-get upgrade
If you receive a message like this while upgrading follow these steps below:
The following packages have been kept back:
rsyslog
0 upgraded, 0 newly installed, 0 to remove and 1 not upgraded.sudo apt-get install rsyslog
We highly appriciate any feedback or bug reports.
The newest information will be available on the Ubuntu Repository project page.
Normalizing Cisco ASA messages
This time, we want to parse log messages received from a Cisco ASA for specific parts. The log messages will be parsed by liblognorm and then they will be written into a specific file resembling the sent code.
This guide has been tested with v7.3.4 of rsyslog.
Things to think about
We basically need a receiver, the normalizer module mmnormalize, some templates and several actions. To keep the logs seperated from other log messages, we also will need a filter. But that is just valid for the rsyslog configuration.
We also need liblognorm installed and a rulebase to work with. The rulebase is needed for liblognorm to know what to do with the messages, so it knows, which part should be fed into a custom property and which to ignore.
Config Statements
We now have basically two parts to configure. The first part should be the rulebase which holds format representations of the expected log messages. For this example we will work with the following log line:
2012-11-23T10:47:42+01:00 0.0.0.0 : %ASA-3-313001: Denied ICMP type=8, code=0 from 77.2.2.2 on interface outside
The rulebase entry for this log line looks like this:
rule=: %date:word% %host:ipv4% : \x25ASA-%ddd:char-to:-%-%eee:number%: Denied ICMP type=%number2:number%, code=%number3:number% from %origin:ipv4% on interface outside
And here is the rsyslog configuration:
module (load="immark")
module (load="imuxsock")
module (load="imklog")
module (load="mmnormalize")
module (load="imudp")
input(type="imudp" port="514")
template(name="filename" type="string" string="/var/log/%$!ddd%-%$!eee%")
if $msg contains '%ASA' then{
 action(type="mmnormalize" userawmsg="off" rulebase="/path/to/rulebase.rb")
 action(type="omfile" DynaFile="filename")
}
How it works
The rulebase holds currently one rule. The rule is a representation of the above log message. For this case, we are only interested in the ASA code. The code identifies a specific message, thus, the message itself is not interesting. Though, we have to reflect complete message and put temporary variables, where the same message of a kind still has different values. These would be the timestamp, source, type and code the the IP which triggered the message. The problem is here, that we really only need two parts to be filled into a property, but other parts can be variable. The message format can be the same, but i.e. the IP from the source can vary. If you fill in a concrete value into the rule where such parts are, the message will only be parsed correctly if the message originates from the exact same IP.
The configuration itself isn’t very complicated. It loads several standard modules, which are mainly used to ensure local logging, as well as the UDP input module and the precious mmnormalize. The mmnormalize module will be later used as a output module. It handles the loading of the rulebase, as well as implements the normalization features of liblognorm.
After loading the modules, we have our single UDP input configured, which is necessary to receive the log messages from the Cisco ASA. Nothing fancy here, but a standard syslog receiver for UDP.
The next step is to create a template. The template is not for a message output format, but a file name format. It will help writing the messages into log files that reflect the ASA number in the filename.
Finally we will filter for “%ASA” in the message. That will ensure, that only ASA messages are processed by the following actions. The first action runs the message through mmnormalize, while using our rulebase. The messages will be parsed by liblognorm. If the messages do fit the rules in the rulebase, the parts we need will be put into properties. These properties come into play in the second action where we simply write the messages via Dynafile to disk. The template and our new properties will be used to define the filename.
Important
This configuration works or fails with the rulebase. All messages, that should be run through the normalizer must fit to a rule. If you are in doubt, that the rules are correct, follow the linked guide. It will show you how to create a output format that shows if a message has been parsed correctly or if and where the parsing broke.