Monitoring rsyslog’s impstats with Kibana and SPM
Original post: Monitoring rsyslog with Kibana and SPM by @Sematext
A while ago we published this post where we explained how you can get stats about rsyslog, such as the number of messages enqueued, the number of output errors and so on. The point was to send them to Elasticsearch (or Logsene, our logging SaaS, which exposes the Elasticsearch API) in order to analyze them.
This is part 2 of that story, where we share how we process these stats in production. We’ll cover:
- an updated config, working with Elasticsearch 2.x
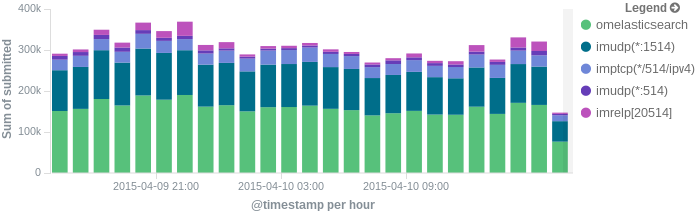
- what Kibana dashboards we have in Logsene to get an overview of what rsyslog is doing
- how we send some of these metrics to SPM as well, in order to set up alerts on their values: both threshold-based alerts and anomaly detection
Continue reading “Monitoring rsyslog’s impstats with Kibana and SPM”
Tutorial: Sending impstats Metrics to Elasticsearch Using Rulesets and Queues
Originally posted on the Sematext blog: Monitoring rsyslog’s Performance with impstats and Elasticsearch
If you’re using rsyslog for processing lots of logs (and, as we’ve shown before, rsyslog is good at processing lots of logs), you’re probably interested in monitoring it. To do that, you can use impstats, which comes from input module for process stats. impstats produces information like:
– input stats, like how many events went through each input
– queue stats, like the maximum size of a queue
– action (output or message modification) stats, like how many events were forwarded by each action
– general stats, like CPU time or memory usage
In this post, we’ll show you how to send those stats to Elasticsearch (or Logsene — essentially hosted ELK, our log analytics service, that exposes the Elasticsearch API), where you can explore them with a nice UI, like Kibana. For example get the number of logs going through each input/output per hour:
More precisely, we’ll look at:
– useful options around impstats
– how to use those stats and what they’re about
– how to ship stats to Elasticsearch/Logsene by using rsyslog’s Elasticsearch output
– how to do this shipping in a fast and reliable way. This will apply to most rsyslog use-cases, not only impstats
Continue reading “Tutorial: Sending impstats Metrics to Elasticsearch Using Rulesets and Queues”
Newbie guide to rsyslog
Written by Jan Gerhards
Here are some different guides for people, who never worked with rsyslog. First I’ll explain, how to install rsyslog. Besides, I will explain how to install some packages, which you will need to install rsyslog. There are two important ones and some minor ones. After that, I will show how to do some easy configurations. Questions like how can I configure a module? Or How can I configure the input? Will be answered. In the example I will configure rsyslog to receive messages, filter them for one specific IP and store only the messages in a file. In the end I’ll explain something about easy rulesets. In my example I will try the same like I did with the configuration, but I will work with rulesets.
Before you begin
Please note, there are many ways to distribute rsyslog. But, make sure that the platform you build rsyslog on is the same platform as where it should be used. You cannot build rsyslog on CentOS and use it on Ubuntu. The differences between the platforms are just to big. The same applies to different versions of the same platform. When building on a older platform and using it on a newer version, this may work, but with restrictions. Whereas building on a newer version and using it on a older version will probably not work at all. So, if you build rsyslog from Source and want to use it on another machine, make sure the platform is the same.
Preliminary actions
There are generally two very often needed packages, that you have to install before rsyslog: libestr and libee. These can be downloaded here:
Libestr: http://libestr.adiscon.com/download/
Libee: http://www.libee.org/download/
Both are being installed the same, so here is only one step-by-step instruction.
- Download the file
Just download libestr or libee and “cd” into the folder, where you want them. - “tar xzf” the file
after you “cd” to the folder, where the file is, type “tar xzf -name of file”. Your command line should look like this:tar xzf -name of file-
- “Cd” into the new folder
“cd” into the made directory. It will have the same name like the downloaded file. Your command line should look like this:cd -name of file-
- Run “./configure configure –libdir=/usr/lib –includedir=/usr/include”
After you “cd” into that file, just run ” ./configure –libdir=/usr/lib –includedir=/usr/include”. Your command line should look like this:./configure --libdir=/usr/lib --includedir=/usr/include
- Type “sudo make”
Just type this and let the Computer work. Your command line should look like this:sudo make
- Type “sudo make install”
This is the last step. Like with “sudo make”, just let the computer work. Your command line should look like thissudo make install
- The package should work now
Congratulation! You have installed the package! If it doesn’t work properly, you should check if you followed every step right and if you have, contact the support.
There might also be some other packages like libjson0-dev, uuid-dev, bison, flex, libz-dev or python-docutils. These you’ll have to install before installing rsyslog, too. This guide was made on Ubuntu, so if you use any other system, they might be named differently. You can install them with the command
sudo apt-get install -package name-
After you got all the packages, you can install rsyslog. Here is a How to for installing rsyslog.
How to install rsyslog
In this guide is explained how to install rsyslog with the download from the homepage.
- Download rsyslog
You can download rsyslog from the rsyslog webpage at http://www.rsyslog.com/download/ - “tar xzf” the file
Open a terminal. Then you “cd” to where you want the file and then type “tar xzf -name of downloaded file”. Your command line should look like this:tar xzf -name of downloaded file-
- “cd” into the new folder
Then “cd” into the made directory. The new directory will have the same name like the downloaded file. Your command line should look like this:cd -name of file-
- Type “./configure –prefix=/usr”
You just need to run “./configure –prefix=/usr”. There might be an Error that you need to install some packages to precede with installing. For two specific packages I’ve explained how to install them, because you will need them often. Your command line should look like this:./configure --prefix=/usr
- Run “sudo make”
it’s easy, just run “sudo make” and let the computer work. Your command line should look like this:sudo make
- Run “sudo make install”
Just like “sudo make”. Type it, press enter and let the Computer work. Again, there might be some missing packages. Just install them. Your command line should look like this:sudo make install
- Rsyslog should now be installed
Congratulation! You have installed rsyslog! You can check the version of rsyslog by typing: “rsyslogd -v”.
If it doesn’t work properly, you should check if you followed every step right and if you have, contact the support.
Now after you installed rsyslog, you have to configure it. How to do this is explained here.
Configure rsyslog
In this part I’ll explain some basic configuration steps for rsyslog. We configure rsyslog to recive UDP messages, to filter them depending on the IP of the host and to store them in a file.
- How to configure the module
The module has to be configured first. The general line for this configuration is: “module (load=”im-type of protocol-”). So in our example, where we want UDP, it will look like this:Module (load=”imudp”)
- How to configure the input for rsyslog
For the input, you have to give two different information to rsyslog. The first information needed is the protocol type of the input; in my example again UDP. Like in the first line there is an “im-” in front of the protocol-type. The other information is to configure a port for rsyslog, in my example 514. These two information are together in only one line. The line is: “Input (type=”-protocol of input-“port=”-number of port-“). This means for my example, the line has to beInput (type=”imudp” port=”514”)
- How to configure a filter for fromhost-IPs and store them in a file
A filter always has, like a normal conditional sentence, an “if…then” part. If you want to configure it to do something with all notes from a specific IP, between “if” and “then” will be the property “$fromhost-ip ==”-IP, you want to filter-”. After this stays a “then” and after the “then” follows an action in brackets, which I will explain later. In my example I want only the notes from the host with the IP 172.19.1.135. So the line will beIf $fromhost-ip == “172.19.1.135” then {After this we have to tell the computer, what to do if that case is given. In this example we want him to store these messages in the file “/var/log/network1.log”. This is an action with the type “omfile”. To configure the file where to store the messages, the action is “action (type=”omfile” File=”-filename-“). So in this example, it will look like this:
Action (type=”omfile” file=”/var/log/network1.log”)
}
All the lines together now are
Module (load=“imudp“)

Input (type=”imudp” port=”514”)
If $fromhost-ip == “172.19.1.135“ then {
Action (type=”omfile” File=”/var/log/network1.log”)
}
All in all it means: The input for rsyslog will listen to syslog via UDP on port 514. If the IP from the Computer, which sends the messages, is 172.19.1.135, then the action in the brackets will get activated for these. In the action the messages will be stored in the file /var/log/network1.log.
Rsyslog and rulesets
Rulesets are a bit more complicated. A ruleset is a set of rules, as the name implies. These are bound to an input. This works by adding an option to the input, namely “ruleset=”-rulesetname-“”. For example, if I want to bind a ruleset “rs1” to a input the line will look like this:
Input (type=”imudp” port=”514” ruleset=”rs1”)But you still have to define, what the ruleset should do. In this guide I will limit myself to explain, how to create a ruleset, which has one action: to store all the messages in a file. In my example I want to store the messages in the file /var/log/network1.log”.
You define a ruleset like the normal configuration. To define it, you first name it with ruleset (name=”-rulesetname-“). After this you write what it does, in my example the action action (type=”omfile” file=”/var/log/network1.log”). This action you write in these curly brackets: {}.
So my full example looks like this
Module (load=”imudp”)

Input (type=”imudp” port=”514” ruleset=”rs1”)

Ruleset (name=”rs1”) {
Action (type=”omfile” file=”/var/log/network1.log”)
}
In that second example for configurations you can see, how to store all messages from the input into a file by using a ruleset. A rulesset can consist of multiple rules, but without binding it to the input it is useless. It can be bound to an input multiple times or even other rulesets can be called.
Final Conclusion
In this guide I explained how to install rsyslog, how to configure it and how to use rulesets. After you read this guide you are able to do exactly this: you can install rsyslog, configure it and have basic knowlege about rulesets. If you want to learn more about rsyslog, how to configure it or about rulesets, you can find information in the other guides or in the documentation.
rulesets and rsyslog 7.2+
In rsyslog 7.2.0 we introduced some interesting config enhancements. Among these are changes to how rulesets can be specified or called. A ruleset is basically looking like this:
ruleset(name="rulesetname") { statements here }
As you can see, you specify a ruleset by its name. All statements that will be specified go into the curly brackets. In addition, a ruleset can be called by another ruleset. This is simply done by callrulesetname The rulesetname is just plainly specified. We hope this to be more intuitively. Here is a larger example (bascially taken from the rsyslog mailing list, thanks to Brian Knox). module(load="imptcp" keepalive="on") # use imptcp just as example for bind ruleset below ruleset(name="rs1") { *.* /var/log/test1.log } ruleset(name="rs2") { *.* /var/log/test2.log call rs1 } input(type="imptcp" port="13514" ruleset="rs2") All statements, which are NOT specified in a ruleset will be automatically inserted into the default ruleset.
Legacy $Ruleset statements are still supported, but cannot be cross-used with the new ruleset() statements.
Storing and forwarding remote messages
In this scenario, we want to store remote sent messages into a specific local file and forward the received messages to another syslog server. Local messages should still be locally stored.
Things to think about
How should this work out? Basically, we need a syslog listener for TCP and one for UDP, the local logging service and two rulesets, one for the local logging and one for the remote logging.
TCP recpetion is not a build-in capability. You need to load the imtcp plugin in order to enable it. This needs to be done only once in rsyslog.conf. Do it right at the top.
Note that the server port address specified in $InputTCPServerRun must match the port address that the clients send messages to.
Config Statements
# Modules
$ModLoad imtcp
$ModLoad imudp
$ModLoad imuxsock
$ModLoad imklog
# Templates
# log every host in its own directory
$template RemoteHost,"/var/syslog/hosts/%HOSTNAME%/%$YEAR%/%$MONTH%/%$DAY%/syslog.log"
### Rulesets
# Local Logging
$RuleSet local
kern.*                                                 /var/log/messages
*.info;mail.none;authpriv.none;cron.none                /var/log/messages
authpriv.*                                              /var/log/secure
mail.*                                                  -/var/log/maillog
cron.*                                                  /var/log/cron
*.emerg                                                 *
uucp,news.crit                                          /var/log/spooler
local7.*                                                /var/log/boot.log
# use the local RuleSet as default if not specified otherwise
$DefaultRuleset local

# Remote Logging
$RuleSet remote
*.* ?RemoteHost
# Send messages we receive to Gremlin
*.* @@W.X.Y.Z:514
### Listeners
# bind ruleset to tcp listener
$InputTCPServerBindRuleset remote
# and activate it:
$InputTCPServerRun 10514

$InputUDPServerBindRuleset remote
$UDPServerRun 514
How it works
The configuration basically works in 4 parts. First, we load all the modules (imtcp, imudp, imuxsock, imklog). Then we specify the templates for creating files. The we create the rulesets which we can use for the different receivers. And last we set the listeners.
The rulesets are somewhat interesting to look at. The ruleset “local” will be set as the default ruleset. That means, that it will be used by any listener if it is not specified otherwise. Further, this ruleset uses the default log paths vor various facilities and severities.
The ruleset “remote” on the other hand takes care of the local logging and forwarding of all log messages that are received either via UDP or TCP. First, all the messages will be stored in a local file. The filename will be generated with the help of the template at the beginning of our configuration (in our example a rather complex folder structure will be used). After logging into the file, all the messages will be forwarded to another syslog server via TCP.
In the last part of the configuration we set the syslog listeners. We first bind the listener to the ruleset “remote”, then we give it the directive to run the listener with the port to use. In our case we use 10514 for TCP and 514 for UDP.
Important
There are some tricks in this configuration. Since we are actively using the rulesets, we must specify those rulesets before being able to bind them to a listener. That means, the order in the configuration is somewhat different than usual. Usually we would put the listener commands on top of the configuration right after the modules. Now we need to specify the rulesets first, then set the listeners (including the bind command). This is due to the current configuration design of rsyslog. To bind a listener to a ruleset, the ruleset object must at least be present before the listener is created. And that is why we need this kind of order for our configuration.