Newbie guide to rsyslog
Written by Jan Gerhards
Here are some different guides for people, who never worked with rsyslog. First I’ll explain, how to install rsyslog. Besides, I will explain how to install some packages, which you will need to install rsyslog. There are two important ones and some minor ones. After that, I will show how to do some easy configurations. Questions like how can I configure a module? Or How can I configure the input? Will be answered. In the example I will configure rsyslog to receive messages, filter them for one specific IP and store only the messages in a file. In the end I’ll explain something about easy rulesets. In my example I will try the same like I did with the configuration, but I will work with rulesets.
Before you begin
Please note, there are many ways to distribute rsyslog. But, make sure that the platform you build rsyslog on is the same platform as where it should be used. You cannot build rsyslog on CentOS and use it on Ubuntu. The differences between the platforms are just to big. The same applies to different versions of the same platform. When building on a older platform and using it on a newer version, this may work, but with restrictions. Whereas building on a newer version and using it on a older version will probably not work at all. So, if you build rsyslog from Source and want to use it on another machine, make sure the platform is the same.
Preliminary actions
There are generally two very often needed packages, that you have to install before rsyslog: libestr and libee. These can be downloaded here:
Libestr: http://libestr.adiscon.com/download/
Libee: http://www.libee.org/download/
Both are being installed the same, so here is only one step-by-step instruction.
- Download the file
Just download libestr or libee and “cd” into the folder, where you want them. - “tar xzf” the file
after you “cd” to the folder, where the file is, type “tar xzf -name of file”. Your command line should look like this:tar xzf -name of file-
- “Cd” into the new folder
“cd” into the made directory. It will have the same name like the downloaded file. Your command line should look like this:cd -name of file-
- Run “./configure configure –libdir=/usr/lib –includedir=/usr/include”
After you “cd” into that file, just run ” ./configure –libdir=/usr/lib –includedir=/usr/include”. Your command line should look like this:./configure --libdir=/usr/lib --includedir=/usr/include
- Type “sudo make”
Just type this and let the Computer work. Your command line should look like this:sudo make
- Type “sudo make install”
This is the last step. Like with “sudo make”, just let the computer work. Your command line should look like thissudo make install
- The package should work now
Congratulation! You have installed the package! If it doesn’t work properly, you should check if you followed every step right and if you have, contact the support.
There might also be some other packages like libjson0-dev, uuid-dev, bison, flex, libz-dev or python-docutils. These you’ll have to install before installing rsyslog, too. This guide was made on Ubuntu, so if you use any other system, they might be named differently. You can install them with the command
sudo apt-get install -package name-
After you got all the packages, you can install rsyslog. Here is a How to for installing rsyslog.
How to install rsyslog
In this guide is explained how to install rsyslog with the download from the homepage.
- Download rsyslog
You can download rsyslog from the rsyslog webpage at http://www.rsyslog.com/download/ - “tar xzf” the file
Open a terminal. Then you “cd” to where you want the file and then type “tar xzf -name of downloaded file”. Your command line should look like this:tar xzf -name of downloaded file-
- “cd” into the new folder
Then “cd” into the made directory. The new directory will have the same name like the downloaded file. Your command line should look like this:cd -name of file-
- Type “./configure –prefix=/usr”
You just need to run “./configure –prefix=/usr”. There might be an Error that you need to install some packages to precede with installing. For two specific packages I’ve explained how to install them, because you will need them often. Your command line should look like this:./configure --prefix=/usr
- Run “sudo make”
it’s easy, just run “sudo make” and let the computer work. Your command line should look like this:sudo make
- Run “sudo make install”
Just like “sudo make”. Type it, press enter and let the Computer work. Again, there might be some missing packages. Just install them. Your command line should look like this:sudo make install
- Rsyslog should now be installed
Congratulation! You have installed rsyslog! You can check the version of rsyslog by typing: “rsyslogd -v”.
If it doesn’t work properly, you should check if you followed every step right and if you have, contact the support.
Now after you installed rsyslog, you have to configure it. How to do this is explained here.
Configure rsyslog
In this part I’ll explain some basic configuration steps for rsyslog. We configure rsyslog to recive UDP messages, to filter them depending on the IP of the host and to store them in a file.
- How to configure the module
The module has to be configured first. The general line for this configuration is: “module (load=”im-type of protocol-”). So in our example, where we want UDP, it will look like this:Module (load=”imudp”)
- How to configure the input for rsyslog
For the input, you have to give two different information to rsyslog. The first information needed is the protocol type of the input; in my example again UDP. Like in the first line there is an “im-” in front of the protocol-type. The other information is to configure a port for rsyslog, in my example 514. These two information are together in only one line. The line is: “Input (type=”-protocol of input-“port=”-number of port-“). This means for my example, the line has to beInput (type=”imudp” port=”514”)
- How to configure a filter for fromhost-IPs and store them in a file
A filter always has, like a normal conditional sentence, an “if…then” part. If you want to configure it to do something with all notes from a specific IP, between “if” and “then” will be the property “$fromhost-ip ==”-IP, you want to filter-”. After this stays a “then” and after the “then” follows an action in brackets, which I will explain later. In my example I want only the notes from the host with the IP 172.19.1.135. So the line will beIf $fromhost-ip == “172.19.1.135” then {After this we have to tell the computer, what to do if that case is given. In this example we want him to store these messages in the file “/var/log/network1.log”. This is an action with the type “omfile”. To configure the file where to store the messages, the action is “action (type=”omfile” File=”-filename-“). So in this example, it will look like this:
Action (type=”omfile” file=”/var/log/network1.log”)
}
All the lines together now are
Module (load=“imudp“)

Input (type=”imudp” port=”514”)
If $fromhost-ip == “172.19.1.135“ then {
Action (type=”omfile” File=”/var/log/network1.log”)
}
All in all it means: The input for rsyslog will listen to syslog via UDP on port 514. If the IP from the Computer, which sends the messages, is 172.19.1.135, then the action in the brackets will get activated for these. In the action the messages will be stored in the file /var/log/network1.log.
Rsyslog and rulesets
Rulesets are a bit more complicated. A ruleset is a set of rules, as the name implies. These are bound to an input. This works by adding an option to the input, namely “ruleset=”-rulesetname-“”. For example, if I want to bind a ruleset “rs1” to a input the line will look like this:
Input (type=”imudp” port=”514” ruleset=”rs1”)But you still have to define, what the ruleset should do. In this guide I will limit myself to explain, how to create a ruleset, which has one action: to store all the messages in a file. In my example I want to store the messages in the file /var/log/network1.log”.
You define a ruleset like the normal configuration. To define it, you first name it with ruleset (name=”-rulesetname-“). After this you write what it does, in my example the action action (type=”omfile” file=”/var/log/network1.log”). This action you write in these curly brackets: {}.
So my full example looks like this
Module (load=”imudp”)

Input (type=”imudp” port=”514” ruleset=”rs1”)

Ruleset (name=”rs1”) {
Action (type=”omfile” file=”/var/log/network1.log”)
}
In that second example for configurations you can see, how to store all messages from the input into a file by using a ruleset. A rulesset can consist of multiple rules, but without binding it to the input it is useless. It can be bound to an input multiple times or even other rulesets can be called.
Final Conclusion
In this guide I explained how to install rsyslog, how to configure it and how to use rulesets. After you read this guide you are able to do exactly this: you can install rsyslog, configure it and have basic knowlege about rulesets. If you want to learn more about rsyslog, how to configure it or about rulesets, you can find information in the other guides or in the documentation.
Using rsyslog mmnormalize module effectively with Adiscon LogAnalyzer
Using the mmnormalize module in rsyslog is a bit complicated at first. We want to describe in this article how to set up the basic components for using log normalization. In addition to that we will show how to configure these components so messages will be split into pieces of information. These pieces of information should then be written into a database for review with Adiscon LogAnalyzer.
This guide has been tested with rsyslog v5.8.0 and liblognorm 0.3, libee 0.3.
The goal of this guide is to have a setup, that will have a message parsed by the normalizing tool, put some content of the message into specific properties. These properties will then be filled into a special database format, which will should be reviewed by Adiscon LogAnalyzer.
For using normalization we need the following:
- rsyslog
- liblognorm
- libee
- libestr
In the further process of the article we need additional elements:
- apache webserver with PHP5
- mysql database (usually with phpmyadmin)
- Adiscon LogAnalyzer
Step 1: Setting up rsyslog and log normalization
First of all we need to setup rsyslog for log normalization. So before installing rsyslog, we will install liblognorm, libee and libestr. They can be installed according to this guide. rsyslog can now be installed. We assume you have downloaded and extracted a tarball from the rsyslog download page. Change into the directory you installed rsyslog in. Now use the following commands to setup rsyslog correctly:
./configure --libdir=/lib --sbindir=/sbin --enable-mysql --enable-mmnormalize
make
make install
If everything is correct, the installation procedure should complete successfully. We can now start configuring rsyslog itself. We need a configuration that looks like this:
$ModLoad immark
$ModLoad imuxsock
$ModLoad imklog
$ModLoad mmnormalize
$ModLoad ommysql.so
$ModLoad imudp.so
$UDPServerRun 514
$mmnormalizeUseRawMSG 1
$mmnormalizeRuleBase /rsyslog/rulebase.rb
*.* :mmnormalize:
$template database,"insert into normalized (date, uhost, msgnumber, protocol, ipin, ipout, portin, portout)
values ('%$!date%', '%$!uhost%', '%$!msgnumber%', '%$!protocol%', '%$!ipin%', '%$!ipout%', '%$!portin%',
'%$!portout%')",SQL
*.* :ommysql:172.19.3.17,syslog, test, test;database
That is all for our rsyslog config. Looks pretty complicated right now. Basically, we load all necessary modules at the top. After that we start the UDP syslog server. It is needed to receive the messages. The next 3 lines are the parameters to initiate the normalization of messages. We declare, that the raw message should be used. Our rulebase for the normalization lies in the rsyslog directory (this path has to be changed if your directory lies somewhere else). And after that, we tell rsyslog to use normalization on all messages. The next line describes the template for the processed message. In the end, there should be a sql insert statement that puts all the parsed variables into their corresponding fields in the table “normalized”. The last line is finally the action that makes rsyslog write all messages (the ones created by the template – the sql statement – into a remote database.
After the configuration, we still need to setup a rulebase. This is done in a separate file. For our example, the rulebase should be the following file: /rsyslog/rulebase.rb
The file should look like this:
rule=:%date:date-rfc3164% %uhost:word% %tag:word%  %notused:char-to:x3a%: %msgnumber:char-to:x3a%: access-list
inside_access_in permitted %protocol:word% inside/%ipin:ipv4%(portin:number%) ->
outside/%ipout:ipv4%(portout:number%) %notused2:char-to:]%]
The rule is basically one line. It might be shown otherwise here due to restrictions of the webdesign. It is basically a format of a message. The different parameters of a rule are shown in a different guide. The rule we have here should resemble the following message:
May 16 07:23:09 BHG-FW : %ASA-4-106100: access-list inside_access_in  permitted tcp inside/10.200.22.183(2969) ->
outside/67.192.232.82(80)  hit-cnt 1 first hit [0x48e9c345, 0x386bad81]
If you want to have multiple messages, where the format differs, you need multiple rules as well of course. The rules must be as precise as possible to resemble the message. If a message does not fit any listed rules, it will not be processed further. Something else that needs to be pointed out, is to keep the rules variable enough as well. Like in our example, there are some parts that will be the same for every message of this kind. Other parts might be with different content. And even if we do not need the content further, it should be put into a variable. Else the message might again not fit to the rule.
Step 2: Setting up the database
We suppose, that you already have a server with a database and webserver installed. The installation of the components has to be made according to the instructions given by the manufacturer of the software. Therefore we cannot give any examples for that.
But we need a specific database scheme for our example here. So we need to show this at least. As you have seen before, we have some specific parts of the message filled into properties. These properties should be written to the database. So here is the basic SQL statement to create the table according to our needs:
CREATE TABLE normalize
(
ID int unsigned not null auto_increment primary key,
date datetime NULL,
host varchar(255) NULL,
msgnumber varchar(20),
protocol varchar(60) NULL,
ipin varchar(60) NULL,
ipout varchar(60) NULL,
portin int NULL,
portout int NULL
)
You can execute this statement as you like. It is currently designed for a MySQL database, so you might need to change some bits if you are using a different database.
3. Using Adiscon LogAnalyzer with this database
Adiscon LogAnalyzer can be used to review the data from this database. Installation of Adiscon LogAnalyzer is shown here. Please note, that we will need the admin center. So please think of creating a user database when installing.
Point your browser to your Adiscon LogAnalyzer installation. Now we need to go to the admin center. There we have to set some parts to fit our custom format.
Edit Fields
First, we need to add some Fields. We need to do this, so we can use the custom fields in our database with LogAnalyzer. By default, the list of fields only reflects basically the MonitorWare Database Scheme. When clicking on Fields in the Admin Center, a list of the currently available fields will be shown:
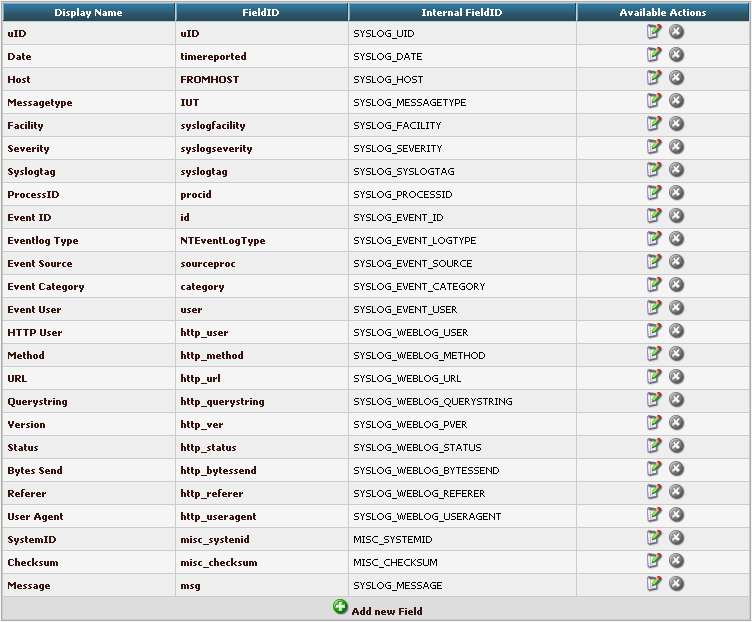
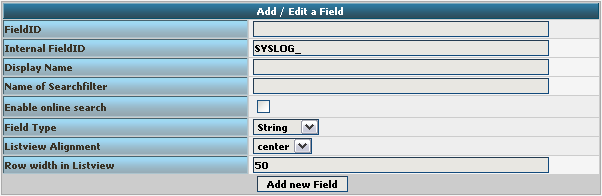
By clicking on Add new Field, we can create a new Field.
We need to create 7 new fields only, though we have 8 custom fields in the table. Since date is the same, we can use the already formatted field. So we only need to create the fields for host, msgnumber, protocol, ipin, ipout, portin and portout.
Basically, the Field details should look like this:
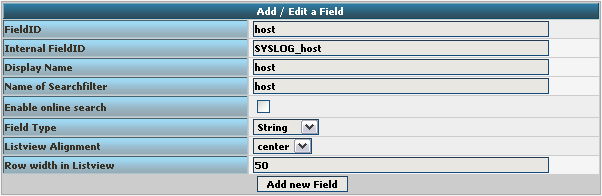
To finally create the Field, click on the button “Add new Field”. Now the list should appear again with the newly created Field. Repeat this step for the other fieldnames as well.
Edit DBMappings
In conjunction with the Fields which are only for the internal use in Adiscon LogAnalyzer, we need to create a custom database mapping. Therefore go to DBMappings in the Admin Center. You will see a list of the currently available database mappings.
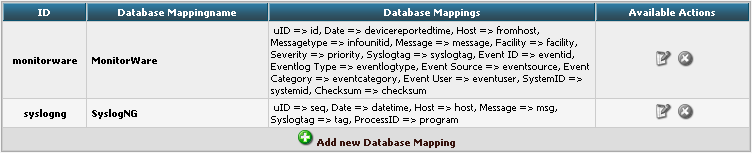
Click on Add new Database Mapping:
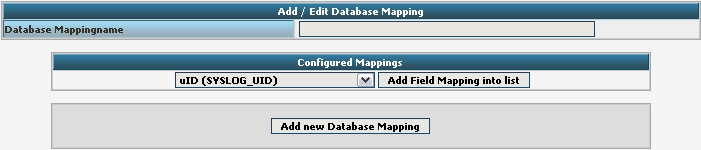
Here we need to tell Adiscon LogAnalyzer, which Field we created depends on which database field. Give your database mapping a name first. After that, choose the Fields we need from the dropdown menu and click on “Add Field Mapping into list”. The final step will be to enter the database field names into the list. It should now look like this now:
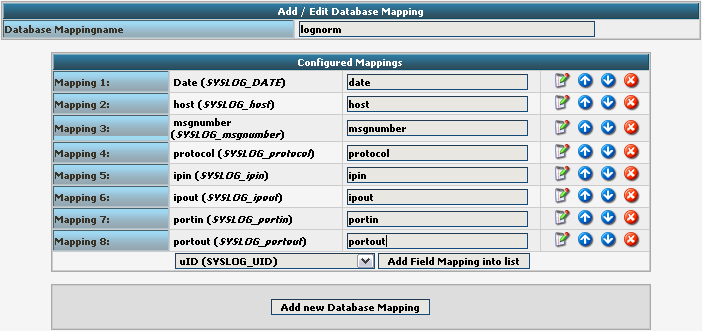
Finally click on “Add new Database Mapping”. This will save the mapping and get you back to the list of DBMappings.

Edit Views
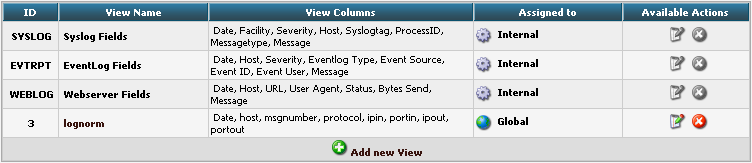
The next step we need to adjust is the Views. In Views you can configure, what LogAnalyzer should show. This is related to the data that is stored in the database. Basically, a View should represent the kind of logs that are stored. For example if you use the View for Windows Event Logs, but have a database where Linux syslog is stored, many Fields will be shown as empty, because they are not filled like from Windows Event Logs. Therefore we need a custom view.
You will get there by clicking on Views in the Admin Center.

There are already pre-configured Views for Windows EventLog, Syslog and Webserver Logs. We need a completely different View though. A new View can be configured by clicking on “Add new View” at the bottom of the list.
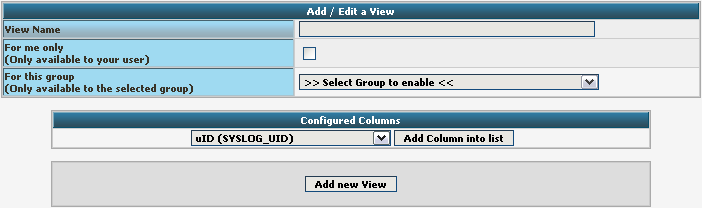
You need to give your view a name. If you want, you can restrict the use of this view to certain users or groups, but we will skip that for now. The most important part is to select the Fields that should be displayed. This is done at “Configured Columns”. Before clicking on “Add new View” it should look like this:
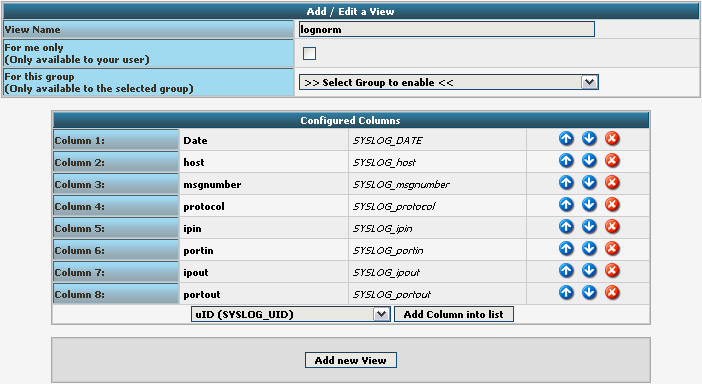
After clicking the button, the new View should appear in our list.
Edit Sources
Finally, we need to create a Source. When installing Adiscon LogAnalyzer, you can already configure a Source. For our example, we need to create another Source. Therefore go to Sources in the Admin Center.

You will see a list of the configured Sources. It currently holds one Source. By clicking on Add new Source you can create another one.
Basically, we need to insert a Source Name. If you want, you can also create a description. Change the Source Type to MYSQL Native. You can also select a default View. Choose our lognorm View we created earlier. No more general options need to be set. If you want, you can again restrict the source to a user or group.
We still need to change the database Type options. As you can see, the fields have changed by setting the Source Type to MYSQL Native. As table type choose the lognorm type we created before. Insert the details as your database needs them. The complete form should look like this now:
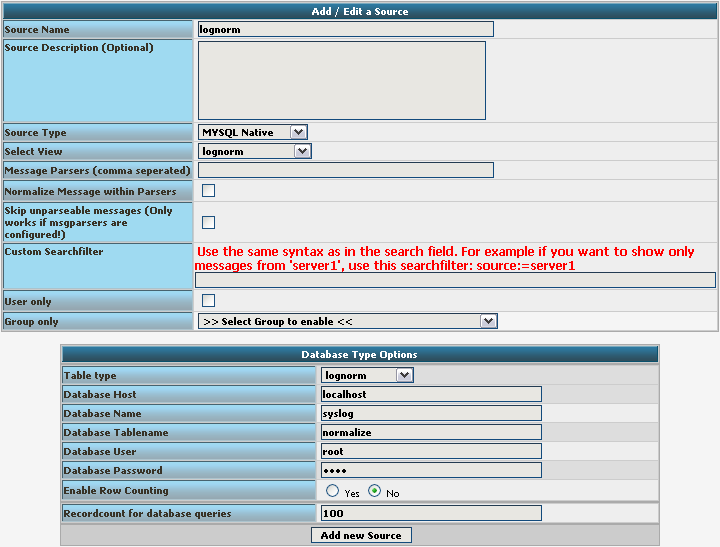
Finish the new Source by clicking on Add new Source. It should now appear in the list.

Final Thoughts
Though this scenario seems very complex it shows in the end how easy some things can be afterwards. This setup shows exactly, how different products from the Adiscon product line can work together. And we have a good example for how normalizing works.
normalizer – first steps for mmnormalize
Since rsyslog 6.1.2 there is a new module called mmnormalize. This module provides the capability to normalize log messages via liblognorm. (This example has been done on a Fedora 13 workstation. Please note that there can be some differences in the file paths.)
For using this module you need
libestr
libee
liblognorm
rsyslog 6.1.2
After downloading the mentioned items we have to install them.
You can find a guide for installing liblestr, libee and liblognorm at
http://www.liblognorm.com/help/first-steps-using-liblognorm/.
The next step would be to extract the downloaded rsyslog folder and install it. Please note that we habe to mention the mmnormalize module in the configure
(after extracting:)
$ ./configure --libdir=/usr/lib --sbindir=/sbin --enable-mmnormalize
 $ make
 $ make install
Now we have to load the mmnormalize module in the rsyslog.conf.
$ModLoad mmnormalize     # loads the mmnormalize module
 $mmnormalizeRuleBase rulebase.rb     # specifies which rulebase is to use
 *.* :mmnormalize:     # applies normalization to all messages
Finally we need an action that uses the normalizer. Below you will find a simple sample for an action using normalizer
$template cee,"msg is '%msg%', %$!all-json%\n"
 *.*     /home/test/logfile;cee
This example will write everything to logfile and shows you the original message and what parts have been parsed and which not.
A further sample how to use mmnormalize to filter for IP in messages
$template cee, "ip is '%$!ip%', %$!all-json%\n"
 if $!ip != '' then /home/test/logfile-cee;cee
With this example you can extract messages which have an IP in the ‘field’ ip. The available fields are applying to your rulebase, there they are specified. Fields are used in a template like properties but they use the additional signs ‘$!’ in their names, e.g. %$!name% instead of %name%. Below you will find a link which tells you more about creating a rule base http://www.liblognorm.com/help/creating-a-rulebase/.