Using MongoDB with rsyslog and LogAnalyzer
In this scenario we want to receive cee-formatted messages from a different system with rsyslog, store the messages with MongoDB and then display the stored messages with Adiscon LogAnalyzer. This is a very common use-case. Please read through the complete guide before starting.
We will split this guide in 3 main parts. These parts can consist of several steps.
- Setting up rsyslog
- Setting up MongoDB
- Setting up LogAnalyzer
This guide has been created with rsyslog 7.3.6 on ubuntu 12.04 LTS and Adiscon LogAnalyzer 3.6.3. All additional packages, services or applications where the latest version at that time.
Before you begin
Please note, there are many ways to distribute rsyslog. But, make sure that the platform you build rsyslog on is the same platform as where it should be used. You cannot build rsyslog on CentOS and use it on Ubuntu. The differences between the platforms are just to big. The same applies to different versions of the same platform. When building on a older platform and using it on a newer version, this may work, but with restrictions. Whereas building on a newer version and using it on a older version will probably not work at all. So, if you build rsyslog from Source and want to use it on another machine, make sure the platform is the same.
Step 1 – Setting up rsyslog
We need to setup rsyslog first. Not only do we need the core functionality, but several additional modules. For this case we want to receive the syslog messages via TCP, thus we need imtcp. For processing we need first mmjsonparse and ommongodb. Your configure should look like this.
./configure --prefix=/usr --enable-imtcp --enable-mmjsonparse --enable-ommongodb
The module mmjsonparse will be needed to verify and parse the @cee messages. Ommongodb will be used to write into the MongoDB. After the configure and installation, we can create our config. The config for our case looks like this:
module(load="imtcp")
module(load="mmjsonparse")
module(load="ommongodb")
input(type="imtcp" port="13514" Ruleset="mongodb")
template(name="mongodball" type="subtree" subtree="$!")
ruleset(name="mongodb") {
        action(type="mmjsonparse")
        if $parsesuccess == "OK" then {
                set $!time = $timestamp;
                set $!sys = $hostname;
                set $!procid = $syslogtag;
                set $!syslog_fac = $syslogfacility;
                set $!syslog_sever = $syslogpriority;
                set $!pid = $procid;
                action(type="ommongodb" server="127.0.0.1" db="logs" collection="syslog" template="mongodball")
                }
        }
As always, we first load the modules. The next part is the input. We need to receive tcp via imtcp. Please note, that we directly bind the input to a ruleset. The third part of the configuration is a template. We need it later when writing to MongoDB. Since we will automatically transform our @cee-message into json, we can use a subtree template. The template itself is basically the root of the subtree.
The last and most important part is the ruleset. Here all of our work is done. First, all messages are run through the mmjsonparse module. This will not only verify if we received a valid json message, but also transforms all the values into a json subtree. If the parsing was successful, we need to set several variables for the subtree. Information that is delivered in the syslog header will not be parsed into the subtree by mmjsonparse automatically. Thus we have to set subtree variables with the values of some default properties like timestamp, hostname and so on. After that we have basically all information from the complete syslog message in the subtree format. Finally a last action is needed. We need to write our log messages to MongoDB. In this example, MongoDB is installed on the same machine. We want to use the db “logs” and as collection we want to use “syslog”. And we use our subtree template to define the format that is written to MongoDB. Thus, all our parsed variables are stored separately. If we do not use this template, the @cee message gets written as it is into the msg field in MongoDB. But this is not what we want. We want all variables to be available separately.
That is basically it for rsyslog. You can now save the configuration and restart rsyslog. Though it won’t be able to be useful yet. We still need to install MongoDB.
Step 2 – Install MongoDB
Making a basic install for MongoDB is rather easy. Simply install the following packages:
mongodb
mongodb-server
php-pecl-mongo
libmongo-client
libglib2.0-dev
Please note, that package names may vary for different distributions.
After we have installed the packages, the MongoDB Server is already ready. By default, it is not secured by a user or password. Refer to the MongoDB manual for more information. Databases and collections (equivalent to tables) are created by rsyslog and do not need to be defined with the mongo shell. We will stick with the default setup to keep it simple.
Step 3 – Installing Adiscon LogAnalyzer
To run Adiscon LogAnalyzer, you need a webserver with PHP. The easiest way is to use apache2 and php5. To be able to access the MongoDB, we need to install an additional package. Run the following command
sudo pecl install mongo
You might need to install the package php-pear first, if it hasn’t been installed already with PHP.
After that, we need to put the following line into the file php.ini.
extension=mongo.so
Remember to restart your webserver after making changes to the php.ini. Without a lot of configuration, this should aready work.
We can now install Adiscon LogAnalyzer. Download the latest version from the Adiscon LogAnalyzer Download page and install it as it is described in the documentation.
The only difference we need to make is when setting up the log source in step 4.5. You need to set at least the following as shown in the screenshot:

Source Type: MongoDB Native
Table Type: MongoDB
Database Name: logs
Database Tablename: syslog
Database user: <clear this field>
The User and Password is of course needed, if you set it in your MongoDB setup.
After you have finished the installation of Adiscon LogAnalyzer, you should now be seeing the LogAnalyzer overview and the log messages in a table view (if you have already stored them in MongoDB). Now if you click on a specific message, you get to see the detail view of the log message.
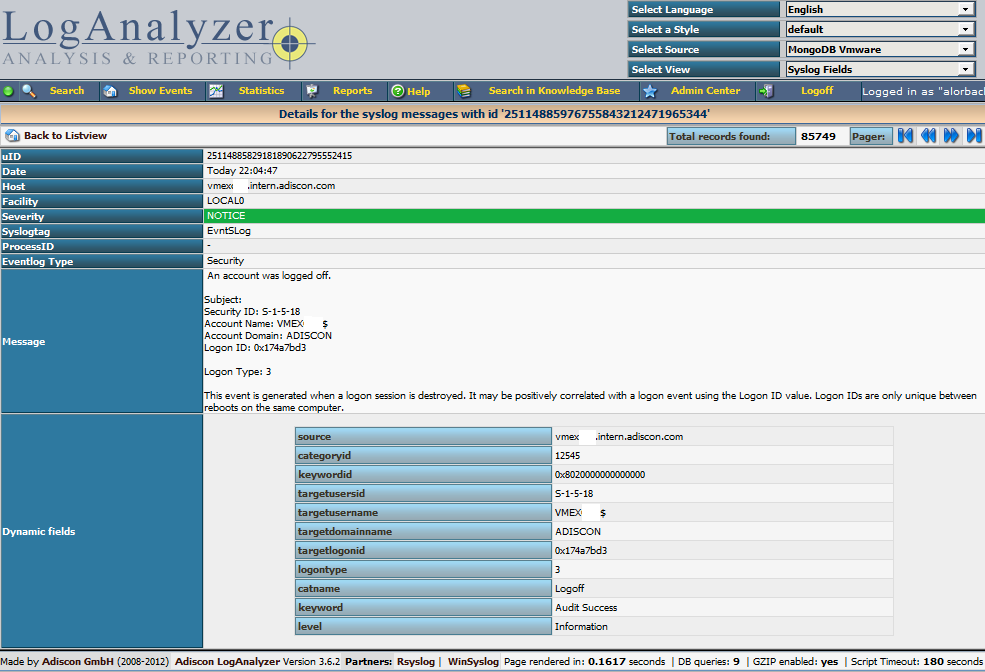
Click on the picture for a bigger size
As you can see, you get a list of dynamic fields. These fields where already sent in @cee format from the original source and were parsed by rsyslog and mmjsonparse and finally they were automatically filled into the MongoDB.
With this setup, you are independent of a fixed database structure. Fields are inserted dynamically into the database as they are available and they are dynamically display by Adiscon LogAnalyzer as well.
rsyslog 7.2.0 (v7-stable) released
We are proud to announce the first stable version of the v7 branch. It contains only minor bug fixes in addition to the latest beta.
With that version, a full structured-logging/lumberjack enabled version is now available. For the top 5 advantages of rsyslog v7, please see
http://www.rsyslog.com/main-advantages-of-rsyslog-v7-vs-v5/
With this release, version 5 of rsyslog becomes legacy and is no longer supported by the rsyslog project. However, rsyslog v5 continues to be supported as part of Adiscon’s professional services for rsyslog, please see
http://www.rsyslog.com/professional-services/enterprise-support/
We would also like to point you to Rainer’s blog, where he describes the importance of this release in more detail. The relationship to v6 is also clarified. Please see
http://blog.gerhards.net/2012/10/new-v7v6-stable-v5-now-legacy.html
ChangeLog:
http://www.rsyslog.com/changelog-for-7-2-0-v7-stable/
Download:
http://www.rsyslog.com/rsyslog-7-2-0-v7-stable/
As always, feedback is appreciated.
Best regards,
Florian Riedl
rsyslog 6.5.1 (beta)
Download
file name: rsyslog 6.5.1 (beta)
rsyslog 6.5.1 (beta) md5sum: e6f8ef3dc1acdb5b7f64a1046b7e8a8f5a4f39bc1ebd1bf02eb092394a6774b4
Author: Rainer Gerhards (rgerhards@adiscon.com)
Version: 6.5.1
File size: 2.55 MB
Download this file now!
Changelog for 6.5.1 (v6-beta)
Version 6.5.1 [BETA] 2012-10-11
- added tool “logctl” to handle lumberjack logs in MongoDB
- imfile ported to new v6 config interface
- imfile now supports config parameter for maximum number of submits
which is a fine-tuning parameter in regard to input baching - added pure JSON output plugin parameter passing mode
- ommongodb now supports templates
- bugfix: imtcp could abort on exit due to invalid free()
- bugfix: remove invalid socket option call from imuxsock
Thanks to Cristian Ionescu-Idbohrn and Jonny Törnbom - bugfix: missing support for escape sequences in RainerScript
only \’ was supported. Now the usual set is supported. Note that v5
used \x as escape where x was any character (e.g. “\n” meant “n” and NOT
LF). This also means there is some incompatibility to v5 for well-know
sequences. Better break it now than later. - bugfix: small memory leaks in template() statements
these were one-time memory leaks during startup, so they did NOT grow
during runtime - bugfix: config validation run did not always return correct return state
- bugfix: config errors did not always cause statement to fail
This could lead to startup with invalid parameters.
rsyslog 6.5.1 (v6-beta) released
This is the new v6-beta, which includes the full v6-subset of the new config language as well as somewhat improved support for lumberjack/CEE. This version concludes development efforts for v6.
Note that it is recommended to use v7 if you do not have any special need for v6.
ChangeLog:
http://www.rsyslog.com/changelog-for-6-5-1-v6-beta/
Download:
http://www.rsyslog.com/rsyslog-6-5-1-beta/
As always, feedback is appreciated.
Best regards,
Tim Eifler
Main Advantages of rsyslog v7 vs. v5
Why rsyslog V7:
- greatly improved configuration language – the new language is much more intuitive than the legacy format. It will also prevent some typical mistakes simply by not permitting these invalid constructs. Note that legacy format is still fully supported (and you can of course do the same mistakes if you use legacy format).
- greatly improved execution engine – with nested if/then/else constructs as well as the capability to modify variables during processing.
- full support for structured logging and project lumberjack / CEE – this includes everything from being able to create, interpret and handle JSON-based structured log messages, including the ability to normalize legacy text log messages.
- more plugins – like support for MongoDB, HDFS, and ElasticSearch as well as for the kernel’s new structured logging system.
- higher performance – many optimizations all over the code, like 5 to 10 times faster execution time for script-based filters, enhanced multithreaded TCP input plugin, DNS cache and many more.
Of course, there are many more improvements. This list contains just the most important ones. For full details, check the file ChangeLog.
rsyslog 7.1.0 (v7-devel) released
This release kicks off rsyslog v7. Version 7.1.0 is very similar to v6-devel, except that it contains the important capability to work with hierarchical properties. Note that this version does not yet contain the new ruleengine work – this will be part of the next v7 release. This release is primarily intended for those interested in working with the hierarchical properties. Note that the code obviously is currently in a somewhat experimental state.
ChangeLog:
http://www.rsyslog.com/changelog-for-7-1-0-v7-devel/
Download:
http://www.rsyslog.com/rsyslog-7-1-0-v7-devel/
As always, feedback is appreciated.
Best regards,
Florian Riedl
Changelog for 7.1.0 (v7-devel)
Version 7.1.0 [devel] 2012-09-06
- added support for hierarchical properties (CEE/lumberjack)
- added pure JSON output plugin parameter passing mode
- ommongodb now supports templates
- bugfix: imtcp could abort on exit due to invalid free()
- imported bugfixes from 6.4.1