new rsyslog config system materializes
The past weeks we have worked pretty hard on the new rsyslog config system. The legacy system was quite different from what you expect in modern software. Most importantly, the legacy system applied directives as the config file was read, which made it extremely hard to restructure the config file format. That also prevented features like privilege drop from working fully correct.
We have now basically changed the config system so that there is a clear difference between the config load phase and applying the config. Most importantly, this means privilege drop now works correctly in all cases. Other than that, there are no user-visible enhancements at the moment. However, the internal plumbing has changed dramatically and enables future change. Most importantly, this finally creates a path to a new config language, as we now have a clear interface as part of the in-memory representation of the config, which is config language agnostic.
With this initial release, there may still be some things inside the core that can be optimized. Right now, the system aims at the capability to have multiple config objects loaded (but not active) at the same time. However, there are some data instances where this is not cleanly followed in order to reuse some code. This is not a problem, because the rest of the rsyslog engine does not support dynamic config reload (and thus multiple configs at runtime) at all.
Also it must be noted that the current code is quite experimental. So there is some risk involved in running the initial 6.3.0 version. However, all dramatic changes were made to the config system. That means if the system initializes correctly, it will most probably run without any issues. The risk window is constrained to the initial startup, what should be quite controllable. Users that use privilege drop are advised to check that their configurations work as expected. The previous system did some initialization with full privileges. This is no longer the case, except for modules that actually require full privileges (e.g. imtcp to bind privileged ports). Most importantly, files are now created with dropped privileges right from the beginning. I expect that some (unclean) configurations will run into trouble with that. The good news about that is that they would run into trouble with older releases as well, but only after a HUP. Now things break immediately, what makes them much easier to diagnose.
Using rsyslog mmnormalize module effectively with Adiscon LogAnalyzer
Using the mmnormalize module in rsyslog is a bit complicated at first. We want to describe in this article how to set up the basic components for using log normalization. In addition to that we will show how to configure these components so messages will be split into pieces of information. These pieces of information should then be written into a database for review with Adiscon LogAnalyzer.
This guide has been tested with rsyslog v5.8.0 and liblognorm 0.3, libee 0.3.
The goal of this guide is to have a setup, that will have a message parsed by the normalizing tool, put some content of the message into specific properties. These properties will then be filled into a special database format, which will should be reviewed by Adiscon LogAnalyzer.
For using normalization we need the following:
- rsyslog
- liblognorm
- libee
- libestr
In the further process of the article we need additional elements:
- apache webserver with PHP5
- mysql database (usually with phpmyadmin)
- Adiscon LogAnalyzer
Step 1: Setting up rsyslog and log normalization
First of all we need to setup rsyslog for log normalization. So before installing rsyslog, we will install liblognorm, libee and libestr. They can be installed according to this guide. rsyslog can now be installed. We assume you have downloaded and extracted a tarball from the rsyslog download page. Change into the directory you installed rsyslog in. Now use the following commands to setup rsyslog correctly:
./configure --libdir=/lib --sbindir=/sbin --enable-mysql --enable-mmnormalize
make
make install
If everything is correct, the installation procedure should complete successfully. We can now start configuring rsyslog itself. We need a configuration that looks like this:
$ModLoad immark
$ModLoad imuxsock
$ModLoad imklog
$ModLoad mmnormalize
$ModLoad ommysql.so
$ModLoad imudp.so
$UDPServerRun 514
$mmnormalizeUseRawMSG 1
$mmnormalizeRuleBase /rsyslog/rulebase.rb
*.* :mmnormalize:
$template database,"insert into normalized (date, uhost, msgnumber, protocol, ipin, ipout, portin, portout)
values ('%$!date%', '%$!uhost%', '%$!msgnumber%', '%$!protocol%', '%$!ipin%', '%$!ipout%', '%$!portin%',
'%$!portout%')",SQL
*.* :ommysql:172.19.3.17,syslog, test, test;database
That is all for our rsyslog config. Looks pretty complicated right now. Basically, we load all necessary modules at the top. After that we start the UDP syslog server. It is needed to receive the messages. The next 3 lines are the parameters to initiate the normalization of messages. We declare, that the raw message should be used. Our rulebase for the normalization lies in the rsyslog directory (this path has to be changed if your directory lies somewhere else). And after that, we tell rsyslog to use normalization on all messages. The next line describes the template for the processed message. In the end, there should be a sql insert statement that puts all the parsed variables into their corresponding fields in the table “normalized”. The last line is finally the action that makes rsyslog write all messages (the ones created by the template – the sql statement – into a remote database.
After the configuration, we still need to setup a rulebase. This is done in a separate file. For our example, the rulebase should be the following file: /rsyslog/rulebase.rb
The file should look like this:
rule=:%date:date-rfc3164% %uhost:word% %tag:word%  %notused:char-to:x3a%: %msgnumber:char-to:x3a%: access-list
inside_access_in permitted %protocol:word% inside/%ipin:ipv4%(portin:number%) ->
outside/%ipout:ipv4%(portout:number%) %notused2:char-to:]%]
The rule is basically one line. It might be shown otherwise here due to restrictions of the webdesign. It is basically a format of a message. The different parameters of a rule are shown in a different guide. The rule we have here should resemble the following message:
May 16 07:23:09 BHG-FW : %ASA-4-106100: access-list inside_access_in  permitted tcp inside/10.200.22.183(2969) ->
outside/67.192.232.82(80)  hit-cnt 1 first hit [0x48e9c345, 0x386bad81]
If you want to have multiple messages, where the format differs, you need multiple rules as well of course. The rules must be as precise as possible to resemble the message. If a message does not fit any listed rules, it will not be processed further. Something else that needs to be pointed out, is to keep the rules variable enough as well. Like in our example, there are some parts that will be the same for every message of this kind. Other parts might be with different content. And even if we do not need the content further, it should be put into a variable. Else the message might again not fit to the rule.
Step 2: Setting up the database
We suppose, that you already have a server with a database and webserver installed. The installation of the components has to be made according to the instructions given by the manufacturer of the software. Therefore we cannot give any examples for that.
But we need a specific database scheme for our example here. So we need to show this at least. As you have seen before, we have some specific parts of the message filled into properties. These properties should be written to the database. So here is the basic SQL statement to create the table according to our needs:
CREATE TABLE normalize
(
ID int unsigned not null auto_increment primary key,
date datetime NULL,
host varchar(255) NULL,
msgnumber varchar(20),
protocol varchar(60) NULL,
ipin varchar(60) NULL,
ipout varchar(60) NULL,
portin int NULL,
portout int NULL
)
You can execute this statement as you like. It is currently designed for a MySQL database, so you might need to change some bits if you are using a different database.
3. Using Adiscon LogAnalyzer with this database
Adiscon LogAnalyzer can be used to review the data from this database. Installation of Adiscon LogAnalyzer is shown here. Please note, that we will need the admin center. So please think of creating a user database when installing.
Point your browser to your Adiscon LogAnalyzer installation. Now we need to go to the admin center. There we have to set some parts to fit our custom format.
Edit Fields
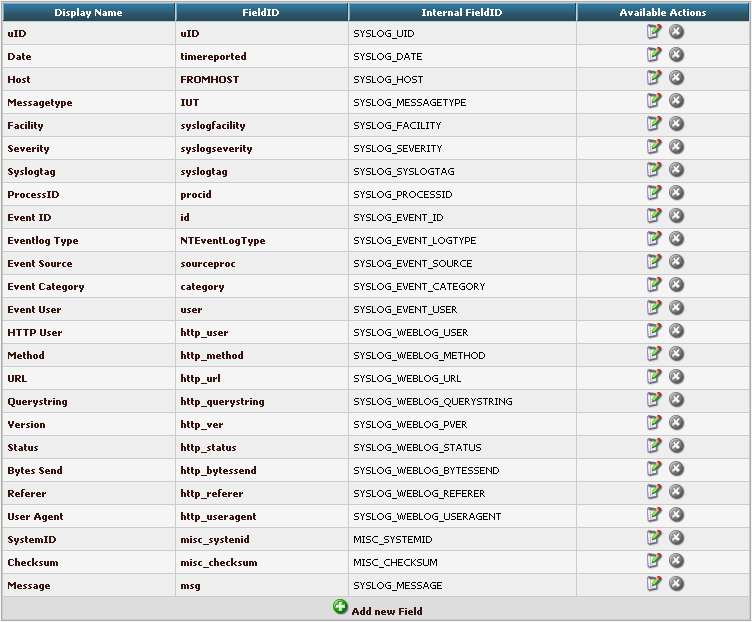
First, we need to add some Fields. We need to do this, so we can use the custom fields in our database with LogAnalyzer. By default, the list of fields only reflects basically the MonitorWare Database Scheme. When clicking on Fields in the Admin Center, a list of the currently available fields will be shown:
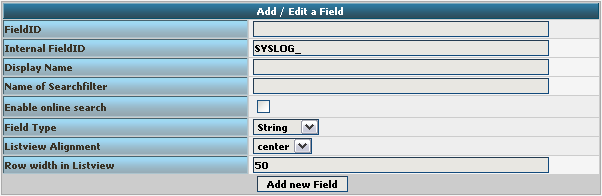
By clicking on Add new Field, we can create a new Field.
We need to create 7 new fields only, though we have 8 custom fields in the table. Since date is the same, we can use the already formatted field. So we only need to create the fields for host, msgnumber, protocol, ipin, ipout, portin and portout.
Basically, the Field details should look like this:
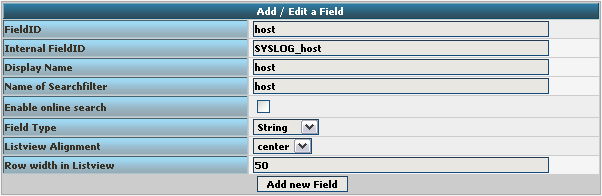
To finally create the Field, click on the button “Add new Field”. Now the list should appear again with the newly created Field. Repeat this step for the other fieldnames as well.
Edit DBMappings
In conjunction with the Fields which are only for the internal use in Adiscon LogAnalyzer, we need to create a custom database mapping. Therefore go to DBMappings in the Admin Center. You will see a list of the currently available database mappings.
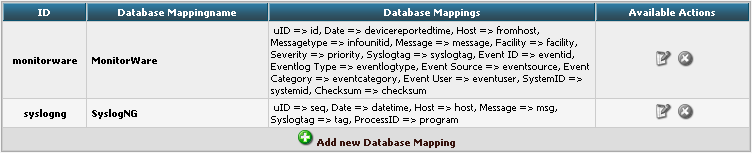
Click on Add new Database Mapping:
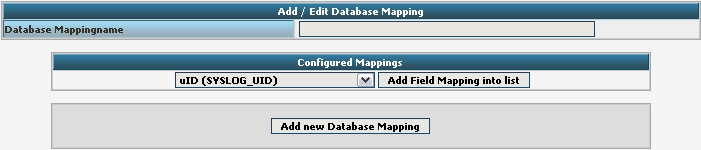
Here we need to tell Adiscon LogAnalyzer, which Field we created depends on which database field. Give your database mapping a name first. After that, choose the Fields we need from the dropdown menu and click on “Add Field Mapping into list”. The final step will be to enter the database field names into the list. It should now look like this now:
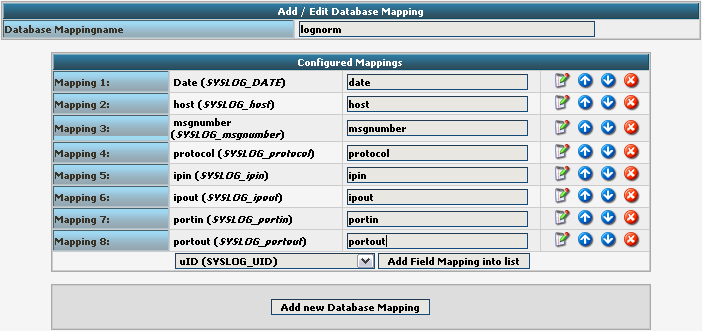
Finally click on “Add new Database Mapping”. This will save the mapping and get you back to the list of DBMappings.

Edit Views
The next step we need to adjust is the Views. In Views you can configure, what LogAnalyzer should show. This is related to the data that is stored in the database. Basically, a View should represent the kind of logs that are stored. For example if you use the View for Windows Event Logs, but have a database where Linux syslog is stored, many Fields will be shown as empty, because they are not filled like from Windows Event Logs. Therefore we need a custom view.
You will get there by clicking on Views in the Admin Center.

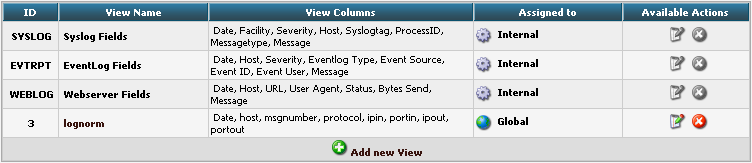
There are already pre-configured Views for Windows EventLog, Syslog and Webserver Logs. We need a completely different View though. A new View can be configured by clicking on “Add new View” at the bottom of the list.
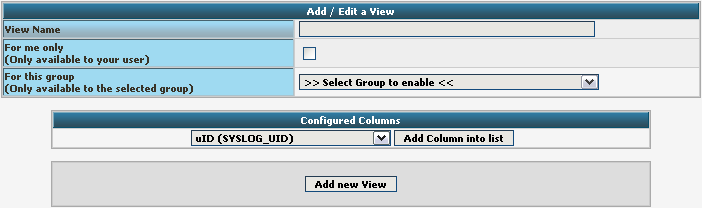
You need to give your view a name. If you want, you can restrict the use of this view to certain users or groups, but we will skip that for now. The most important part is to select the Fields that should be displayed. This is done at “Configured Columns”. Before clicking on “Add new View” it should look like this:
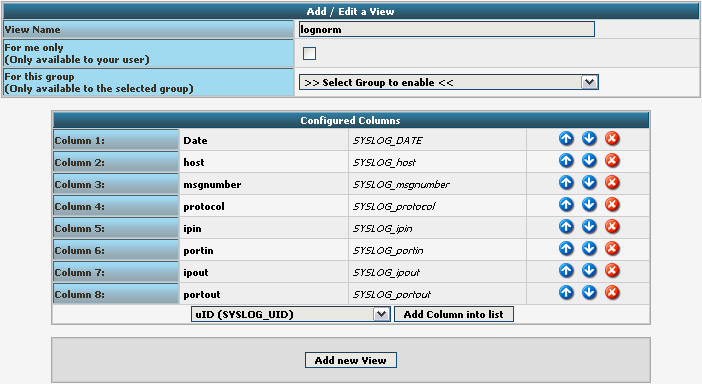
After clicking the button, the new View should appear in our list.
Edit Sources
Finally, we need to create a Source. When installing Adiscon LogAnalyzer, you can already configure a Source. For our example, we need to create another Source. Therefore go to Sources in the Admin Center.

You will see a list of the configured Sources. It currently holds one Source. By clicking on Add new Source you can create another one.
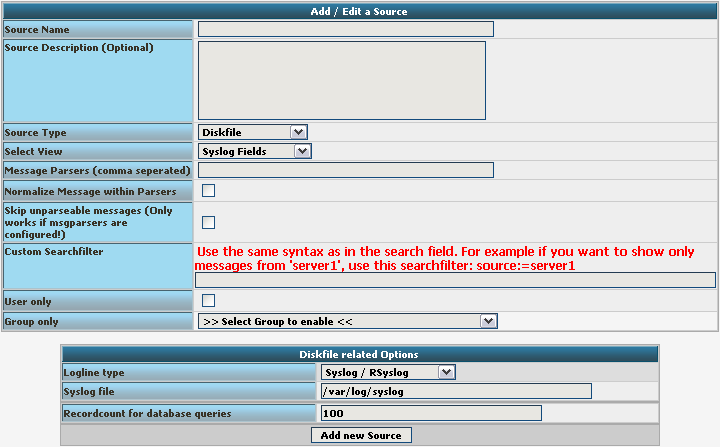
Basically, we need to insert a Source Name. If you want, you can also create a description. Change the Source Type to MYSQL Native. You can also select a default View. Choose our lognorm View we created earlier. No more general options need to be set. If you want, you can again restrict the source to a user or group.
We still need to change the database Type options. As you can see, the fields have changed by setting the Source Type to MYSQL Native. As table type choose the lognorm type we created before. Insert the details as your database needs them. The complete form should look like this now:
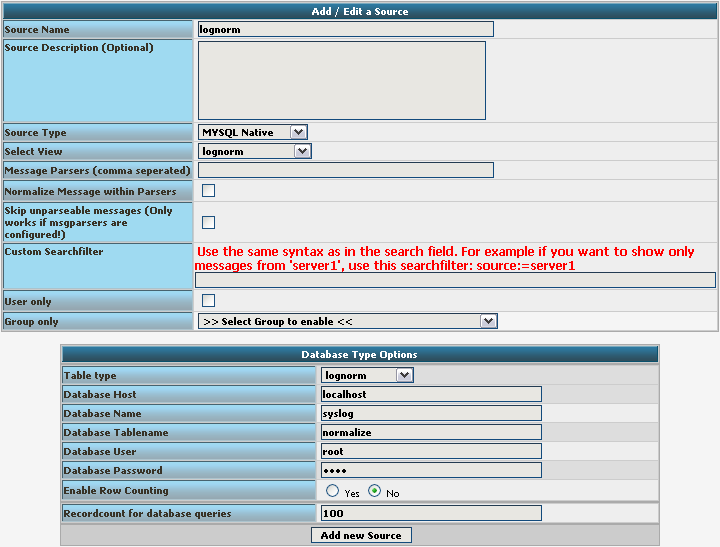
Finish the new Source by clicking on Add new Source. It should now appear in the list.

Final Thoughts
Though this scenario seems very complex it shows in the end how easy some things can be afterwards. This setup shows exactly, how different products from the Adiscon product line can work together. And we have a good example for how normalizing works.
rsyslog 6.1.8 (beta)
Download file name: rsyslog 6.1.8 (beta)
rsyslog 6.1.8 (beta)
md5sum: 45fc3677b6262fdc177bd3560c040531
Author: Rainer Gerhards (rgerhards@adiscon.com)
Version: 6.1.8 File size: 2.3 MB
rsyslog 6.1.8 (beta) released
This release begins the first beta branch for the v6 branch of rsyslog.
Note that the 6.1.7 version, released roughly a month ago was not functionally enhanced since then. We already begun a new branch that will become 6.3.0. So technically, 6.1.7 can be considered beta as well.
As such, we expect a quicker than usual beta cycle for version 6.1.
This release imports some bug fixes done to older versions as well as some minor enhancements (not affecting stability). An update to this version is useful for users of the 6.1 versions, but if you experience no problems, it the update is not urgent.
ChangeLog:
http://www.rsyslog.com/changelog-for-6-1-8-beta/
Download:
http://www.rsyslog.com/rsyslog-6-1-8-beta/
As always, feedback is appreciated.
Best regards,
Tom Bergfeld
Changelog for 6.1.8 (beta)
Version 6.1.8 [BETA] (rgerhards), 2011-05-20
- official new beta version (note that in a sense 6.1.7 was already beta,
so we may release the first stable v6 earlier than usual) - new module mmsnmptrapd, a sample message modification module
- import of minor bug fixes from v4 & v5
rsyslog 5.8.1 (v5-stable) released
This is a maintenance release offering a set of bug fixes. It is suggested that users of the v5-stable branch update to this release.
ChangeLog:
http://www.rsyslog.com/changelog-for-5-8-1-v5-stable/
Download:
http://www.rsyslog.com/rsyslog-5-8-1-v5-stable/
As always, feedback is appreciated.
Best regards,
Tom Bergfeld
rsyslog 5.8.1 (v5-stable)
Download file name: rsyslog 5.8.1 (stable)
rsyslog 5.8.1 (stable)
md5sum: 909d4d867450aeedd6b388c199d79222
Author: Rainer Gerhards (rgerhards@adiscon.com)
Version: 5.8.1 File size: 2.3 MB
Changelog for 5.8.1 (v5-stable)
Version 5.8.1 [V5-stable] (rgerhards), 2011-05-19
- bugfix: invalid processing in QUEUE_FULL condition
If the the multi-submit interface was used and a QUEUE_FULL condition
occured, the failed message was properly destructed. However, the
rest of the input batch, if it existed, was not processed. So this
lead to potential loss of messages and a memory leak. The potential
loss of messages was IMHO minor, because they would have been dropped
in most cases due to the queue remaining full, but very few lucky ones
from the batch may have made it. Anyhow, this has now been changed so
that the rest of the batch is properly tried to be enqueued and, if
not possible, destructed. - new module mmsnmptrapd, a sample message modification module
This can be useful to reformat snmptrapd messages and also serves as
a sample for how to write message modification modules using the
output module interface. Note that we introduced this new
functionality directly into the stable release, as it does not
modify the core and as such cannot have any side-effects if it is
not used (and thus the risk is solely on users requiring that
functionality). - bugfix: rate-limiting inside imuxsock did not work 100% correct
reason was that a global config variable was invalidly accessed where a
listener variable should have been used.
Also performance-improved the case when rate limiting is turned off (this
is a very unintrusive change, thus done directly to the stable version). - bugfix: $myhostname not available in RainerScript (and no error message)
closes: http://bugzilla.adiscon.com/show_bug.cgi?id=233 - bugfix: memory and file descriptor leak in stream processing
Leaks could occur under some circumstances if the file stream handler
errored out during the open call. Among others, this could cause very
big memory leaks if there were a problem with unreadable disk queue
files. In regard to the memory leak, this
closes: http://bugzilla.adiscon.com/show_bug.cgi?id=256 - bugfix: doc for impstats had wrong config statements
also, config statements were named a bit inconsistent, resolved that
problem by introducing an alias and only documenting the consistent
statements
Thanks to Marcin for bringing up this problem. - bugfix: IPv6-address could not be specified in omrelp
this was due to improper parsing of “:”
closes: http://bugzilla.adiscon.com/show_bug.cgi?id=250 - bugfix: TCP connection invalidly aborted when messages needed to be
discarded (due to QUEUE_FULL or similar problem) - bugfix: $LocalHostName was not honored under all circumstances
closes: http://bugzilla.adiscon.com/show_bug.cgi?id=258 - bugfix(minor): improper template function call in syslogd.c
legacy options support
Via the compatibility mode option (-c), rsyslog still supports legacy options (like -t to start a tcp listener). This code complicates a couple of things quite a bit, especially in regard to the config system.
We are very tempted to drop support for legacy options in v6. That could lead to smaller and simpler code. Also, we think it is acceptable that someone running v6 finally moves away from the sysklogd/rsyslog v1 style of configuration via command line options.
We also noticed that the average user seems to have problems identifying where each distro places the actual call to rsyslogd, so users seem to prefer configuring all options inside the main configuration file (what we tend to think to be more useful as well).
Does anyone has a good argument why to retain the legacy support in v6? If so,please make yourself heard, because otherwise we’ll probably drop that support.
Best regards,
Rainer Gerhards
Why does imuxsock not work on Solaris?
When configuring rsyslog on Solaris, you might not be able to use imuxsock. When starting rsyslog, the following message will appear if imuxsock is configured:
rsyslogd: imuxsock does not run because we could not aquire any socket
The reason is, that imuxsock can be used to monitor unix sockers, but it does not monitor the system log “socket” from Solaris, because it works in a different way. Instead of loading the imuxsock module in your rsyslog.conf you must use imsolaris. You only need to load imuxsock if you want to monitor other unix sockets.