rsyslog 7.2.6 (v7-stable) released
We have just released 7.2.6 of the v7 stable branch. This is a pure bug-fixing release that addresses some critical bugs. More information on the changes can be found in the ChangeLog.![]()
![]() Continue reading “rsyslog 7.2.6 (v7-stable) released”
Continue reading “rsyslog 7.2.6 (v7-stable) released”
rsyslog 7.2.6 (v7-stable)
Download file name: rsyslog 7.2.6 (stable)
rsyslog 7.2.6 (stable)
sha256 hash: 19a5c60816ebce6c86468eb8c5fe1c4cc1febf23c9167ce59d2327fe5e047ed9
Author: Rainer Gerhards (rgerhards@adiscon.com)
Version: 7.2.6 File size: 2.713 MB
Changelog for 7.2.6 (v7-stable)
Version 7.2.6 [v7-stable] 2013-03-05
- slightly improved config parser error messages when invalid escapes happen
- bugfix: include files got included in the wrong order
closes: http://bugzilla.adiscon.com/show_bug.cgi?id=411
This happens if an $IncludeConfig directive was done on multiple files (e.g. the distro default of $IncludeConfig /etc/rsyslog.d/*.conf). In that case, the order of include file processing is reversed, which could lead to all sorts of problems.
Thanks to Nathan Stratton Treadway for his great analysis of the problem, which made bug fixing really easy. - bugfix: omelasticsearch failed when authentication data was provided … at least in most cases it emitted an error message:
“snprintf failed when trying to build auth string”
Thanks to Joerg Heinemann for alerting us.
closes: http://bugzilla.adiscon.com/show_bug.cgi?id=404 - bugfix: some property-based filter were incorrectly parsed
This usually lead to a syntax error on startup and rsyslogd not actually starting up. The problem was the regex, which did not care for double quote characters to follow in the action part – unfortunately something that can frequently happen with v6+ format. An example:
:programname, isequal, “as” {action(type=”omfile” …) }
Here, the part
:programname, isequal, “as” {action(type=”omfile”
was treated as the property filter, and the rest as action part. Obviously, this did not work out. Unfortunately, such situations usually resulted in very hard to understand error messages.
Using MongoDB with rsyslog and LogAnalyzer
In this scenario we want to receive cee-formatted messages from a different system with rsyslog, store the messages with MongoDB and then display the stored messages with Adiscon LogAnalyzer. This is a very common use-case. Please read through the complete guide before starting.
We will split this guide in 3 main parts. These parts can consist of several steps.
- Setting up rsyslog
- Setting up MongoDB
- Setting up LogAnalyzer
This guide has been created with rsyslog 7.3.6 on ubuntu 12.04 LTS and Adiscon LogAnalyzer 3.6.3. All additional packages, services or applications where the latest version at that time.
Before you begin
Please note, there are many ways to distribute rsyslog. But, make sure that the platform you build rsyslog on is the same platform as where it should be used. You cannot build rsyslog on CentOS and use it on Ubuntu. The differences between the platforms are just to big. The same applies to different versions of the same platform. When building on a older platform and using it on a newer version, this may work, but with restrictions. Whereas building on a newer version and using it on a older version will probably not work at all. So, if you build rsyslog from Source and want to use it on another machine, make sure the platform is the same.
Step 1 – Setting up rsyslog
We need to setup rsyslog first. Not only do we need the core functionality, but several additional modules. For this case we want to receive the syslog messages via TCP, thus we need imtcp. For processing we need first mmjsonparse and ommongodb. Your configure should look like this.
./configure --prefix=/usr --enable-imtcp --enable-mmjsonparse --enable-ommongodb
The module mmjsonparse will be needed to verify and parse the @cee messages. Ommongodb will be used to write into the MongoDB. After the configure and installation, we can create our config. The config for our case looks like this:
module(load="imtcp")
module(load="mmjsonparse")
module(load="ommongodb")
input(type="imtcp" port="13514" Ruleset="mongodb")
template(name="mongodball" type="subtree" subtree="$!")
ruleset(name="mongodb") {
        action(type="mmjsonparse")
        if $parsesuccess == "OK" then {
                set $!time = $timestamp;
                set $!sys = $hostname;
                set $!procid = $syslogtag;
                set $!syslog_fac = $syslogfacility;
                set $!syslog_sever = $syslogpriority;
                set $!pid = $procid;
                action(type="ommongodb" server="127.0.0.1" db="logs" collection="syslog" template="mongodball")
                }
        }
As always, we first load the modules. The next part is the input. We need to receive tcp via imtcp. Please note, that we directly bind the input to a ruleset. The third part of the configuration is a template. We need it later when writing to MongoDB. Since we will automatically transform our @cee-message into json, we can use a subtree template. The template itself is basically the root of the subtree.
The last and most important part is the ruleset. Here all of our work is done. First, all messages are run through the mmjsonparse module. This will not only verify if we received a valid json message, but also transforms all the values into a json subtree. If the parsing was successful, we need to set several variables for the subtree. Information that is delivered in the syslog header will not be parsed into the subtree by mmjsonparse automatically. Thus we have to set subtree variables with the values of some default properties like timestamp, hostname and so on. After that we have basically all information from the complete syslog message in the subtree format. Finally a last action is needed. We need to write our log messages to MongoDB. In this example, MongoDB is installed on the same machine. We want to use the db “logs” and as collection we want to use “syslog”. And we use our subtree template to define the format that is written to MongoDB. Thus, all our parsed variables are stored separately. If we do not use this template, the @cee message gets written as it is into the msg field in MongoDB. But this is not what we want. We want all variables to be available separately.
That is basically it for rsyslog. You can now save the configuration and restart rsyslog. Though it won’t be able to be useful yet. We still need to install MongoDB.
Step 2 – Install MongoDB
Making a basic install for MongoDB is rather easy. Simply install the following packages:
mongodb
mongodb-server
php-pecl-mongo
libmongo-client
libglib2.0-dev
Please note, that package names may vary for different distributions.
After we have installed the packages, the MongoDB Server is already ready. By default, it is not secured by a user or password. Refer to the MongoDB manual for more information. Databases and collections (equivalent to tables) are created by rsyslog and do not need to be defined with the mongo shell. We will stick with the default setup to keep it simple.
Step 3 – Installing Adiscon LogAnalyzer
To run Adiscon LogAnalyzer, you need a webserver with PHP. The easiest way is to use apache2 and php5. To be able to access the MongoDB, we need to install an additional package. Run the following command
sudo pecl install mongo
You might need to install the package php-pear first, if it hasn’t been installed already with PHP.
After that, we need to put the following line into the file php.ini.
extension=mongo.so
Remember to restart your webserver after making changes to the php.ini. Without a lot of configuration, this should aready work.
We can now install Adiscon LogAnalyzer. Download the latest version from the Adiscon LogAnalyzer Download page and install it as it is described in the documentation.
The only difference we need to make is when setting up the log source in step 4.5. You need to set at least the following as shown in the screenshot:

Source Type: MongoDB Native
Table Type: MongoDB
Database Name: logs
Database Tablename: syslog
Database user: <clear this field>
The User and Password is of course needed, if you set it in your MongoDB setup.
After you have finished the installation of Adiscon LogAnalyzer, you should now be seeing the LogAnalyzer overview and the log messages in a table view (if you have already stored them in MongoDB). Now if you click on a specific message, you get to see the detail view of the log message.
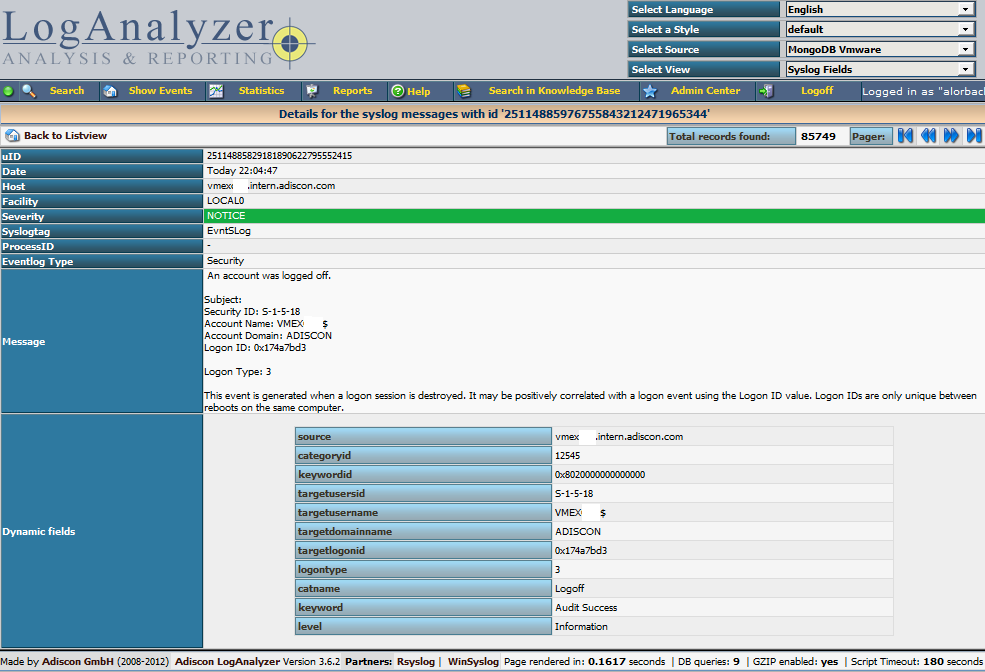
Click on the picture for a bigger size
As you can see, you get a list of dynamic fields. These fields where already sent in @cee format from the original source and were parsed by rsyslog and mmjsonparse and finally they were automatically filled into the MongoDB.
With this setup, you are independent of a fixed database structure. Fields are inserted dynamically into the database as they are available and they are dynamically display by Adiscon LogAnalyzer as well.
How can I check the config?
We have often seen the case, that someone has rsyslog running and makes changes to the configuration. And usually, after making the changes, rsyslog gets restarted, but the changed config is invalid. rsyslog has a function to check the configuration for validity. This can be done very easily by invoking this command:
rsyslogd -N1
(Note that rsyslogd may not be in your search path – then it usually is found in /sbin/rsyslogd)
This tells rsyslog to do a config check. It does NOT run in regular mode, but just check configuration file correctness. This option is meant to verify a config file. To do so, run rsyslogd interactively in foreground, specifying -f <config-file> and -N level. The level argument modifies behaviour. Currently, 0 is the same as not specifying the -N option at all (so this makes limited sense) and 1 actually activates the code.
This configuration check will only check the configuration for integrity like syntax. Additionaly, the modules will be loaded to make sure that they work properly. On the downside, since the engine will not be loaded, errors with permissions or alike cannot be checked. These will occur only when running rsyslog normally.
The verdict for this option is, that it is quite useful for a first check if the changes were correct, without running the configuration in live mode. This might help to prevent that rsyslog gets restarted with a basically wrong configuration and thus rendering rsyslog useless, because it might not work or not work properly.
Modern syslogd Design (rsyslog)
In this (~5 minutes) Video Rainer Gerhards describes the core elements of a modern syslogd (like rsyslog) and how they enable the capability to evolve logging without loosing backwards compatibility. Continue reading “Modern syslogd Design (rsyslog)”
rsyslog 7.3.6 (v7-devel)
Download file name: rsyslog 7.3.6 (devel)
rsyslog 7.3.6 (devel)
sha256 hash: 1dd904459de0aaacf83d7d164caf419ba41fa6936a193e03ba57410b844d422b
Author: Rainer Gerhards (rgerhards@adiscon.com)
Version: 7.3.6 File size: 2.680 MB
rsyslog 7.3.6 (v7-devel) released
The 7.3.6 release contains a number of performance enhancements as well as some functional enhancements and bug fixes.
ChangeLog:
http://www.rsyslog.com/changelog-for-7-3-6-v7-devel/
Download:
http://www.rsyslog.com/rsyslog-7-3-6-v7-devel/
As always, feedback is appreciated.
Best regards,
Tim Eifler
Changelog for 7.3.6 (v7-devel)
Version 7.3.6 [devel] 2013-01-28
- greatly improved speed of large-array [N]EQ RainerScript comparisons
Thanks to David Lang for a related discussion that inspired the idea
to do this with a much simpler (yet sufficient) approach than orignally
planned for. - greatly improved speed of DNS cache for large cache sizes
- general performance improvements
- omfile: added stats counters for dynafile caches
- omfile: improved async writing, finally enabled full async write
also fixed a couple of smaller issues along that way - impstats: added ability to write stats records to local file
and avoid going through the syslog log stream. syslog logging can now
also be turned off (see doc for details). - bugfix: imklog issued wrong facility in error messages
…what could lead to problems in other parts of the code - fix compile problem in imklog
- added capability to output thread-id-to-function debug info
This is a useful debug aid, but nothing of concern for regular users.
How to use the Ubuntu repository
The Adiscon Ubuntu Repository has been setup to provide support for the latest rsyslog versions on Ubuntu 12 including support for necessary third party packages. Please note that the Ubuntu Repository is open for testing at the moment, and contains only the latest version for v7-devel. The new packages are based in the original and latest Ubuntu 12 rsyslog packages, so in most cases an simple sudo apt-get update && sudo apt-get upgrade will be enough to update rsyslog. Please note that these packages are currently experimental. Use at your own risk.
To use our repository, follow these steps:
Install our PGP Key into your apt system
sudo apt-key adv --recv-keys --keyserver keyserver.ubuntu.com AEF0CF8E
Edit your /etc/apt/sources.list and add these lines to the end
# Adiscon repository
deb http://ubuntu.adiscon.com/v7-devel precise/
deb-src http://ubuntu.adiscon.com/v7-devel precise/
Once done perform these commands to update your apt cache and install the latest rsyslog version
sudo apt-get update && sudo apt-get upgrade
If you receive a message like this while upgrading follow these steps below:
The following packages have been kept back:
rsyslog
0 upgraded, 0 newly installed, 0 to remove and 1 not upgraded.sudo apt-get install rsyslog
We highly appriciate any feedback or bug reports.
The newest information will be available on the Ubuntu Repository project page.