How to use rsyslog and MongoDB
rsyslog is since version 6.1.3 capable of using a output module called “ommongodb” to write log messages to mongodb. To achieve this, several packages are needed:
mongodb
mongodb-server
php-pecl-mongo
libmongo-client
libglib2.0-dev
These and of course rsyslog are needed. The packages are easily installed via a package manager. And the installation steps for rsyslog are the usual ones. Except for the “Configure”. Please make sure to include “–enable-ommongodb“. And the other features you plan to use of course.
./configure --libdir=/usr/lib --sbindir=/usr/sbin --enable-ommongodb
make
make install
After this, you need to make some adjustments to the rsyslog.conf. You need to load the module of course and configure an action:
module (load="ommongodb")
*.* action(type="ommongodb" server="127.0.0.1")
In this case we send everything to the local MongoDB server. With the default settings, this should work directly. No username or password is needed if it isn’t configured in MongoDB. And the “db” and “collection” will automatically be created. The default database that rsyslog will use is “syslog” and the default name for the collection is “log“. These can be changed by various parameters.
To review what is written to the database, simply open a command line and enter “mongo“. This is to open the MongoDB Shell. You now need to change the database that is used with
use syslog
That way all further commands will be used on the database that rsyslog uses. Next we let the shell show us the entries:
db.log.find()
Please make sure to use the exact command. Of course there are a lot of other commands that you may find useful. Or information on how to secure the database. Please refer to the MongoDB documentation for that.
Changelog for 6.3.10 (v6-beta)
Version 6.3.10 [BETA] 2012-06-04
- bugfix: delayble source could block action queue, even if there was disk queue associated with it. The root cause of this problem was that it makes no sense to delay messages once they arrive in the action queue – the “input” that is being held in that case is the main queue worker, what makes no sense.
Thanks to Marcin for alerting us on this problem and providing instructions to reproduce it. - bugfix: invalid free in imptcp could lead to abort during startup
- bugfix: if debug message could end up in log file when forking if rsyslog was set to auto-background (thus fork, the default) and debug mode to stdout was enabled, debug messages ended up in the first log file opened. Currently, stdout logging is completely disabled in forking mode (but writing to the debug log file is still possible). This is a change in behaviour, which is under review. If it causes problems to you, please let us know.
Thanks to Tomas Heinrich for the patch. - bugfix: –enable-smcustbindcdr configure directive did not work
closes: http://bugzilla.adiscon.com/show_bug.cgi?id=330
Thanks to Ultrabug for the patch. - bugfix: made rsyslog compile when libestr ist not installed in /usr
Thanks to Miloslav Trmač for providing patches and suggestions
Edition Comparison
Edition Comparison
RSyslog Windows Agent comes in different editions so that you can tailor it to your exact needs. This page here helps you decide which edition is best for your needs. Please note that the licensing is per machine this means you need a license for every device where you install the RSyslog Windows Agent.
Please see the feature sheet below to learn on the different product
capabilities.
| Feature | Basic ($/€ 55) | Professional ($/€ 79) | Enterprise ($/€ 109) |
| Monitoring Services |
| Syslog Server |  | ||
| RFC 3195 compliant Syslog Server | | ||
| Event Log Monitor | | | |
| Advanced Eventlog Clearing Options | | | |
| Text File Monitor | | | |
| Remote Text File Monitor licenses | 0 | 10 | unlimited |
| Heartbeat | | | |
| MonitorWare Echo Reply | | | |
| Actions |
| Syslog Forwarder | | | |
| RFC 3195 compliant Syslog Forwarder | | | |
| Send RELP | | | |
| Property Modification | | | |
| Status Modification | | | |
| Call Another RuleSet | | | |
| Discard | | | |
| Filtering |
| Flexible Rule Engine | | | |
| Multiple Conditions | | | |
| Unlimited Actions per Event | | | |
| Unlimited Rules per Rule Set | | | |
| Unlimited Rule Sets | | | |
| Add-On Support |
| 64 bit ready | | | |
| Available Support & Service Packages |
| Free Online Support Forum | | | |
| Free email support | | | |
| SupportIncidents | | | |
| Custom Development | | | |
| UpgradeInsurance (inludes email priority support) | | | |
Questions remaining? No problem: just contact us via the Customer Service System!
Using TLS for receiving log messages
In this guide, we want to describe, how to use the RSyslog Windows Agent with TLS encrypted syslog. This specific part will describe the setup steps for receiving syslog from a Linux rsyslog installation. First, as a preliminary, you should read the guide from the rsyslog documentation for “Encrypting Syslog Traffic with TLS (SSL)”. It describes in details the overall setup, how certificates are generated and how the clients and server need to be set. It is strongly suggested to be read as a whole.
Since we will receive syslog messages via TLS and we can only forward messages via syslog (with TLS or without) the whole setup will basically resemble what we described in our guide for a syslog relay. Therefore, we will only show how to setup the syslog service.
Step 1: Machine certificates
The easiest way to create the machine certificates is as described in the Linux guide above. So please create a machine certificate as described here: Generating Machine Certificates
Please provide your Windows machine with those certificates. Make sure, that they are safe and cannot get into someones’ hands.
Step 2: Setting up the ruleset and action.
Usually we start by creating the ruleset, rule and action. The reason lies in the configuration structure. So we will first create the mentioned items. In the end, we will have a basic rule with no particular filter and a forward via syslog action. That means, that all messages will be forwarded to a central host.
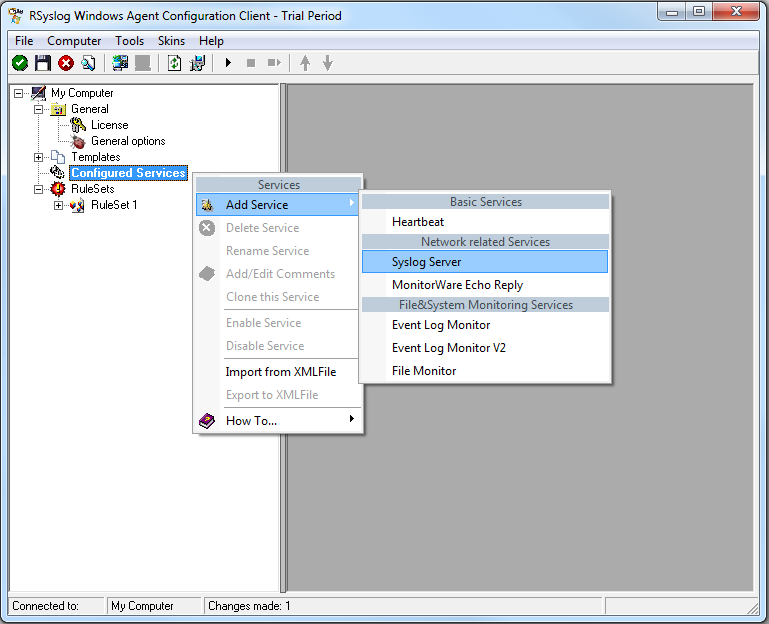
Step 3: Create a Syslog Server Service
Now we need to create a syslog server service.
To create it, right click on “Services”, then select “Add Service” and the “Syslog Server”:
Once you have done so, a new wizard starts:
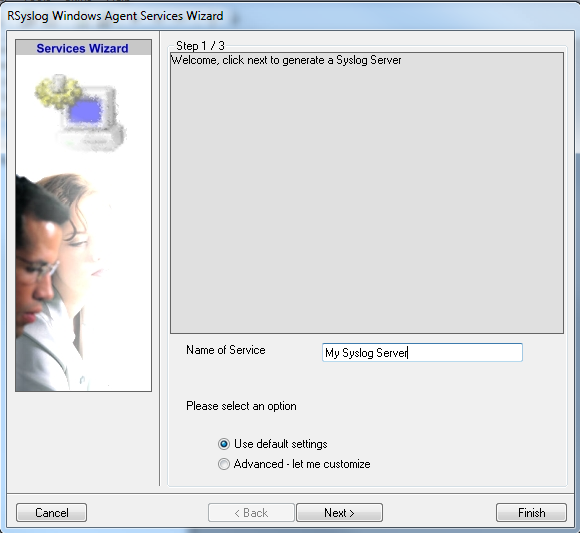
Again, you can use either the default name or any one you like. We will use “My Syslog Server” in this example. Leave the “Use default settings” selected and press “Next”:
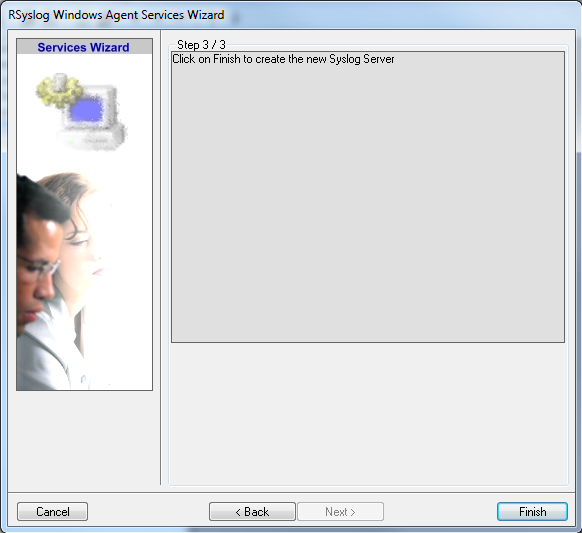
As we have used the default, the wizard will immediately proceed with step 3, the confirmation page. Press “Finish” to create the service. The wizard completes and returns to the configuration client. There, you will see the newly created service beneath the “Services” part of the tree view:
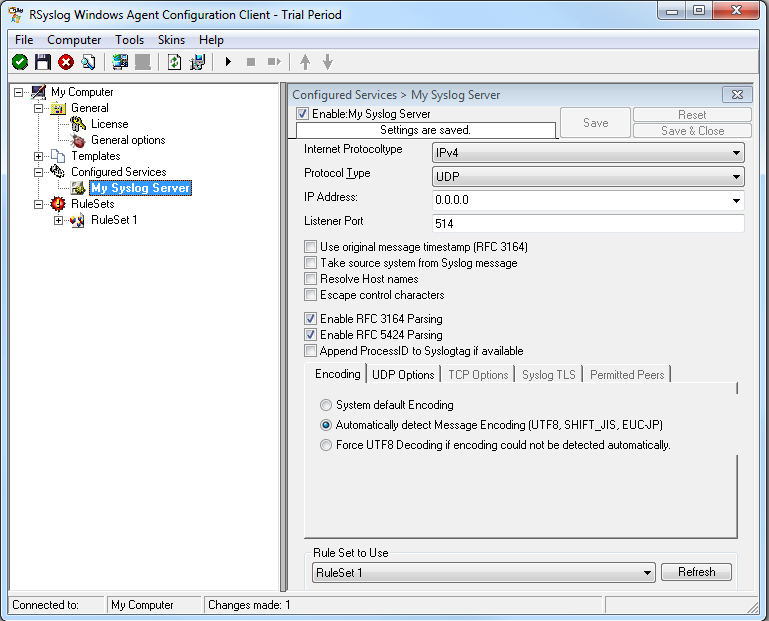
As you can see, the service has been created with the default parameters. As such, it operates as a RFC compliant standard Syslog server. But, we still need to make some changes so we can receive TLS syslog.
Step 4: Changing to TLS
First we need to change the protocol type. Change it to TCP. TLS syslog is not available with UDP. If you want, you can change the port to what your clients use for sending.
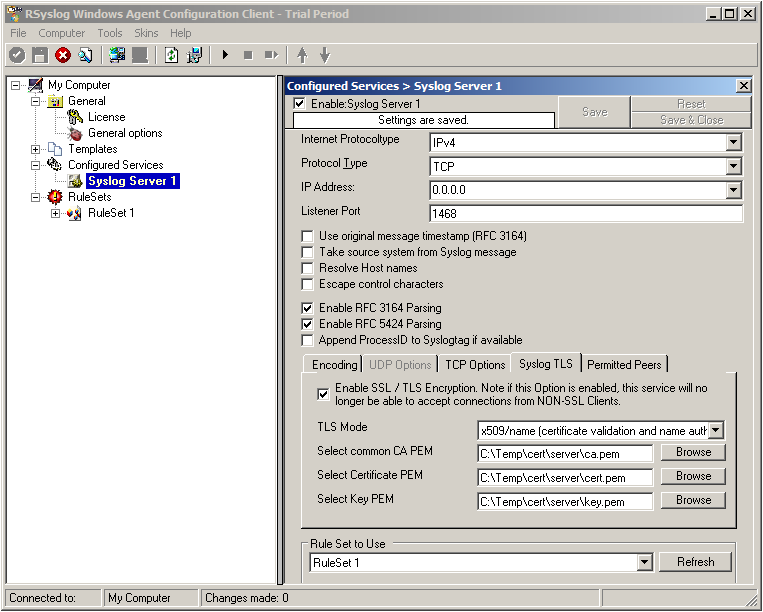
Now in the lower part of the configuration window click on the tab Syslog TLS. This is where the important TLS settings will be made.
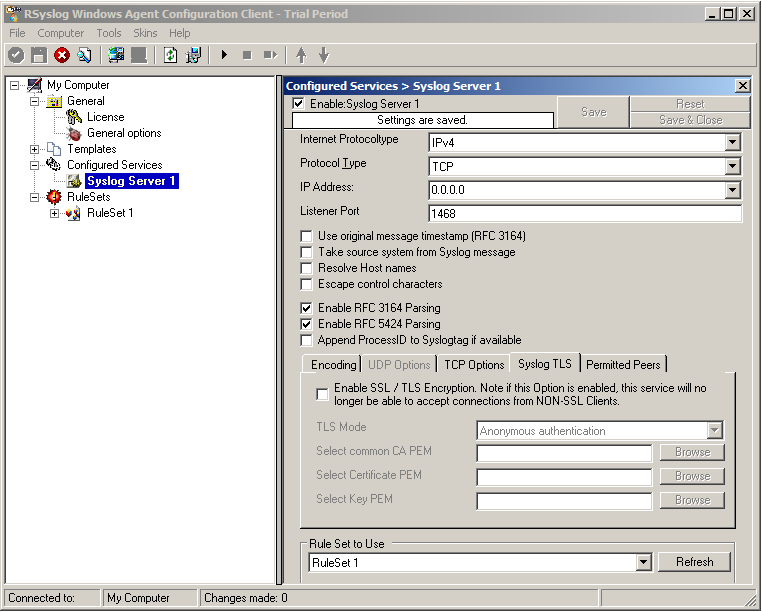
Now check the box for “Enable SSL / TLS Encryption”. The other options become available now. We suggest using x509/name mode, which is obviously the most secure of the available modes.
Below, select your PEMs that you created in Step 1 and submitted to the machine. It should look something like this, though your paths and certificate names might be different.
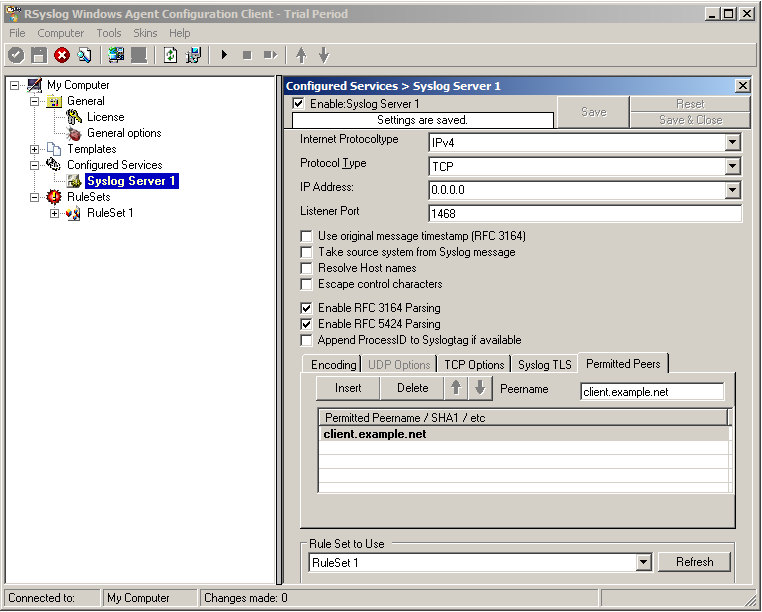
Now we can go on to the Permitted Peers tab. Here we define the systems that are allowed to send their syslog messages to our relay host. You could also use wildcards for the peers, like *.example.net. Just look below:
That is basically what we need to set up when receiving syslog via TLS.
Final Thoughts
That is just the setup need for receiving syslog via TLS in RSyslog Windows Agent. This is, as we already mentioned before, for a setup where the RSyslog Windows Agent is used as a relay. You could also apply TLS syslog to the outgoing syslog traffic, but that is not what we wanted to show here.
Forward Windows Eventlogs with RSyslog Windows Agent
This article will describe, how to use the RSyslog Windows Agent to forward the local Windows EventLog messages. This article will show the different steps. For this we take you to several smaller guides, that show you, how to setup each part. We assume, that no basic configuration is currently available.
A configuration like this is needed very often and basically on any Windows machine that should forward it’s logs. Therefore, this reflects the default configuration after installing the RSyslog Windows Agent. It can be used on machines in your local network or on a site to forward from the single machines to a central relay server, which then forwards all messages to your company’s central log server.
Basically, the configuration of RSyslog Windows Agent consists of 3 parts.
1. A so-called service which generates the log data to be processed by, for example, polling the Windows EventLog.
2. Rules with Filters. Filters give you the power to decide which log messages are important enough to be kept or not.
3. The action that has to be taken. In our case, forwarding the syslog messages.
Step 1: Setting up the ruleset and action.
Usually we start by creating the ruleset, rule and action. The reason lies in the configuration structure. So we will first create the mentioned items. In the end, we will have a basic rule with no particular filter and a forward via syslog action. That means, that all messages will be forwarded to a central host.
Step 2: Setting up the service.
Now we will set up the service. There is one thing to mention first. You need to know choose one of the latter links according to your operating system. This is important, or the setup might not work properly. We have 2 different versions of the EventLog Monitor. Here is a small list in which you can see, which service fits which operating systems.
1. EventLog Monitor: 2000, XP, 2003
2. EventLog Monitor V2: Vista, 2008, 7, 10
This is important. EventLog Monitor V2 will NOT work on the older operating systems. In contrary, the older EventLog Monitor will work on the newer systems, but might not work correctly, so it is advised to used the optimized EventLog Monitor V2. This is due to the massive changes that Microsoft introduced to the EventLog system with Vista.
That’s it, you are already finished. Easy wasn’t it? Now you should receive your EventLog messages on your central syslog server.
Sending messages with tags larger than 32 characters
The relevant syslog RFCs 3164 and 5424 limit the syslog tag to 32 characters max. Messages with larger tag length are malformed and may be discarded by receivers. Anyhow, some folks sometimes need to send tags longer than permitted.
To do so, a new template must be created and used when sending. The simplest way is to start with the standard forwarding template. The standard templates are hardcoded inside rsyslog. Thus they do not show up in your configuration file (but you can obtain them from the source, of course). In 5.8.6, the forwarding template is defined as follows:
template (name="ForwardFormat" type="string" string="<%PRI%>%TIMESTAMP:::date-rfc3339% %HOSTNAME%
%syslogtag:1:32%%msg:::sp-if-no-1st-sp%%msg%")
NOTE: all templates are on one line in rsyslog.conf. They are broken here for readability.
This template is RFC-compliant. Now look at the part in red. It specifies the tag. Note that, via the property replacer, it is restricted to 32 characters (from position 1 to position 32 inclusive). This is what you need to change. To remove the limit … just remove it ;-) This leads to a template like this:
template (name="LongTagForwardFormat" type="string" string="<%PRI%>%TIMESTAMP:::date-rfc3339% %HOSTNAME%
%syslogtag%%msg:::sp-if-no-1st-sp%%msg%")
Note that I have renamed the template in order to avoid conflicts with build-in templates. As it is a custom template, it is not hardcoded, so you need to actually configure it in your rsyslog.conf. Then, you need to use that template if you want to send messages to a remote host. This can be done via the usual way. Let’s assume you use legacy plain TCP syslog. Then the line looks as follows:
action(type="omfwd"
Target="server.example.net"
Port="10514"
Protocol="tcp"
Template="LongTagForwardFormat"
)
This will bind the forwarding action to the newly defined template. Now tags of any size will be forwarded. Please keep in mind that receivers may have problems with large tags and may truncate them or drop the whole message. So check twice that the receiver handles long tags well.
Rsyslog supports tags to a build-defined maximum. The current (5.8.6) default is 511 characters, but this may be different if you install from a package, use a newer version of rsyslog or use sources obtained from someone else. So double-check.
Using rsyslog mmnormalize module effectively with Adiscon LogAnalyzer
Using the mmnormalize module in rsyslog is a bit complicated at first. We want to describe in this article how to set up the basic components for using log normalization. In addition to that we will show how to configure these components so messages will be split into pieces of information. These pieces of information should then be written into a database for review with Adiscon LogAnalyzer.
This guide has been tested with rsyslog v5.8.0 and liblognorm 0.3, libee 0.3.
The goal of this guide is to have a setup, that will have a message parsed by the normalizing tool, put some content of the message into specific properties. These properties will then be filled into a special database format, which will should be reviewed by Adiscon LogAnalyzer.
For using normalization we need the following:
- rsyslog
- liblognorm
- libee
- libestr
In the further process of the article we need additional elements:
- apache webserver with PHP5
- mysql database (usually with phpmyadmin)
- Adiscon LogAnalyzer
Step 1: Setting up rsyslog and log normalization
First of all we need to setup rsyslog for log normalization. So before installing rsyslog, we will install liblognorm, libee and libestr. They can be installed according to this guide. rsyslog can now be installed. We assume you have downloaded and extracted a tarball from the rsyslog download page. Change into the directory you installed rsyslog in. Now use the following commands to setup rsyslog correctly:
./configure --libdir=/lib --sbindir=/sbin --enable-mysql --enable-mmnormalize
make
make install
If everything is correct, the installation procedure should complete successfully. We can now start configuring rsyslog itself. We need a configuration that looks like this:
$ModLoad immark
$ModLoad imuxsock
$ModLoad imklog
$ModLoad mmnormalize
$ModLoad ommysql.so
$ModLoad imudp.so
$UDPServerRun 514
$mmnormalizeUseRawMSG 1
$mmnormalizeRuleBase /rsyslog/rulebase.rb
*.* :mmnormalize:
$template database,"insert into normalized (date, uhost, msgnumber, protocol, ipin, ipout, portin, portout)
values ('%$!date%', '%$!uhost%', '%$!msgnumber%', '%$!protocol%', '%$!ipin%', '%$!ipout%', '%$!portin%',
'%$!portout%')",SQL
*.* :ommysql:172.19.3.17,syslog, test, test;database
That is all for our rsyslog config. Looks pretty complicated right now. Basically, we load all necessary modules at the top. After that we start the UDP syslog server. It is needed to receive the messages. The next 3 lines are the parameters to initiate the normalization of messages. We declare, that the raw message should be used. Our rulebase for the normalization lies in the rsyslog directory (this path has to be changed if your directory lies somewhere else). And after that, we tell rsyslog to use normalization on all messages. The next line describes the template for the processed message. In the end, there should be a sql insert statement that puts all the parsed variables into their corresponding fields in the table “normalized”. The last line is finally the action that makes rsyslog write all messages (the ones created by the template – the sql statement – into a remote database.
After the configuration, we still need to setup a rulebase. This is done in a separate file. For our example, the rulebase should be the following file: /rsyslog/rulebase.rb
The file should look like this:
rule=:%date:date-rfc3164% %uhost:word% %tag:word%  %notused:char-to:x3a%: %msgnumber:char-to:x3a%: access-list
inside_access_in permitted %protocol:word% inside/%ipin:ipv4%(portin:number%) ->
outside/%ipout:ipv4%(portout:number%) %notused2:char-to:]%]
The rule is basically one line. It might be shown otherwise here due to restrictions of the webdesign. It is basically a format of a message. The different parameters of a rule are shown in a different guide. The rule we have here should resemble the following message:
May 16 07:23:09 BHG-FW : %ASA-4-106100: access-list inside_access_in  permitted tcp inside/10.200.22.183(2969) ->
outside/67.192.232.82(80)  hit-cnt 1 first hit [0x48e9c345, 0x386bad81]
If you want to have multiple messages, where the format differs, you need multiple rules as well of course. The rules must be as precise as possible to resemble the message. If a message does not fit any listed rules, it will not be processed further. Something else that needs to be pointed out, is to keep the rules variable enough as well. Like in our example, there are some parts that will be the same for every message of this kind. Other parts might be with different content. And even if we do not need the content further, it should be put into a variable. Else the message might again not fit to the rule.
Step 2: Setting up the database
We suppose, that you already have a server with a database and webserver installed. The installation of the components has to be made according to the instructions given by the manufacturer of the software. Therefore we cannot give any examples for that.
But we need a specific database scheme for our example here. So we need to show this at least. As you have seen before, we have some specific parts of the message filled into properties. These properties should be written to the database. So here is the basic SQL statement to create the table according to our needs:
CREATE TABLE normalize
(
ID int unsigned not null auto_increment primary key,
date datetime NULL,
host varchar(255) NULL,
msgnumber varchar(20),
protocol varchar(60) NULL,
ipin varchar(60) NULL,
ipout varchar(60) NULL,
portin int NULL,
portout int NULL
)
You can execute this statement as you like. It is currently designed for a MySQL database, so you might need to change some bits if you are using a different database.
3. Using Adiscon LogAnalyzer with this database
Adiscon LogAnalyzer can be used to review the data from this database. Installation of Adiscon LogAnalyzer is shown here. Please note, that we will need the admin center. So please think of creating a user database when installing.
Point your browser to your Adiscon LogAnalyzer installation. Now we need to go to the admin center. There we have to set some parts to fit our custom format.
Edit Fields
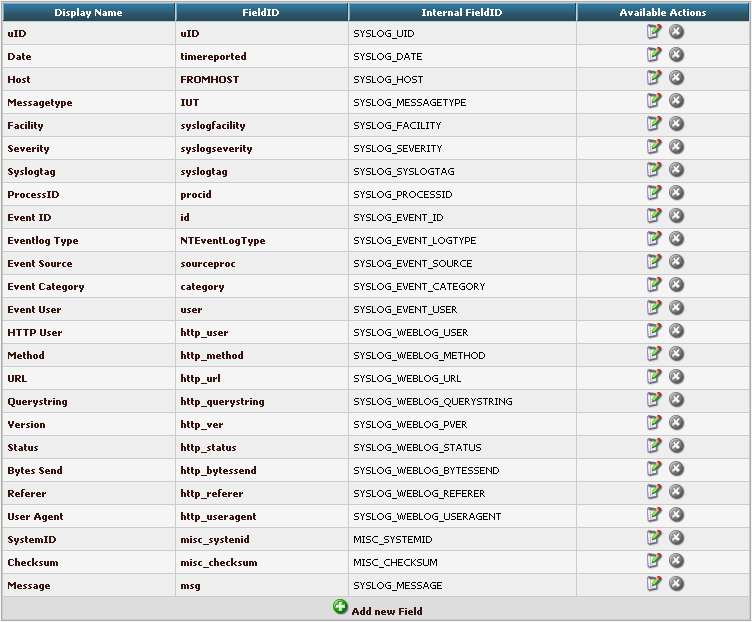
First, we need to add some Fields. We need to do this, so we can use the custom fields in our database with LogAnalyzer. By default, the list of fields only reflects basically the MonitorWare Database Scheme. When clicking on Fields in the Admin Center, a list of the currently available fields will be shown:
By clicking on Add new Field, we can create a new Field.
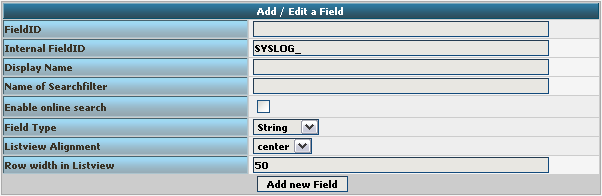
We need to create 7 new fields only, though we have 8 custom fields in the table. Since date is the same, we can use the already formatted field. So we only need to create the fields for host, msgnumber, protocol, ipin, ipout, portin and portout.
Basically, the Field details should look like this:
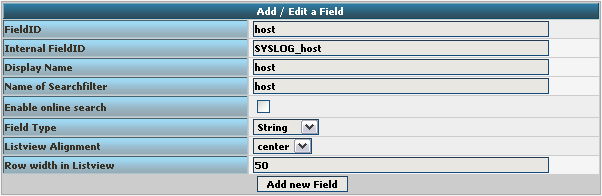
To finally create the Field, click on the button “Add new Field”. Now the list should appear again with the newly created Field. Repeat this step for the other fieldnames as well.
Edit DBMappings
In conjunction with the Fields which are only for the internal use in Adiscon LogAnalyzer, we need to create a custom database mapping. Therefore go to DBMappings in the Admin Center. You will see a list of the currently available database mappings.
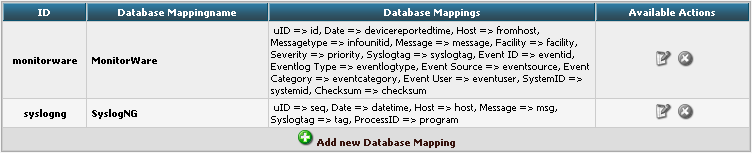
Click on Add new Database Mapping:
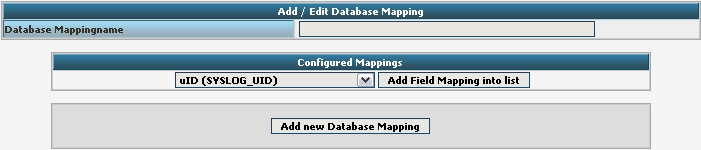
Here we need to tell Adiscon LogAnalyzer, which Field we created depends on which database field. Give your database mapping a name first. After that, choose the Fields we need from the dropdown menu and click on “Add Field Mapping into list”. The final step will be to enter the database field names into the list. It should now look like this now:
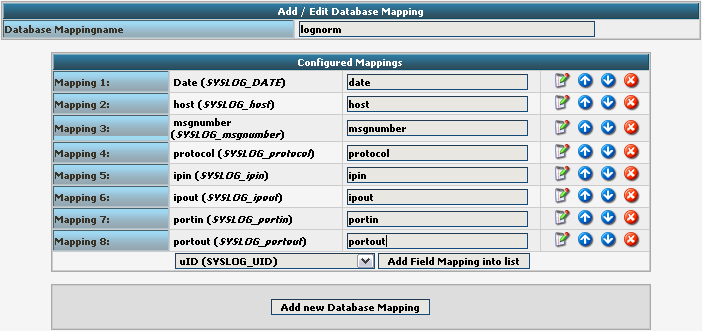
Finally click on “Add new Database Mapping”. This will save the mapping and get you back to the list of DBMappings.

Edit Views
The next step we need to adjust is the Views. In Views you can configure, what LogAnalyzer should show. This is related to the data that is stored in the database. Basically, a View should represent the kind of logs that are stored. For example if you use the View for Windows Event Logs, but have a database where Linux syslog is stored, many Fields will be shown as empty, because they are not filled like from Windows Event Logs. Therefore we need a custom view.
You will get there by clicking on Views in the Admin Center.

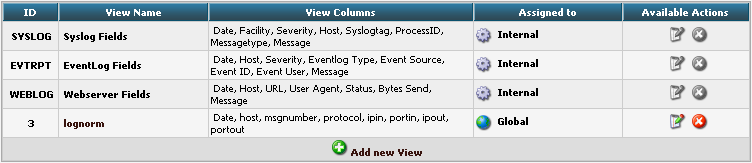
There are already pre-configured Views for Windows EventLog, Syslog and Webserver Logs. We need a completely different View though. A new View can be configured by clicking on “Add new View” at the bottom of the list.
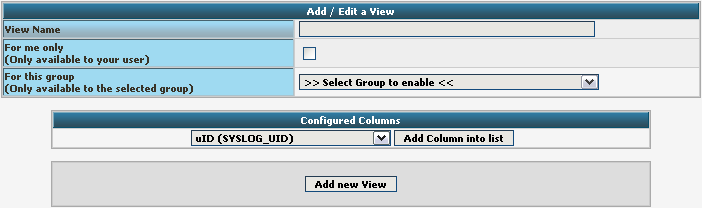
You need to give your view a name. If you want, you can restrict the use of this view to certain users or groups, but we will skip that for now. The most important part is to select the Fields that should be displayed. This is done at “Configured Columns”. Before clicking on “Add new View” it should look like this:
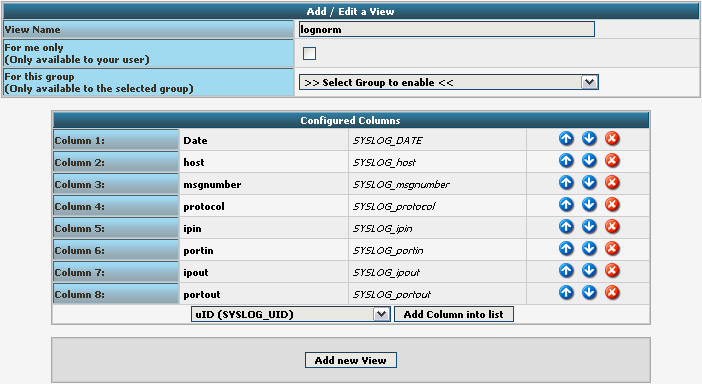
After clicking the button, the new View should appear in our list.
Edit Sources
Finally, we need to create a Source. When installing Adiscon LogAnalyzer, you can already configure a Source. For our example, we need to create another Source. Therefore go to Sources in the Admin Center.

You will see a list of the configured Sources. It currently holds one Source. By clicking on Add new Source you can create another one.
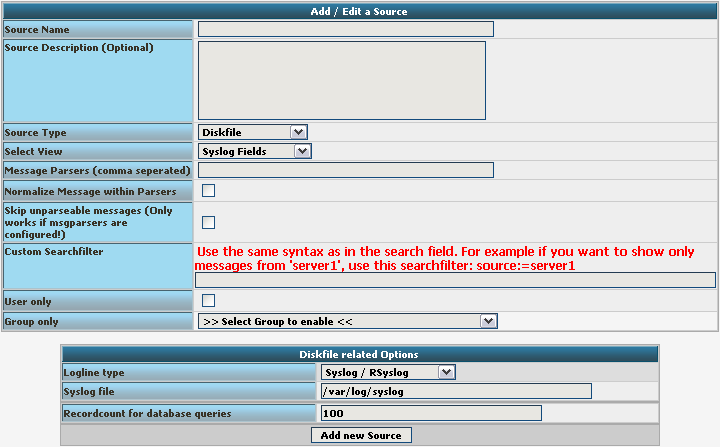
Basically, we need to insert a Source Name. If you want, you can also create a description. Change the Source Type to MYSQL Native. You can also select a default View. Choose our lognorm View we created earlier. No more general options need to be set. If you want, you can again restrict the source to a user or group.
We still need to change the database Type options. As you can see, the fields have changed by setting the Source Type to MYSQL Native. As table type choose the lognorm type we created before. Insert the details as your database needs them. The complete form should look like this now:
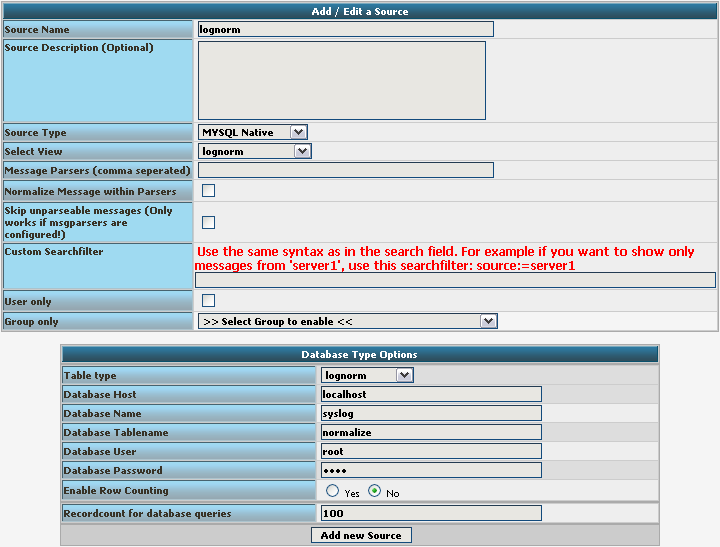
Finish the new Source by clicking on Add new Source. It should now appear in the list.

Final Thoughts
Though this scenario seems very complex it shows in the end how easy some things can be afterwards. This setup shows exactly, how different products from the Adiscon product line can work together. And we have a good example for how normalizing works.
Using a strgen module to write into a database
In many cases, log messages have to be transformed. This can be done in various ways with the property replacer for example. But processing messages this way can be rather slow, since the transformation part is no native code. In this case, strgen (string generator) is the way to go. A string generator is a separate plugin, that will be loaded in rsyslog. It provides a native C interface for template generation and thus speed up message transformation. String generators are not a very easy thing to create yourself. But Adiscon happily offers this as paid service to support the rsyslog project.
A string generator usually takes a message, that is in a certain format and transforms it into another format. That is where the speed bonus comes into play, since there is no dynamic message transformation.
In this example we want to show how a string generator is used that has been created for a customer. Basically, the string generator takes a message and transforms it into a specific MySQL INSERT statement to write the message into a database with a different database scheme. The database scheme is customer specific as well, so this is rather not usable by someone else. But the steps shown can be applied to every other strgen as well.
To test the correct transformation of messages, we can write messages into a file as well. But, this is in this case just to check the correct output. The file should then hold a SQL INSERT statement for every message that has been sent.
What we need
Basically we need a linux system. The steps will be described with a installation of Fedora 13. If another system is being used, some paths need to be changed. Please note, that rsyslog is already the default syslog daemon here. But we need a newer version. If the sysklogd or another syslog daemon is still present on the system you are using, you need to permanently disable it.
The setup
Our setup should reflect a configuration of rsyslog, which is able to receive syslog via UDP. The messages that are received should be “filtered” for several IP addresses. The message with IPs that evaluate the filter to true will be discarded (description in the configuration part). All other messages should be transformed into SQL statements via the strgen plugin and then injected into a MySQL database on the same system.
On this system we need the usual suspects.
git
mysql-devel
pkgconfig
libtool
libxml2-devel
zlib-devel
These are most likely needed and should be installed. Further, you need a server that holds the MySQL database. Perhaps you have this installed on the same server. In that case, you need to check the MySQL documentation for instructions. We will only describe the installation of rsyslog here. For our example, the MySQL server will be on the same system.
Please note, that the syslog messages that can be processed by the strgen plugin are very specific and the created INSERT statements do only fit a certain database scheme.
Setting up rsyslog
Basically, we need to set up rsyslog. The strgen plugin we will use is called “sm_cust_bindcdr”. It has been released in the rsyslog v5.8.0 stable release. But, due to some changes afterwards, we need to use the latest v5-stable version from the git repository. Assuming the above mentioned packages are installed we will start directly.
Open up a terminal with root permission and change to the folder which should later hold the rsyslog files. In our case we will install rsyslog directly in the user directory, though this is not recommended. When you have switched to that folder, type the following:
git clone git://git.adiscon.com/git/rsyslog.git
You will see, that the current state of rsyslog development will be downloaded from the git repository into a folder rsyslog. By default, the downloaded git repository does reflect the current master branch (v6-devel currently). Therefore we need to switch to the newly created folder rsyslog and change the branch by doing the following:
git checkout v5-stable
You should get a confirmation message, that the branch has been switched accordingly. Now we can start installing rsyslog. This is done by using the following commands one after another:
autoreconf-vfi
./configure --libdir=/lib --sbindir=/sbin --enable-mysql --enable-smcustbindcdr
make
make install
Basically, we have rsyslog v5.8.0 stable now installed.
Configuring rsyslog
We are now ready to configure rsyslog. Open the configuration file for rsyslog. It is located here:
/etc/rsyslog.conf
Usually, this is a basic configuration that has been shipped with the operating system. In the end, our configuration should look somehow like this (the minimum for our scenario):
$ModLoad imudp.so
$ModLoad ommysql
$ModLoad sm_cust_bindcdr

$UDPServerRun 514
$sgcustombindcdrallowedip 10.0.0.51
$sgcustombindcdrallowedip 10.0.0.52
$sgcustombindcdrallowedip 10.0.0.53
$template sm,=Custom_BindCDR,sql
*.* :ommysql:127.0.0.1,Data,test,pass;sm
At the top, we have the modules loaded which we need. The first module is for receiving UDP syslog. The second module handles the MySQL capabilities of rsyslog. The third module is our custom string generator plugin.
After that, the UDP receiver is enabled. We will use the default UDP port 514.
Now we define the “filters”. We will use the configuration $sgcustombindcdrallowedip for this. This directive is included in the strgen plugin and only available if the plugin was loaded. Basically we define a IP, which will be compared to the IP in the syslog message. If the IP is the same, the message will be discarded. If the IP is different, the message will be further processed. Behind this is a system where some service is offered. Some IPs are allowed to do that for free, others are not. Those which are not allowed to use the service for free are collected in the database for later billing. This directive can be used multiple times with different IPs. Basically the only limit for the amount of filters is either the address space or the main memory of the machine.
After the filters, we define a template which is used for the final processing. Basically, this works like a regular template. We define a custom name for the template (“sm” in this case) and after the comma we tell the template what it looks like. In this case, we use the template name of the strgen plugin – “Custom_BindCDR,sql”. The name is introduced by “=”. This is very important. If this is missed out, the template will not know, that it has to get the format information from the plugin. You could also say, that you call a template in a template.
Finally, we have our action. This is the last part of the configuration. Basically, we want to forward all messages (“*.*”) to our MySQL server. We access the server by defining its address, the database name, user and password. The final part of this statement is “;sm” which calls the template.
That’s it. Save the configuration file now and exit your editor.
Getting rsyslog to run
We have rsyslog installed and configured now. The only thing left to do is to restart rsyslog. Right now, the old version is still running. When we restart rsyslog, the new installation with our new configuration file will be loaded. Now use the following command to stop and start rsyslog:
service rsyslog restart
This works at least in Fedora. If it does not work for you, you can as well use this:
/etc/init.d/rsyslog restart
Final thoughts
We have now achieved what we wanted. We can receive our messages, filter and transform then and inject them into our database. The important thoughts were on the string generator. The format of the messages cannot be changed later. The problem in this case is the common use, which is virtualy not possible. The module will only work with messages of a certain format and create a INSERT statement that has a very customer specific form as well. So it will only work if the correct messages are received and the database scheme fits as well. All other mesages will be dropped.
Enterprise Support
Professional services are being offered by Adiscon, the company that sponsors rsyslog development. For details, please contact Adiscon Sales.
| Options | Enterprise Support | Extended Enterprise Support | Unlimited Enterprise Support |
| Max. hours | 15 | 25 | 40 |
| Email support | |||
| Phone support | |||
| Response time | 1 – 2 business days | 24 hours on business days | 24 hours on business days |
| Cost | 2999 EURO | 4999 EURO | 19999 EURO |
| Number of installations | 5 | 5 | Unlimited |
| Customer contact personnel | 1 | 2 | 2 |
Purchase RSYSLOG support directly from the source. This contract provides priority email support and phone support. It is a great option if you need to provide proof of software support in your organization. This contract provides
- unlimited email support tickets during validity
- fixes for current and outdated rsyslog releases
- advise on how to implement rsyslog in the best possible way.
All contracts run for a period of one year.
Under this contract, fixes for rsyslog releases will be provided / created, assuming it is possible to do that with the code base in question.
The contract is for end-users only, not for interim-support through a service provider. If you are a service provider, please contact us via the Customer Service System.
CentOS 5: how to compile rsyslog from git
If you compile rsyslog from git on CentOS 5 you run into the trouble that
autoreconf -fvi
fails, telling you that autotools 2.59 provided by CentOS is too old.
The solution to this problem is to install version 2.61 of autotools. You will probably not want to overwrite the default CentOS package, so you should install it in some alternate location (e.g. /opt) and include that location in the topmost spot of your path. all this can be done as follows:
wget http://ftp.gnu.org/gnu/autoconf/autoconf-2.61.tar.bz2
 tar xjf autoconf-2.61.tar.bz2
 cd autoconf-2.61
 ./configure --prefix=/opt
 make
 sudo make install
Then, you need to change your path, for example as follows (this is obviously a temporary alteration!):
export PATH=/opt/bin:$PATH
After these changes, you should be able to run autoreconf for rsyslog.