Using RSyslog Windows Agent to forward log files
in this article we describe how to use the RSyslog Windows Agent to forward log messages that are stored in plain text files. The article itself will be made of two larger steps. Both steps contain some substeps which will be shown in detail in one of the smaller articles. We assume, that no basic configuration is currently available.
This time, we want to use textfiles as log sources. Many programs for Windows do not use the EventLog system. They use simple and plain text files to store their log messages. Though, the information that is logged there could be as important as EventLogs.
Basically, the configuration of RSyslog Windows Agent consists of 3 parts.
1. A so-called service which generates the log data to be processed by, for example, a file monitor.
2. Rules with Filters. Filters give you the power to decide which log messages are important enough to be kept or not.
3. The action that has to be taken. In our case, forwarding the syslog messages.
Step 1: Setting up the ruleset and action.
Usually we start by creating the ruleset, rule and action. The reason lies in the configuration structure. So we will first create the mentioned items. In the end, we will have a basic rule with no particular filter and a forward via syslog action. That means, that all messages will be forwarded to a central host.
Step 2: Setting up the service.
Now we will set up the service. We need to create a File Monitor Service. The File Monitor Service is able to monitor a file or a directory with files. It will check the specified file(s) periodically for new lines (which would be new log messages) and use them for further processing.
That’s it, you are already finished. Easy wasn’t it? Now you should be able to poll log files and forward the log messages to your central syslog server.
Using RSyslog Windows Agent as a syslog relay
This time we want to use the RSyslog Windows Agent as a syslog relay. The article itself will be described in two larger steps. Both steps contain some substeps which will be shown in detail in one of the smaller articles. We assume, that no basic configuration is currently available.
This configuration can be used to attach several sites to a larger log network. Imagine you have a central log server at your company in your central facility. You have some branch offices around the country and their log messages should be stored in the central location as well. Now it wouldn’t be very clever to have every computer or device at these sites forward their log messages directly. It would be better to have a central machine at the site, that works as a relay. It will receive all the log messages via syslog and then again forward the messages to the central server. Cascading setups like this ensure a part of the reliability, stability and security of your infrastructure, by keeping the connection count low and lowering the amount of machines using the network.
Basically, the configuration of RSyslog Windows Agent consists of 3 parts.
1. A so-called service which generates the log data to be processed by, for example, a syslog server.
2. Rules with Filters. Filters give you the power to decide which log messages are important enough to be kept or not.
3. The action that has to be taken. In our case, forwarding the syslog messages.
Step 1: Setting up the ruleset and action.
Usually we start by creating the ruleset, rule and action. The reason lies in the configuration structure. So we will first create the mentioned items. In the end, we will have a basic rule with no particular filter and a forward via syslog action. That means, that all messages will be forwarded to a central host.
Step 2: Setting up the service.
Now we will set up the service. As we already know, we want to create a syslog server. Therefore we need the syslog server service. It will create a listener, that is listening to syslog traffic on a specific port. You can choose the protocol, like TCP or UDP as well.
That’s it, you are already finished. Easy wasn’t it? Now you should be able to receive syslog messages from different devices and forward them from only one machine to your central syslog server.
Forward Windows Eventlogs with RSyslog Windows Agent
This article will describe, how to use the RSyslog Windows Agent to forward the local Windows EventLog messages. This article will show the different steps. For this we take you to several smaller guides, that show you, how to setup each part. We assume, that no basic configuration is currently available.
A configuration like this is needed very often and basically on any Windows machine that should forward it’s logs. Therefore, this reflects the default configuration after installing the RSyslog Windows Agent. It can be used on machines in your local network or on a site to forward from the single machines to a central relay server, which then forwards all messages to your company’s central log server.
Basically, the configuration of RSyslog Windows Agent consists of 3 parts.
1. A so-called service which generates the log data to be processed by, for example, polling the Windows EventLog.
2. Rules with Filters. Filters give you the power to decide which log messages are important enough to be kept or not.
3. The action that has to be taken. In our case, forwarding the syslog messages.
Step 1: Setting up the ruleset and action.
Usually we start by creating the ruleset, rule and action. The reason lies in the configuration structure. So we will first create the mentioned items. In the end, we will have a basic rule with no particular filter and a forward via syslog action. That means, that all messages will be forwarded to a central host.
Step 2: Setting up the service.
Now we will set up the service. There is one thing to mention first. You need to know choose one of the latter links according to your operating system. This is important, or the setup might not work properly. We have 2 different versions of the EventLog Monitor. Here is a small list in which you can see, which service fits which operating systems.
1. EventLog Monitor: 2000, XP, 2003
2. EventLog Monitor V2: Vista, 2008, 7, 10
This is important. EventLog Monitor V2 will NOT work on the older operating systems. In contrary, the older EventLog Monitor will work on the newer systems, but might not work correctly, so it is advised to used the optimized EventLog Monitor V2. This is due to the massive changes that Microsoft introduced to the EventLog system with Vista.
That’s it, you are already finished. Easy wasn’t it? Now you should receive your EventLog messages on your central syslog server.
How To setup the Forward via Syslog Action
This Guide is for the RSyslog Windows Agent.
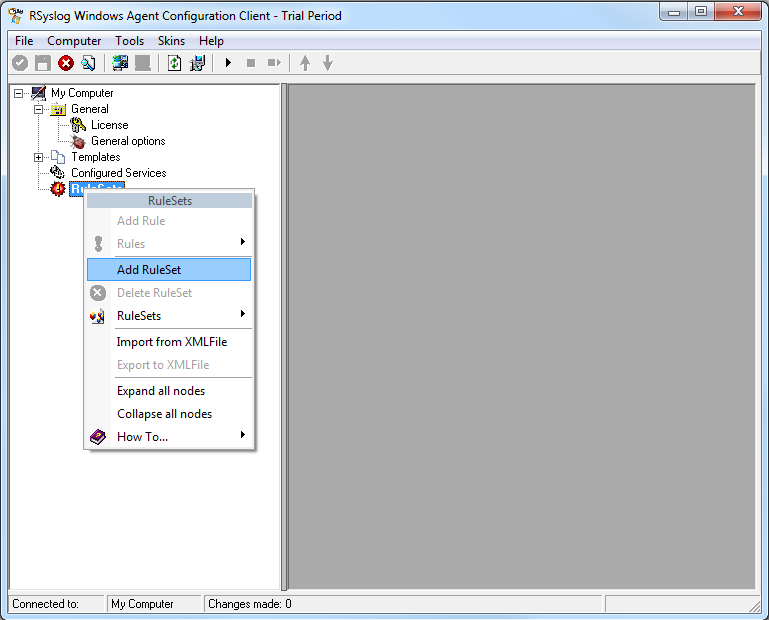
1. First we define a new rule set. Right-click “Rules”. A pop up menu will appear. Select “Add Rule Set” from this menu. On screen, it looks as follows:
2. Then, a wizard starts. Change the name of the rule to whatever name you like. We will use “Forward syslog” in this example. The screen looks as follow:
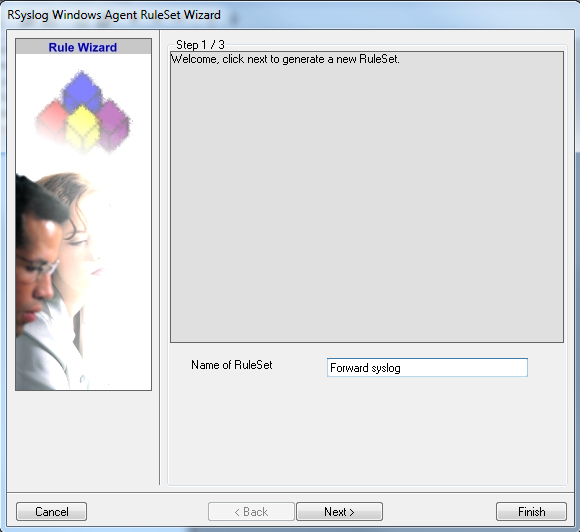
Click “Next” to go on with the next step.
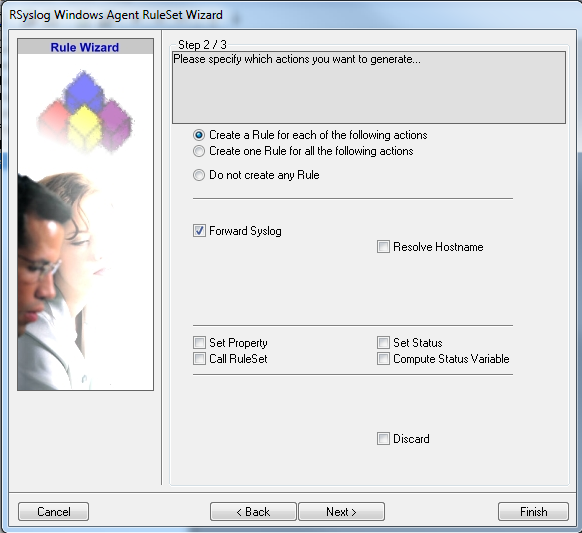
3. Select only Forward via Syslog. Do not select any other options for this sample. Also, leave the “Create a Rule for each of the following actions” setting selected. Click “Next”. You will see a confirmation page. Click “Finish” to create the rule set.
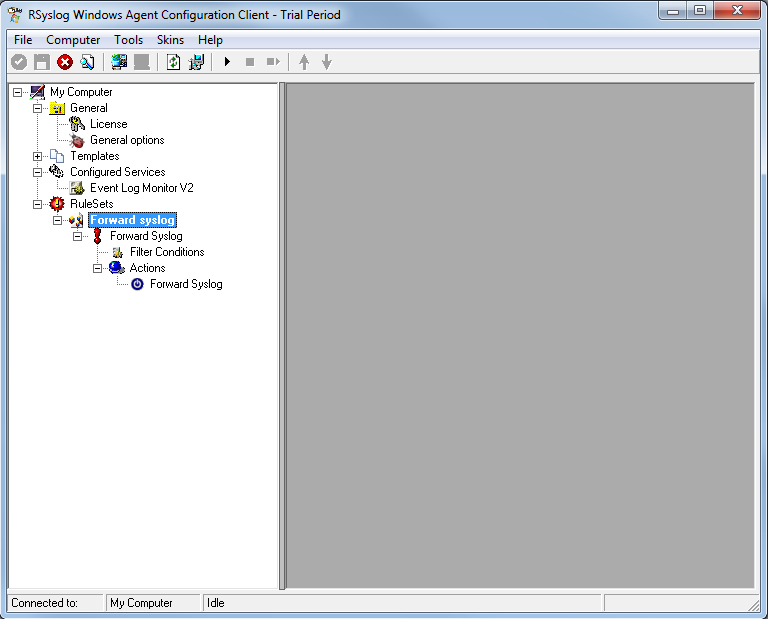
4. As you can see, the new Rule Set “Forward syslog” is present. Please expand it in the tree view until the action level of the “Forward syslog” Rule and select the “Forward syslog” action to configure.
5. Configure the “Forward via Syslog” Action
Type the IP or the Hostname of your syslog server into the Syslog Server field in the form. Then Change the protocol to “TCP (octet-count based framing”. We use TCP that we will have no traffic lost. And edit the Port to 10514. Attention RSyslog Windows Agent and rsyslog must use the same port and the same protocol.
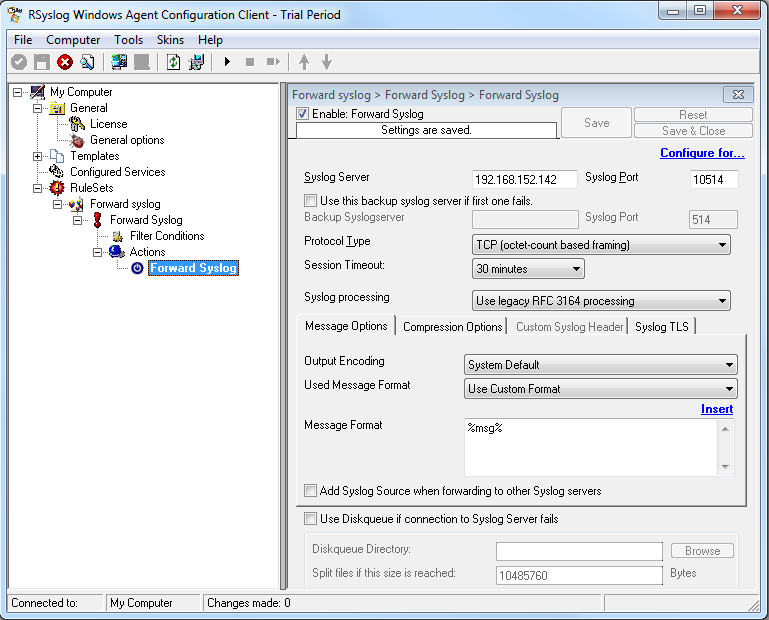
6. Finally, make sure you press the “Save” button – otherwise your changes will not be applied. Then start the service and you are done.