rsyslog 8.21.0 (v8-stable) released
We have released rsyslog 8.21.0.
This release is mostly for maintenance. There was a big change to how internal messages are handled. These are no longer logged via the internal bridge, but via the syslog() API call. For regular users, this should make not too much difference.
Additionaly, the TLS syslog error messages have been improved, as well as the robustness of the queue subsystem.
https://github.com/rsyslog/rsyslog/blob/v8-stable/ChangeLog
Download:
http://www.rsyslog.com/downloads/download-v8-stable/
As always, feedback is appreciated.
Best regards,
Florian Riedl
Changelog for 8.8.0 (v8-stable)
Version 8.8.0 [v8-stable] 2015-02-24
- omkafka: add support for dynamic topics and auto partitioning
Thanks to Tait Clarridge for the patches. - imtcp/imptcp: support for broken Cisco ASA TCP syslog framing
- omfwd: more detailled error messages in case of UDP send error
- TLS syslog: enable capability to turn on GnuTLS debug logging
This provides better diagnostics in hard-to-diagnose cases,
especially when GnuTLS is extra-picky about certificates. - bugfix: $AbortOnUncleanConfig did not work
- improve rsyslogd -v output and error message with meta information
version number is now contained in error message and build platform in
version output. This helps to gets rid of the usual “which version”
question on mailing list, support forums, etc… - bugfix imtcp: octet-counted framing cannot be turned off
- bugfix: build problems on Illuminos
Thanks to Andrew Stormont for the patch - bugfix: invalid data size for iMaxLine global property
It was defined as int, but inside the config system it was declared as
size type, which uses int64_t. With legacy config statements, this could
lead to misadressing, which usually meant the another config variable was
overwritten (depending on memory layout).
closes https://github.com/rsyslog/rsyslog/issues/205 - bugfix: negative values for maxMessageSize global parameter were permitted
rsyslog 7.4.2 (v7-stable) released
This is a maintenance release, consisting primarily of bug fixes. It also provides a fix for a potential security issue in omelasticsearch. Please note that the security issue only exists in non-default configuration if the “errorfile” parameter was specified.
ChangeLog:
http://www.rsyslog.com/changelog-for-7-4-2-v7-stable/
Download:
http://www.rsyslog.com/rsyslog-7-4-2-v7-stable/
As always, feedback is appreciated.
Best regards,
Florian Riedl
Changelog for 7.4.2 (v7-stable)
Version 7.4.2 [v7.4-stable] 2013-07-04
- bugfix: in RFC5425 TLS, multiple wildcards in auth could cause segfault
- bugfix: RainerScript object required parameters were not properly checked – this clould result to segfaults on startup if parameters were missing.
- bugfix: double-free in omelasticsearch closes: http://bugzilla.adiscon.com/
show_bug.cgi?id=461 a security advisory for this bug is available at: http://www.lsexperts.de/ advisories/lse-2013-07-03.txt PLEASE NOTE: This issue only existed if omelasticsearch was used in a non-default configuration, where the “errorfile” parameter was specified. Without that parameter set, the bug could not be triggered. Thanks to Markus Vervier and Marius Ionescu for providing a detailled bug report. Special thanks to Markus for coordinating his security advisory with us. - bugfix: omrelp potential segfault at startup on invalid config parameters
- bugfix: small memory leak when $uptime property was used
- bugfix: potential segfault on rsyslog termination in imudp closes: http://bugzilla.adiscon.com/
show_bug.cgi?id=456 - bugfix: lmsig_gt abort on invalid configuration parameters closes: http://bugzilla.adiscon.com/
show_bug.cgi?id=448 Thanks to Risto Laanoja for the patch. - imtcp: fix typo in “listner” parameter, which is “listener” Currently, both names are accepted.
- solved build problems on FreeBSD closes: http://bugzilla.adiscon.com/
show_bug.cgi?id=457 closes: http://bugzilla.adiscon.com/ show_bug.cgi?id=458 Thanks to Christiano for reproting and suggesting patches - solved build problems on CENTOS5
rsyslog 7.5.1 (v7-devel) released
This release opens the new 7.5 development branch. Most importantly, this version provides certificate-based authentication for RELP. It also includes mmfields, a module that can be used to parse CEF and other similar delimited formats. BSD-support has been improved and imjournal has been hardened to prevent corrupt journal databases from spamming the system too much. More information about configuring the certificate-based authentication for RELP: http://www.rsyslog.com/using-tls-with-relp/
ChangeLog: http://www.rsyslog.com/changelog-for-7-5-1-v7-devel/
Download: http://www.rsyslog.com/rsyslog-7-5-1-v7-devel/
As always, feedback is appreciated.
Best regards,
Florian Riedl
Using TLS with RELP
In this guide, we want to describe how to setup rsyslog with a RELP connection which is to be secured with TLS. For this guide you need at least rsyslog 7.5.1 and librelp 1.1.3 as well as gnutls 2.10.0 or above. These need to be installed on the server as well on the clients. The guide will split up into 3 parts.
- Creating the certificates
- Client Configuration
- Server Configuration
Step 1 – Creating the certificates
1.1 Setting up the CA
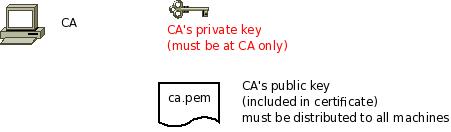
The first step is to set up a certificate authority (CA). It must be maintained by a trustworthy person (or group) and approves the indentities of all machines. It does so by issuing their certificates. In a small setup, the administrator can provide the CA function. What is important is the the CA’s private key is well-protocted and machine certificates are only issued if it is know they are valid (in a single-admin case that means the admin should not issue certificates to anyone else except himself). The CA creates a so-called self-signed certificate. That is, it approves its own authenticy. This sounds useless, but the key point to understand is that every machine will be provided a copy of the CA’s certificate. Accepting this certificate is a matter of trust. So by configuring the CA certificate, the administrator tells rsyslog which certificates to trust. This is the root of all trust under this model. That is why the CA’s private key is so important – everyone getting hold of it is trusted by our rsyslog instances.
- generate the private key:
certtool --generate-privkey --outfile ca-key.pem
This takes a short while. Be sure to do some work on your workstation, it waits for radom input. Switching between windows is sufficient ;)
- now create the (self-signed) CA certificate itself:
certtool --generate-self-signed --load-privkey ca-key.pem --outfile ca.pem
This generates the CA certificate. This command queries you for a number of things. Use appropriate responses. When it comes to certificate validity, keep in mind that you need to recreate all certificates when this one expires. So it may be a good idea to use a long period, eg. 3650 days (roughly 10 years). You need to specify that the certificates belongs to an authority. The certificate is used to sign other certificates.
Sample Screen Session
Text in red is user input. Please note that for some questions, there is no user input given. This means the default was accepted by simply pressing the enter key.
[root@rgf9dev sample]# certtool --generate-privkey --outfile ca-key.pem --bits 2048
Generating a 2048 bit RSA private key...
[root@rgf9dev sample]# certtool --generate-self-signed --load-privkey ca-key.pem --outfile ca.pem
Generating a self signed certificate...
Please enter the details of the certificate's distinguished name. Just press enter to ignore a field.
Country name (2 chars): US
Organization name: SomeOrg
Organizational unit name: SomeOU
Locality name: Somewhere
State or province order research paper online name: CA
Common name: someName (not necessarily DNS!)
UID:
This field should not be used in new certificates.
E-mail: Enter the certificate's serial number (decimal):
Activation/Expiration time.
The certificate will expire in (days): 3650
Extensions.
Does the certificate belong to an authority? (Y/N): y
Path length constraint (decimal, -1 for no constraint):
Is this a TLS web client certificate? (Y/N):
Is this also a TLS web server certificate? (Y/N):
Enter the e-mail of the subject of the certificate: someone@example.net
Will the certificate be used to sign other certificates? (Y/N): y
Will the certificate be used to sign CRLs? (Y/N):
Will the certificate be used to sign code? (Y/N):
Will the certificate be used to sign OCSP requests? (Y/N):
Will the certificate be used for time stamping? (Y/N):
Enter the URI of the CRL distribution point:
X.509 Certificate Information:
Version: 3
Serial Number (hex): 485a365e
Validity:
Not Before: Thu Jun 19 10:35:12 UTC 2008
Not After: Sun Jun 17 10:35:25 UTC 2018
Subject: C=US,O=SomeOrg,OU=SomeOU,L=Somewhere,ST=CA,CN=someName (not necessarily DNS!)
Subject Public Key Algorithm:
RSA Modulus (bits 2048):
d9:9c:82:46:24:7f:34:8f:60:cf:05:77:71:82:61:66
05:13:28:06:7a:70:41:bf:32:85:12:5c:25:a7:1a:5a
28:11:02:1a:78:c1:da:34:ee:b4:7e:12:9b:81:24:70
ff:e4:89:88:ca:05:30:0a:3f:d7:58:0b:38:24:a9:b7
2e:a2:b6:8a:1d:60:53:2f:ec:e9:38:36:3b:9b:77:93
5d:64:76:31:07:30:a5:31:0c:e2:ec:e3:8d:5d:13:01
11:3d:0b:5e:3c:4a:32:d8:f3:b3:56:22:32:cb:de:7d
64:9a:2b:91:d9:f0:0b:82:c1:29:d4:15:2c:41:0b:97
Exponent:
01:00:01
Extensions:
Basic Constraints (critical):
Certificate Authority (CA): TRUE
Subject Alternative Name (not critical):
RFC822name: someone@example.net
Key Usage (critical):
Certificate signing.
Subject Key Identifier (not critical):
fbfe968d10a73ae5b70d7b434886c8f872997b89
Other Information:
Public Key Id:
fbfe968d10a73ae5b70d7b434886c8f872997b89
Is the above information ok? (Y/N): y
Signing certificate...
[root@rgf9dev sample]# chmod 400 ca-key.pem
[root@rgf9dev sample]# ls -l
total 8
-r-------- 1 root root 887 2008-06-19 12:33 ca-key.pem
-rw-r--r-- 1 root root 1029 2008-06-19 12:36 ca.pem
[root@rgf9dev sample]#
Be sure to safeguard ca-key.pem! Nobody except the CA itself needs to have it. If some third party obtains it, you security is broken!
1.2 Generating the machine certificate
In this step, we generate certificates for each of the machines. Please note that both clients and servers need certificates. The certificate identifies each machine to the remote peer. The DNSName specified inside the certificate can be specified inside the tls.PermittedPeer config statements. For now, we assume that a single person (or group) is responsible for the whole rsyslog system and thus it is OK if that single person is in posession of all machine’s private keys. This simplification permits us to use a somewhat less complicated way of generating the machine certificates. So, we generate both the private and public key on the CA (which is NOT a server!) and then copy them over to the respective machines. If the roles of machine and CA administrators are split, the private key must be generated by the machine administrator. This is done via a certificate request. This request is then sent to the CA admin, which in turn generates the certificate (containing the public key). The CA admin then sends back the certificate to the machine admin, who installs it. That way, the CA admin never get’s hold of the machine’s private key. Instructions for this mode will be given in a later revision of this document. In any case, it is vital that the machine’s private key is protected. Anybody able to obtain that private key can imporsonate as the machine to which it belongs, thus breaching your security.
Sample Screen Session Text in red is user input. Please note that for some questions, there is no user input given. This means the default was accepted by simply pressing the enter key. Please note: you need to substitute the names specified below with values that match your environment. Most importantly, machine.example.net must be replaced by the actual name of the machine that will be using this certificate. For example, if you generate a certificate for a machine named “server.example.com”, you need to use that name. If you generate a certificate for “client.example.com”, you need to use this name. Make sure that each machine certificate has a unique name. If not, you can not apply proper access control.
[root@rgf9dev sample]# certtool --generate-privkey --outfile key.pem --bits 2048
Generating a 2048 bit RSA private key...
[root@rgf9dev sample]# certtool --generate-request --load-privkey key.pem --outfile request.pem
Generating a PKCS #10 certificate request...
Country name (2 chars): US
Organization name: SomeOrg
Organizational unit name: SomeOU
Locality name: Somewhere
State or province name: CA
Common name: machine.example.net
UID: Enter a dnsName of the subject of the certificate:
Enter the IP address of the subject of the certificate:
Enter the e-mail of the subject of the certificate:
Enter a challange password:
Does the certificate belong to an authority? (y/N): n
Will the certificate be used for signing (DHE and RSA-EXPORT ciphersuites)? (y/N):
Will the certificate be used for encryption (RSA ciphersuites)? (y/N):
Is this a TLS web client certificate? (y/N): y
Is this also a TLS web server certificate? (y/N): y
[root@rgf9dev sample]# certtool --generate-certificate --load-request request.pem --outfile cert.pem --load-ca-certificate ca.pem --load-ca-privkey ca-key.pem
Generating a signed certificate...
Enter the certificate's serial number (decimal):


Activation/Expiration time.
The certificate will expire in (days): 1000


Extensions.
Do you want to honour the extensions from the request? (y/N):
Does the certificate belong to an authority? (Y/N): n
Is this a TLS web client certificate? (Y/N): y
Is this also a TLS web server certificate? (Y/N): y
Enter the dnsName of the subject of the certificate: machine.example.net {This is the name of the machine that will use the certificate}
Enter  the IP address of the subject of certificate:
Will the certificate be used for signing (DHE and RSA-EXPORT ciphersuites)? (Y/N):
Will the certificate be used for encryption (RSA ciphersuites)? (Y/N):
X.509 Certificate Information:
Version: 3 Serial Number (hex): 485a3819
Validity:
Not Before: Thu Jun 19 10:42:54 UTC 2008
Not After: Wed Mar 16 10:42:57 UTC 2011
Subject: C=US,O=SomeOrg,OU=SomeOU,L=Somewhere,ST=CA,CN=machine.example.net
Subject Public Key Algorithm: RSA
Modulus (bits 2048):
b2:4e:5b:a9:48:1e:ff:2e:73:a1:33:ee:d8:a2:af:ae
2f:23:76:91:b8:39:94:00:23:f2:6f:25:ad:c9:6a:ab
2d:e6:f3:62:d8:3e:6e:8a:d6:1e:3f:72:e5:d8:b9:e0
d0:79:c2:94:21:65:0b:10:53:66:b0:36:a6:a7:cd:46
1e:2c:6a:9b:79:c6:ee:c6:e2:ed:b0:a9:59:e2:49:da
c7:e3:f0:1c:e0:53:98:87:0d:d5:28:db:a4:82:36:ed
3a:1e:d1:5c:07:13:95:5d:b3:28:05:17:2a:2b:b6:8e
8e:78:d2:cf:ac:87:13:15:fc:17:43:6b:15:c3:7d:b9

Exponent: 01:00:01
Extensions:
Basic Constraints (critical):
Certificate Authority (CA): FALSE
Key Purpose (not critical):
TLS WWW Client. TLS WWW Server.
Subject Alternative Name (not critical):
DNSname: machine.example.net
Subject Key Identifier (not critical):
0ce1c3dbd19d31fa035b07afe2e0ef22d90b28ac
Authority Key Identifier (not critical):
fbfe968d10a73ae5b70d7b434886c8f872997b89
Other Information:
Public Key Id:
0ce1c3dbd19d31fa035b07afe2e0ef22d90b28ac

Is the above information ok? (Y/N): y
Signing certificate...
[root@rgf9dev sample]# rm -f request.pem
[root@rgf9dev sample]# ls -l
total 16
-r-------- 1 root root 887 2008-06-19 12:33 ca-key.pem
-rw-r--r-- 1 root root 1029 2008-06-19 12:36 ca.pem
-rw-r--r-- 1 root root 1074 2008-06-19 12:43 cert.pem
-rw-r--r-- 1 root root 887 2008-06-19 12:40 key.pem
[root@rgf9dev sample]# # it may be a good idea to rename the files to indicate where they belong to
[root@rgf9dev sample]# mv cert.pem machine-cert.pem
[root@rgf9dev sample]# mv key.pem machine-key.pem
[root@rgf9dev sample]#
Distributing Files Provide the machine with:
- a copy of ca.pem
- cert.pem
- key.pem
Never provide anyone with ca-key.pem! Also, make sure nobody but the machine in question gets hold of key.pem.
Step 2: Client Configuration
Usually, this is a rather simple matter. It is basically a configuration to forward messages via RELP, just with a few extra parameters. A configuration could look like this:
module(load="imuxsock")
module(load="omrelp")
module(load="imtcp")
input(type="imtcp" port="514")
action(type="omrelp" target="192.168.233.153" port="20514" tls="on" tls.caCert="/home/test/cert/ca.pem" tls.myCert="/home/test/cert/ubuntu1-cert.pem" tls.myPrivKey="/home/test/cert/ubuntu1-key.pem" tls.authmode="name" tls.permittedpeer=["ubuntu-server"] )
The configuration is basically made of 3 parts.
First we load the modules that we need. In this case it is imuxsock, omrelp and imtcp. While imtcp and imuxsock are input modules and thus basically server for “generating” log data, omrelp is a output module and server to forward messages to a server via RELP.
The second part is a input. While imuxsock is always listening when the module is loaded, imtcp needs to be configured as an extra item. This also holds the possibility to configure multiple TCP listeners which could listen to different ports or have different parameters.
The third part is the action. In our case, we simply take all messages and forward them via RELP to our central server. Basically for a RELP connection it would be sufficient to configure the target and the port to send on. For this case, we enable TLS transportation with tls=”on” and secure it with our certificates. As you can see, we need to load our three certificate files as mentioned in the first section. They are all three needed. Also, we define the authentication mode as “name”. By that, the certificate of the other machine will be checked against the hostname to ensure the right machine uses the certificate. Also we allow a certain peer with tls.permittedpeer to answer to this machine.
Step 3: Server Configuration
The server configuration is only a little more complicated than the client configuration. Here is the example.
module(load="imuxsock")
module(load="imrelp" ruleset="relp")
input(type="imrelp" port="20514"
tls="on"
tls.caCert="/home/test/cert/ca.pem"
tls.myCert="/home/test/cert/server-cert.pem"
tls.myPrivKey="/home/test/cert/server-key.pem"
tls.authMode="name"
tls.permittedpeer=["ubuntu-client1","ubuntu-client2","ubuntu-client3"] )
ruleset (name="relp") { action(type="omfile" file="/var/log/relp_log") }
Again, the configuration is made of 3 sections.
First we load the modules. In this case, we load imuxsock for local logging ability (though not further used here) and imrelp for receiving log messages via RELP. As you can see, the module has the ruleset parameter given. That means, that the whole module is bound to a ruleset. This means, that all configured listeners will automatically use the later configured ruleset. This is contrary to other modules where you can configure a separate ruleset for each listener, but this is not possible with imrelp.
The second portion is the input. For a basic configuration it would be sufficient to specify the port to listen on. But since we want to enable TLS-functionality, we need to use tls=”on” again. Also we need to configure the parameters for all the parts of the certificate. Please note, that except for the CA certificate (which is the same on all machines) the certificate and key need to be for this single machine. Also we configure the authentication mode to “name” and an array of permitted peers.
Finally, as third step, we configure the ruleset and the action. In this case, we simply use the omfile module. The functionality is automatically loaded through rsyslog and we do not need to configure the module explicitely at the beginning.
Verdict
One would agree, that setting up rsyslog to use TLS-secured RELP for transferring log messages is basically very easy. Though, creating and maintaing all the certificates can be a tedious amount of work. But, a secure log transmission sure is worth the effort. Also, despite what has been mentioned, a machine certificate could also be created for multiple machines at once, though this is not recommended by Adiscon.
Something that is also noteworthy concerns the authentication mode. There are two other options that can be used, but these are not as secure as authentication against the name. Anonymous authentication can be reached by simply using tls=”on”, but not setting any other parameters. This only secures transportation of log messages, but does not ensure, that no false log data can be injected by a compromised machine or a machine not belonging to your network. A different approach would be fingerprint authentication. This can be used by using the fingerprint of a machine certificate on the peer machine. The fingerprint can be either received by the error log of a machine and then copying and pasting it into tls.permittedpeer, or by using certtool to review certificate details. Please note, that this is not very secure as well as the peers only check for the fingerprint of the certificate and not the certificate itself.
Changelog for 7.5.1 (v7-devel)
Version 7.5.1 [devel] 2013-06-26
- librelp 1.1.3 is required – older versions can lead to a segfault
- add mmfields, which among others supports easy parsing of CEF messages
- omrelp:
* new parameter “compression.prioritystring” to control encryption parameters used by GnuTLS - imrelp:
* new parameter “compression.dhbits” to control the number of bits being used for Diffie-Hellman key generation
* new parameter “compression.prioritystring” to control encryption parameters used by GnuTLS
* support for impstats added
* support for setting permitted peers (client authentication) added
* bugfix: potential segfault at startup on invalid config parameters - imjournal: imported patches from 7.4.1
- omprog: add support for command line parameters
- added experimental TCP stream compression (imptcp only, currently)
- added BSD-specific syslog facilities
* “console”
* “bsd_security” – this is called “security” under BSD, but that name was unfortunately already taken by some standard facility. So I did the (hopefully) second-best thing and renamed it a little. - imported fixes from 7.4.2 (especially build problems on FreeBSD)
- bugfix: imptcp did not properly initialize compression status variable could lead to segfault if stream:always compression mode was selected
TLS secured syslog via RELP
This article will show you, how to use simple tls encryption with the RELP protocol for sending and receiving syslog messages.
We basically need two machines, both running at least rsyslog 7.3.16. In addition to rsyslog, we also need the most current version of librelp.
General information
When installing rsyslog, make sure to enable the RELP functionality by issuing the correct commands for the configure. The configure command should look like this:
./configure --prefix=/usr --enable-relp
This is the most basic command for our example. Please note, that you might need to enable other modules as well if you plan to use them.
Before you start to configure rsyslog on either machine, make sure you have librelp already installed. You might need to additionaly install the gnutls package.
Client Config
The configuration for the client is relatively simple. Basically, we can use as inputs whatever we like and simply use RELP with TLS encryption for forwarding the messages. The configuration could look like this:
module(load="imuxsock")
module(load="imudp")
module(load="omrelp")

input(type="imudp" port="514")

action(type="omrelp" target="192.168.233.144" port="2514" tls="on")
As you can see, we first load our modules. That is a generic step. We also load the output module “omrelp” which enables us later to forward messages via RELP.
In the second stage we configure our input. This example has the ability to receive syslog via imudp on port 514.
And the final step is our action. We use omrelp to forward all log messages to our central server via port 2514. Please note the option tls=”on” which directs the module to encrypt all messages via TLS.
Server Config
The server configuration looks a bit different and is one step more complicated.
module(load="imuxsock")
module(load="imrelp" ruleset="relp")

input(type="imrelp" port="2514" tls="on")

ruleset(name="relp") {
action(type="omfile" file="/var/log/relptls")
}
Again, we first configure the modules. Contrary to the Client configuration, we load “imrelp” and create the input with it in the second step.
The input with imrelp must listen to the same port, that the client sends its messages to. Also we must enable the TLS option as well. The reason might seem obvious, because without the option enabled, imrelp will push only garbage messages into the processing system. So we need TLS enabled to decrypt the messages. Please note, that I also bound the input to a ruleset.
The ruleset and action are again very basic. The ruleset (which is bound to the input) ensures, that only the messages that are received via RELP are processend by the enclosed actions. This is much easier, than creating filters to determine the source of the message (not only from a setup point of view, but also in regards of processing speed). The action in the ruleset will then write all messages that run into the ruleset into a single file. Please note: for imrelp, you can only bind the module to a ruleset. In consequence, all created listeners of this type are bound to this single ruleset.
Using TLS for receiving log messages
In this guide, we want to describe, how to use the RSyslog Windows Agent with TLS encrypted syslog. This specific part will describe the setup steps for receiving syslog from a Linux rsyslog installation. First, as a preliminary, you should read the guide from the rsyslog documentation for “Encrypting Syslog Traffic with TLS (SSL)”. It describes in details the overall setup, how certificates are generated and how the clients and server need to be set. It is strongly suggested to be read as a whole.
Since we will receive syslog messages via TLS and we can only forward messages via syslog (with TLS or without) the whole setup will basically resemble what we described in our guide for a syslog relay. Therefore, we will only show how to setup the syslog service.
Step 1: Machine certificates
The easiest way to create the machine certificates is as described in the Linux guide above. So please create a machine certificate as described here: Generating Machine Certificates
Please provide your Windows machine with those certificates. Make sure, that they are safe and cannot get into someones’ hands.
Step 2: Setting up the ruleset and action.
Usually we start by creating the ruleset, rule and action. The reason lies in the configuration structure. So we will first create the mentioned items. In the end, we will have a basic rule with no particular filter and a forward via syslog action. That means, that all messages will be forwarded to a central host.
Step 3: Create a Syslog Server Service
Now we need to create a syslog server service.
To create it, right click on “Services”, then select “Add Service” and the “Syslog Server”:
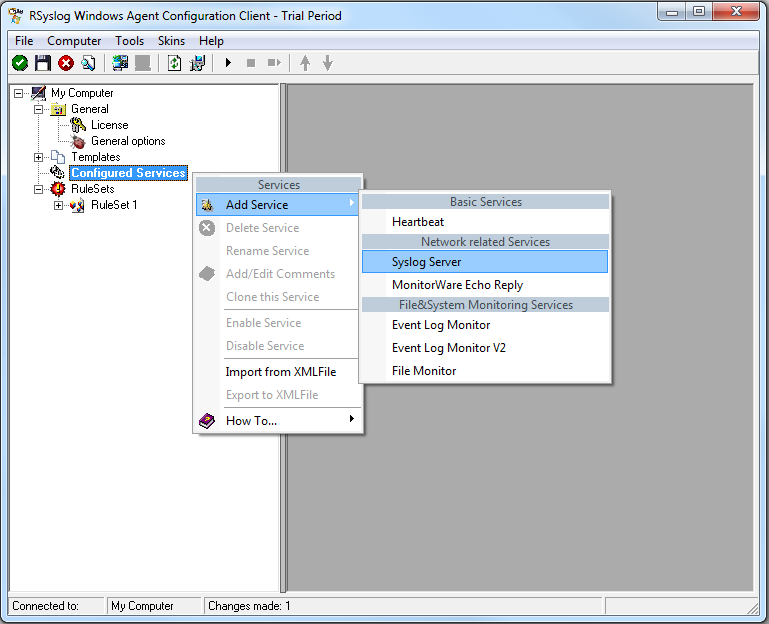
Once you have done so, a new wizard starts:
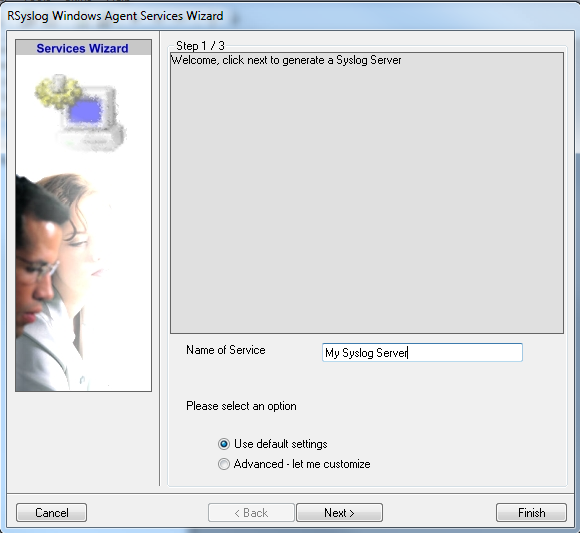
Again, you can use either the default name or any one you like. We will use “My Syslog Server” in this example. Leave the “Use default settings” selected and press “Next”:
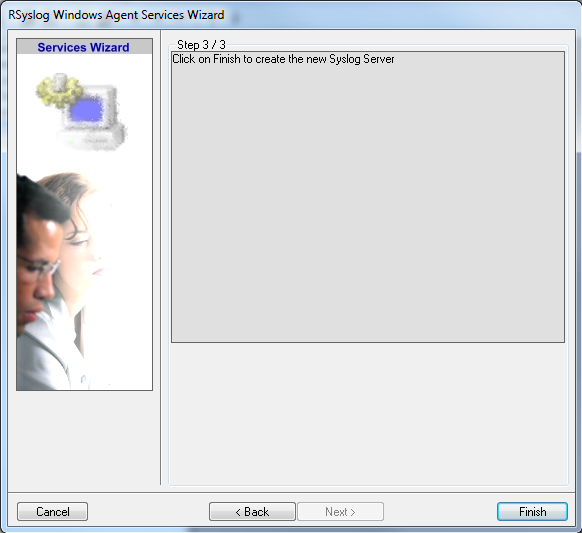
As we have used the default, the wizard will immediately proceed with step 3, the confirmation page. Press “Finish” to create the service. The wizard completes and returns to the configuration client. There, you will see the newly created service beneath the “Services” part of the tree view:
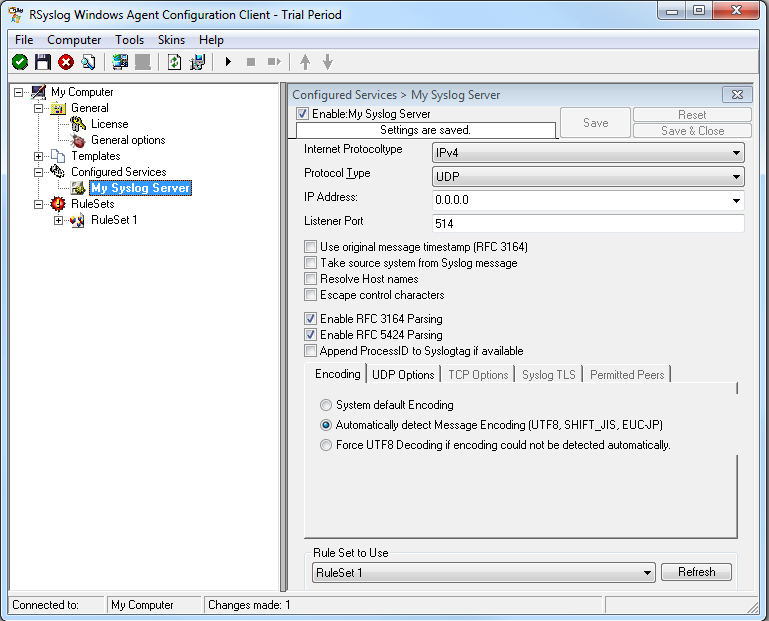
As you can see, the service has been created with the default parameters. As such, it operates as a RFC compliant standard Syslog server. But, we still need to make some changes so we can receive TLS syslog.
Step 4: Changing to TLS
First we need to change the protocol type. Change it to TCP. TLS syslog is not available with UDP. If you want, you can change the port to what your clients use for sending.
Now in the lower part of the configuration window click on the tab Syslog TLS. This is where the important TLS settings will be made.
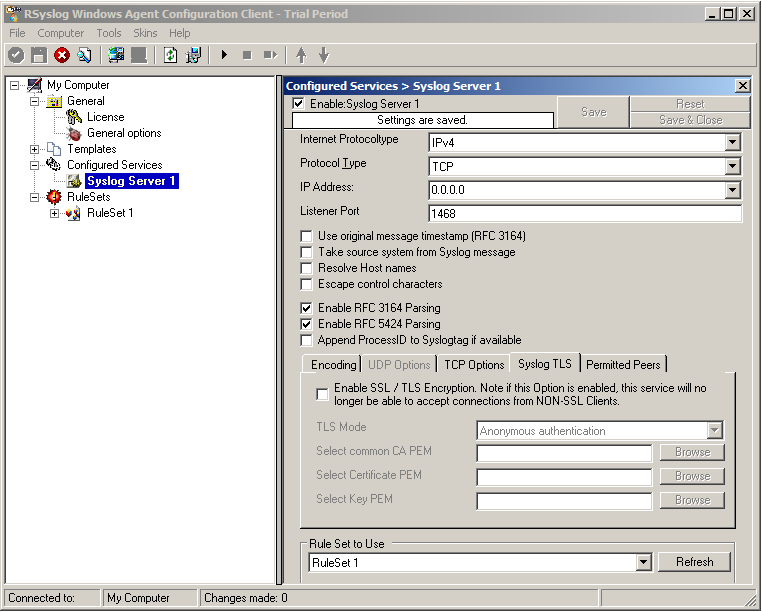
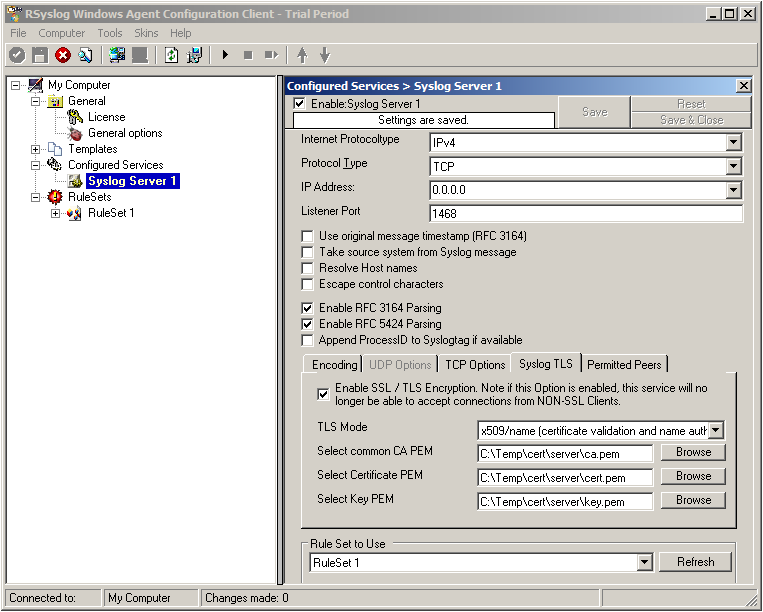
Now check the box for “Enable SSL / TLS Encryption”. The other options become available now. We suggest using x509/name mode, which is obviously the most secure of the available modes.
Below, select your PEMs that you created in Step 1 and submitted to the machine. It should look something like this, though your paths and certificate names might be different.
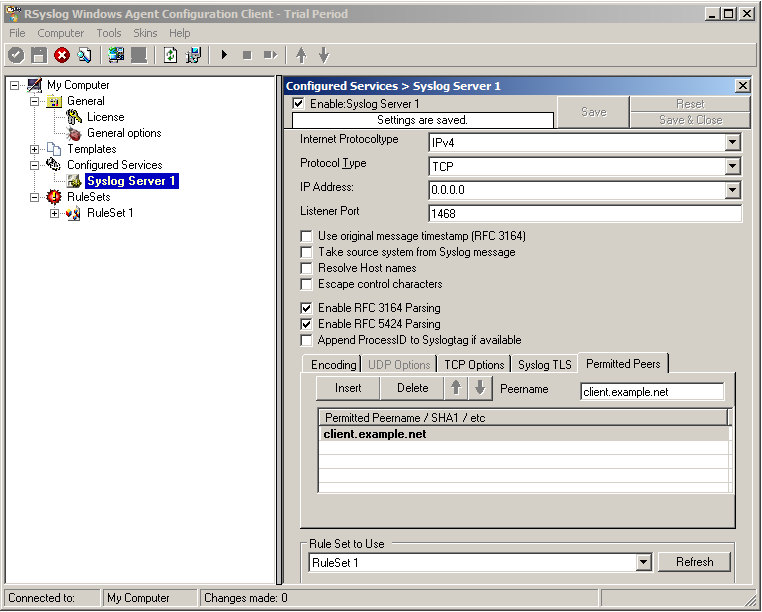
Now we can go on to the Permitted Peers tab. Here we define the systems that are allowed to send their syslog messages to our relay host. You could also use wildcards for the peers, like *.example.net. Just look below:
That is basically what we need to set up when receiving syslog via TLS.
Final Thoughts
That is just the setup need for receiving syslog via TLS in RSyslog Windows Agent. This is, as we already mentioned before, for a setup where the RSyslog Windows Agent is used as a relay. You could also apply TLS syslog to the outgoing syslog traffic, but that is not what we wanted to show here.
rsyslog 4.7.3 (v4-devel) released
Hi all,
We have just released rsyslog 4.7.3, a member of the v4-devel branch. 4.7.3 adds some new functions as well as some bugfixes. Continue reading “rsyslog 4.7.3 (v4-devel) released”