Using TLS with RELP
In this guide, we want to describe how to setup rsyslog with a RELP connection which is to be secured with TLS. For this guide you need at least rsyslog 7.5.1 and librelp 1.1.3 as well as gnutls 2.10.0 or above. These need to be installed on the server as well on the clients. The guide will split up into 3 parts.
- Creating the certificates
- Client Configuration
- Server Configuration
Step 1 – Creating the certificates
1.1 Setting up the CA
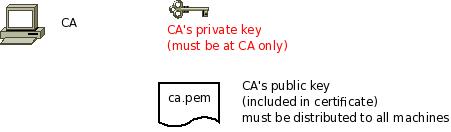
The first step is to set up a certificate authority (CA). It must be maintained by a trustworthy person (or group) and approves the indentities of all machines. It does so by issuing their certificates. In a small setup, the administrator can provide the CA function. What is important is the the CA’s private key is well-protocted and machine certificates are only issued if it is know they are valid (in a single-admin case that means the admin should not issue certificates to anyone else except himself). The CA creates a so-called self-signed certificate. That is, it approves its own authenticy. This sounds useless, but the key point to understand is that every machine will be provided a copy of the CA’s certificate. Accepting this certificate is a matter of trust. So by configuring the CA certificate, the administrator tells rsyslog which certificates to trust. This is the root of all trust under this model. That is why the CA’s private key is so important – everyone getting hold of it is trusted by our rsyslog instances.
- generate the private key:
certtool --generate-privkey --outfile ca-key.pem
This takes a short while. Be sure to do some work on your workstation, it waits for radom input. Switching between windows is sufficient ;)
- now create the (self-signed) CA certificate itself:
certtool --generate-self-signed --load-privkey ca-key.pem --outfile ca.pem
This generates the CA certificate. This command queries you for a number of things. Use appropriate responses. When it comes to certificate validity, keep in mind that you need to recreate all certificates when this one expires. So it may be a good idea to use a long period, eg. 3650 days (roughly 10 years). You need to specify that the certificates belongs to an authority. The certificate is used to sign other certificates.
Sample Screen Session
Text in red is user input. Please note that for some questions, there is no user input given. This means the default was accepted by simply pressing the enter key.
[root@rgf9dev sample]# certtool --generate-privkey --outfile ca-key.pem --bits 2048
Generating a 2048 bit RSA private key...
[root@rgf9dev sample]# certtool --generate-self-signed --load-privkey ca-key.pem --outfile ca.pem
Generating a self signed certificate...
Please enter the details of the certificate's distinguished name. Just press enter to ignore a field.
Country name (2 chars): US
Organization name: SomeOrg
Organizational unit name: SomeOU
Locality name: Somewhere
State or province order research paper online name: CA
Common name: someName (not necessarily DNS!)
UID:
This field should not be used in new certificates.
E-mail: Enter the certificate's serial number (decimal):
Activation/Expiration time.
The certificate will expire in (days): 3650
Extensions.
Does the certificate belong to an authority? (Y/N): y
Path length constraint (decimal, -1 for no constraint):
Is this a TLS web client certificate? (Y/N):
Is this also a TLS web server certificate? (Y/N):
Enter the e-mail of the subject of the certificate: someone@example.net
Will the certificate be used to sign other certificates? (Y/N): y
Will the certificate be used to sign CRLs? (Y/N):
Will the certificate be used to sign code? (Y/N):
Will the certificate be used to sign OCSP requests? (Y/N):
Will the certificate be used for time stamping? (Y/N):
Enter the URI of the CRL distribution point:
X.509 Certificate Information:
Version: 3
Serial Number (hex): 485a365e
Validity:
Not Before: Thu Jun 19 10:35:12 UTC 2008
Not After: Sun Jun 17 10:35:25 UTC 2018
Subject: C=US,O=SomeOrg,OU=SomeOU,L=Somewhere,ST=CA,CN=someName (not necessarily DNS!)
Subject Public Key Algorithm:
RSA Modulus (bits 2048):
d9:9c:82:46:24:7f:34:8f:60:cf:05:77:71:82:61:66
05:13:28:06:7a:70:41:bf:32:85:12:5c:25:a7:1a:5a
28:11:02:1a:78:c1:da:34:ee:b4:7e:12:9b:81:24:70
ff:e4:89:88:ca:05:30:0a:3f:d7:58:0b:38:24:a9:b7
2e:a2:b6:8a:1d:60:53:2f:ec:e9:38:36:3b:9b:77:93
5d:64:76:31:07:30:a5:31:0c:e2:ec:e3:8d:5d:13:01
11:3d:0b:5e:3c:4a:32:d8:f3:b3:56:22:32:cb:de:7d
64:9a:2b:91:d9:f0:0b:82:c1:29:d4:15:2c:41:0b:97
Exponent:
01:00:01
Extensions:
Basic Constraints (critical):
Certificate Authority (CA): TRUE
Subject Alternative Name (not critical):
RFC822name: someone@example.net
Key Usage (critical):
Certificate signing.
Subject Key Identifier (not critical):
fbfe968d10a73ae5b70d7b434886c8f872997b89
Other Information:
Public Key Id:
fbfe968d10a73ae5b70d7b434886c8f872997b89
Is the above information ok? (Y/N): y
Signing certificate...
[root@rgf9dev sample]# chmod 400 ca-key.pem
[root@rgf9dev sample]# ls -l
total 8
-r-------- 1 root root 887 2008-06-19 12:33 ca-key.pem
-rw-r--r-- 1 root root 1029 2008-06-19 12:36 ca.pem
[root@rgf9dev sample]#
Be sure to safeguard ca-key.pem! Nobody except the CA itself needs to have it. If some third party obtains it, you security is broken!
1.2 Generating the machine certificate
In this step, we generate certificates for each of the machines. Please note that both clients and servers need certificates. The certificate identifies each machine to the remote peer. The DNSName specified inside the certificate can be specified inside the tls.PermittedPeer config statements. For now, we assume that a single person (or group) is responsible for the whole rsyslog system and thus it is OK if that single person is in posession of all machine’s private keys. This simplification permits us to use a somewhat less complicated way of generating the machine certificates. So, we generate both the private and public key on the CA (which is NOT a server!) and then copy them over to the respective machines. If the roles of machine and CA administrators are split, the private key must be generated by the machine administrator. This is done via a certificate request. This request is then sent to the CA admin, which in turn generates the certificate (containing the public key). The CA admin then sends back the certificate to the machine admin, who installs it. That way, the CA admin never get’s hold of the machine’s private key. Instructions for this mode will be given in a later revision of this document. In any case, it is vital that the machine’s private key is protected. Anybody able to obtain that private key can imporsonate as the machine to which it belongs, thus breaching your security.
Sample Screen Session Text in red is user input. Please note that for some questions, there is no user input given. This means the default was accepted by simply pressing the enter key. Please note: you need to substitute the names specified below with values that match your environment. Most importantly, machine.example.net must be replaced by the actual name of the machine that will be using this certificate. For example, if you generate a certificate for a machine named “server.example.com”, you need to use that name. If you generate a certificate for “client.example.com”, you need to use this name. Make sure that each machine certificate has a unique name. If not, you can not apply proper access control.
[root@rgf9dev sample]# certtool --generate-privkey --outfile key.pem --bits 2048
Generating a 2048 bit RSA private key...
[root@rgf9dev sample]# certtool --generate-request --load-privkey key.pem --outfile request.pem
Generating a PKCS #10 certificate request...
Country name (2 chars): US
Organization name: SomeOrg
Organizational unit name: SomeOU
Locality name: Somewhere
State or province name: CA
Common name: machine.example.net
UID: Enter a dnsName of the subject of the certificate:
Enter the IP address of the subject of the certificate:
Enter the e-mail of the subject of the certificate:
Enter a challange password:
Does the certificate belong to an authority? (y/N): n
Will the certificate be used for signing (DHE and RSA-EXPORT ciphersuites)? (y/N):
Will the certificate be used for encryption (RSA ciphersuites)? (y/N):
Is this a TLS web client certificate? (y/N): y
Is this also a TLS web server certificate? (y/N): y
[root@rgf9dev sample]# certtool --generate-certificate --load-request request.pem --outfile cert.pem --load-ca-certificate ca.pem --load-ca-privkey ca-key.pem
Generating a signed certificate...
Enter the certificate's serial number (decimal):


Activation/Expiration time.
The certificate will expire in (days): 1000


Extensions.
Do you want to honour the extensions from the request? (y/N):
Does the certificate belong to an authority? (Y/N): n
Is this a TLS web client certificate? (Y/N): y
Is this also a TLS web server certificate? (Y/N): y
Enter the dnsName of the subject of the certificate: machine.example.net {This is the name of the machine that will use the certificate}
Enter  the IP address of the subject of certificate:
Will the certificate be used for signing (DHE and RSA-EXPORT ciphersuites)? (Y/N):
Will the certificate be used for encryption (RSA ciphersuites)? (Y/N):
X.509 Certificate Information:
Version: 3 Serial Number (hex): 485a3819
Validity:
Not Before: Thu Jun 19 10:42:54 UTC 2008
Not After: Wed Mar 16 10:42:57 UTC 2011
Subject: C=US,O=SomeOrg,OU=SomeOU,L=Somewhere,ST=CA,CN=machine.example.net
Subject Public Key Algorithm: RSA
Modulus (bits 2048):
b2:4e:5b:a9:48:1e:ff:2e:73:a1:33:ee:d8:a2:af:ae
2f:23:76:91:b8:39:94:00:23:f2:6f:25:ad:c9:6a:ab
2d:e6:f3:62:d8:3e:6e:8a:d6:1e:3f:72:e5:d8:b9:e0
d0:79:c2:94:21:65:0b:10:53:66:b0:36:a6:a7:cd:46
1e:2c:6a:9b:79:c6:ee:c6:e2:ed:b0:a9:59:e2:49:da
c7:e3:f0:1c:e0:53:98:87:0d:d5:28:db:a4:82:36:ed
3a:1e:d1:5c:07:13:95:5d:b3:28:05:17:2a:2b:b6:8e
8e:78:d2:cf:ac:87:13:15:fc:17:43:6b:15:c3:7d:b9

Exponent: 01:00:01
Extensions:
Basic Constraints (critical):
Certificate Authority (CA): FALSE
Key Purpose (not critical):
TLS WWW Client. TLS WWW Server.
Subject Alternative Name (not critical):
DNSname: machine.example.net
Subject Key Identifier (not critical):
0ce1c3dbd19d31fa035b07afe2e0ef22d90b28ac
Authority Key Identifier (not critical):
fbfe968d10a73ae5b70d7b434886c8f872997b89
Other Information:
Public Key Id:
0ce1c3dbd19d31fa035b07afe2e0ef22d90b28ac

Is the above information ok? (Y/N): y
Signing certificate...
[root@rgf9dev sample]# rm -f request.pem
[root@rgf9dev sample]# ls -l
total 16
-r-------- 1 root root 887 2008-06-19 12:33 ca-key.pem
-rw-r--r-- 1 root root 1029 2008-06-19 12:36 ca.pem
-rw-r--r-- 1 root root 1074 2008-06-19 12:43 cert.pem
-rw-r--r-- 1 root root 887 2008-06-19 12:40 key.pem
[root@rgf9dev sample]# # it may be a good idea to rename the files to indicate where they belong to
[root@rgf9dev sample]# mv cert.pem machine-cert.pem
[root@rgf9dev sample]# mv key.pem machine-key.pem
[root@rgf9dev sample]#
Distributing Files Provide the machine with:
- a copy of ca.pem
- cert.pem
- key.pem
Never provide anyone with ca-key.pem! Also, make sure nobody but the machine in question gets hold of key.pem.
Step 2: Client Configuration
Usually, this is a rather simple matter. It is basically a configuration to forward messages via RELP, just with a few extra parameters. A configuration could look like this:
module(load="imuxsock")
module(load="omrelp")
module(load="imtcp")
input(type="imtcp" port="514")
action(type="omrelp" target="192.168.233.153" port="20514" tls="on" tls.caCert="/home/test/cert/ca.pem" tls.myCert="/home/test/cert/ubuntu1-cert.pem" tls.myPrivKey="/home/test/cert/ubuntu1-key.pem" tls.authmode="name" tls.permittedpeer=["ubuntu-server"] )
The configuration is basically made of 3 parts.
First we load the modules that we need. In this case it is imuxsock, omrelp and imtcp. While imtcp and imuxsock are input modules and thus basically server for “generating” log data, omrelp is a output module and server to forward messages to a server via RELP.
The second part is a input. While imuxsock is always listening when the module is loaded, imtcp needs to be configured as an extra item. This also holds the possibility to configure multiple TCP listeners which could listen to different ports or have different parameters.
The third part is the action. In our case, we simply take all messages and forward them via RELP to our central server. Basically for a RELP connection it would be sufficient to configure the target and the port to send on. For this case, we enable TLS transportation with tls=”on” and secure it with our certificates. As you can see, we need to load our three certificate files as mentioned in the first section. They are all three needed. Also, we define the authentication mode as “name”. By that, the certificate of the other machine will be checked against the hostname to ensure the right machine uses the certificate. Also we allow a certain peer with tls.permittedpeer to answer to this machine.
Step 3: Server Configuration
The server configuration is only a little more complicated than the client configuration. Here is the example.
module(load="imuxsock")
module(load="imrelp" ruleset="relp")
input(type="imrelp" port="20514"
tls="on"
tls.caCert="/home/test/cert/ca.pem"
tls.myCert="/home/test/cert/server-cert.pem"
tls.myPrivKey="/home/test/cert/server-key.pem"
tls.authMode="name"
tls.permittedpeer=["ubuntu-client1","ubuntu-client2","ubuntu-client3"] )
ruleset (name="relp") { action(type="omfile" file="/var/log/relp_log") }
Again, the configuration is made of 3 sections.
First we load the modules. In this case, we load imuxsock for local logging ability (though not further used here) and imrelp for receiving log messages via RELP. As you can see, the module has the ruleset parameter given. That means, that the whole module is bound to a ruleset. This means, that all configured listeners will automatically use the later configured ruleset. This is contrary to other modules where you can configure a separate ruleset for each listener, but this is not possible with imrelp.
The second portion is the input. For a basic configuration it would be sufficient to specify the port to listen on. But since we want to enable TLS-functionality, we need to use tls=”on” again. Also we need to configure the parameters for all the parts of the certificate. Please note, that except for the CA certificate (which is the same on all machines) the certificate and key need to be for this single machine. Also we configure the authentication mode to “name” and an array of permitted peers.
Finally, as third step, we configure the ruleset and the action. In this case, we simply use the omfile module. The functionality is automatically loaded through rsyslog and we do not need to configure the module explicitely at the beginning.
Verdict
One would agree, that setting up rsyslog to use TLS-secured RELP for transferring log messages is basically very easy. Though, creating and maintaing all the certificates can be a tedious amount of work. But, a secure log transmission sure is worth the effort. Also, despite what has been mentioned, a machine certificate could also be created for multiple machines at once, though this is not recommended by Adiscon.
Something that is also noteworthy concerns the authentication mode. There are two other options that can be used, but these are not as secure as authentication against the name. Anonymous authentication can be reached by simply using tls=”on”, but not setting any other parameters. This only secures transportation of log messages, but does not ensure, that no false log data can be injected by a compromised machine or a machine not belonging to your network. A different approach would be fingerprint authentication. This can be used by using the fingerprint of a machine certificate on the peer machine. The fingerprint can be either received by the error log of a machine and then copying and pasting it into tls.permittedpeer, or by using certtool to review certificate details. Please note, that this is not very secure as well as the peers only check for the fingerprint of the certificate and not the certificate itself.
Log normalization for different formats
In this article we want to show you a very functional use-case. We want to use rsyslog in conjunction with log normalization to bring login events from several different log sources together into a readable format and get rid of all the useless information which we don’t need. The log sources will be windows, linux and snare. All of them create log messages in a very different and often hard to read format. After bringing the information into a format that suits us well, we will finally write the essence of the log messages into a file. For this example we will also show two different output formats.
What do we need?
We need several things to be installed. In brackets we will show the version we used for this guide.
- rsyslog (7.3.6)
- liblognorm (0.3.5)
- libee (0.4.1)
- libestr (0.1.4)
These are the current versions at the date of this guide and need to be considered the minimum to be installed.
What do the logs look like?
The log messages come in different formats as already explained. We differentiate between 3 different formats.
1. Windows
The Adiscon products for Windows are able to send syslog messages directly in @cee/lumberjack format. That means, that the message consists of the default syslog header, which is followed by all the message properties being filled into the @cee representation format.
2. Linux
The log messages from Linux are in no specific format. Therefore we need to make some effort to get the data we want.
3. Snare
Snare logs are somewhat special again. They are somewhat like csv, but it uses tabs as a delimiter.
Installation
You should install libee, libestr and liblognorm before installing rsyslog. This is simply, because you won’t be able to install rsyslog the other way round. For rsyslog you need to know, that we will need several additional modules. These are:
- imtcp
- mmjsonparse
- mmnormalize
You configure should then look simliar to this:
./configure --prefix=/usr --enable-imtcp --enable-mmjsonparse --enable-mmnormalize
This will be sufficient, since we do not want to use any more extra or special features.
Please note: There are many ways to distribute rsyslog. But, make sure that the platform you build rsyslog on is the same platform as where it should be used. You cannot build rsyslog on CentOS and use it on Ubuntu. The differences between the platforms are just to big. The same applies to different versions of the same platform. When building on a older platform and using it on a newer version, this may work, but with restrictions. Whereas building on a newer version and using it on a older version will probably not work at all. So, if you build rsyslog from Source and want to use it on another machine, make sure the platform is the same.
The Configuration
The configuration is quite extensive. Thus we will show it in several parts. You can download the complete configuration here.
1. Rulebase
Before we begin with the rsyslog configuration, we will set up our rulebase for later. The rulebase is needed for mmnormalize and is a separate file. Our rulebase consists of two parts. The first part will handle the linux login messages and the second part is for the login messages sent by Snare. For more information about how to create a rulebase, visit this link.
# SSH and Sudo logins
prefix=%rcvdat:date-rfc3164% %rcvdfrom:word%
rule=: sudo: pam_unix(sudo:session): session %type:word% for user root by %user:char-to:(%(uid=%-:number%)
rule=: sudo: pam_unix(sudo:session): session %type:word% for user %user:word%
rule=: sshd[%-:number%]: pam_unix(sshd:session): session %type:word% for user %user:word% by (uid=%-:number%)
rule=: sshd[%-:number%]: pam_unix(sshd:session): session %type:word% for user %user:word%
As you can see here, we have four rules. They are all lead by what is defined by the prefix. They represent the different log messages, but all variable parts that are needed for our final log will be put into properties. And in the case that some values might be different for each message, but not needed later, they will be parsed into a null property.
# Snare logins
prefix=
rule=:%rcvdat:date-rfc5424%#011%-:char-to:#%#011%-:char-to:#%#011%-:char-to:#%#011%-:char-to:#%#011%id:number%#011%-:char-to:#%#011%-:char-to:\%\%user:char-to:#%#011%-:char-to:#%#011%-:char-to:#%#011%rcvdfrom:char-to:#%#011%-:char-to:#%#011#011%-:char-to:#%#011%-:number%
The Snare format is way different than before. It is basically a tab delimited message format and rsyslog will by default replace all character codes into their ASCII values. Thus the message will look different and we have alle those character code replacements which are represented here as well. Most values from the Snare message are not needed and will be again filled into a null property. But the values we need, will be put into a real property, which we can use later.
2. Modules
In this first configuration step for the rsyslog configuration, we configure the modules that we will use.
module(load="imuxsock")
 module(load="imtcp")
 module(load="mmjsonparse")
 module(load="mmnormalize")
For this example we have basically four modules. Imuxsock will keep local logging activity, though we don’t really need it now. Imtcp will take care of syslog reception, so we can get the log messages via syslog from the various machines. Mmjsonparse and mmnormalize are message modification modules. The first will serve to parse messages in json format, the latter will parse messages according to a rulebase.
3. Inputs
Since we have three log sources, we will use three receivers.
input(type="imtcp" port="13514" Ruleset="windows")
input(type="imtcp" port="13515" Ruleset="linux")
input(type="imtcp" port="13516" Ruleset="snare")
As you can see, all three receivers are working on a different port and are directly bound to a ruleset. That way, there is no need to sort the messages per sender later with filters. The rulesets will be different for each receiver, since there are different needs of processing.
4. Templates
Now come the two format templates for the output.
template(name="csv" type="list") {
        property(name="$!usr!rcvdat" format="csv")
        constant(value=",")
        property(name="$!usr!rcvdfrom" format="csv")
        constant(value=",")
        property(name="$!usr!user" format="csv")
        constant(value=",")
        property(name="$!usr!type" format="csv")
        constant(value="\n")
}
template(name="cee" type="subtree" subtree="$!usr")
The first template is called csv. It will write our needed values in a comma-separated format. The second template is called cee. We can simply choose a subtree of values here which will automatically be put in @cee format. As you can see here, there is a huge difference concerning the effort needed for setting up the templates. In the end, the log messages look somewhat similar and will have the same values, but the format is different.
5. Rulesets
Now we get to the most interesting part. The rulesets. We will have three different rulesets which all serve their special purpose. As you will see later, we have 4 rulesets, indeed. But the forth ruleset holds the output and will be explained in step 6.
# Rulesets
ruleset(name="windows") {
       action(type="mmjsonparse")
       if $parsesuccess == "OK" then {
                if $!id == "4634" then
                        set $!usr!type = "logoff";
                else if $!id == "4624" then
                        set $!usr!type = "logon";
                set $!usr!rcvdfrom = $!source;
                set $!usr!rcvdat = $timereported;
                set $!usr!user = $!TargetUserName;
                call output
        }
}
The first ruleset will handle the log messages sent from Windows. Since they will be already sent in @cee-format, there is not much need for processing. First a action is called for all messages that run into this ruleset. Basically, the message will be parsed for their properties and values. If the message is successfully parsed (which only happens if the format is correct) then we go on and fill some user-defined variables in a special subtree of values. As you can see, it is checked whether the field “id” has a certain number and filles the variable $!usr!type with logoff or logon, which makes the final file more readable. After that we set a variable for the source system, timestamp of the log message and the user name that either logged on or off. Finally, we call our fourth ruleset for writing to disk.
ruleset(name="linux") {
        action(type="mmjsonparse")
        if $parsesuccess == "FAIL" then
        #/* only try normalization if non-lumberjack */
        action(type="mmnormalize" rulebase="/etc/rulebase.rb" userawmsg="on")
        if $!user != "" then {
                if $!type == "opened" then
                        set $!usr!type = "logon";
                else if $!type == "closed" then
                        set $!usr!type = "logoff";
                set $!usr!rcvdfrom = $!rcvdfrom;
                set $!usr!rcvdat = $!rcvdat;
                set $!usr!user = $!user;
                call output
        }
}
The second ruleset is for the linux log messages. Again we first check the log messages with mmjsonparse, but simply to verify that they are NOT in lumberjack format. If parsing the messages failed, which we want here, the log messages will be run through mmnormalize. This module uses the rulebase we created in the beginning and parses the messages according to this rulebase. If parsed successfully, processing continues. We check if the variable $!user isn’t empty. If that is the case, we set again our variables in the subtree and again we begin with the type of message (logon/logoff). Basically opened or closed would be sufficient enough for an experienced reader of logfiles, but we want to have all the log messages in the same format, thus this value will also be changed into logon and logoff. After that we alse set a variable for the source system, timestamp of the log message and the user name again. Finally, we call our fourth ruleset for writing to disk.
ruleset(name="snare") {
        action(type="mmjsonparse")
        if $parsesuccess == "FAIL" then
        #/* only try normalization if non-lumberjack */
        action(type="mmnormalize" rulebase="/etc/rulebase.rb" userawmsg="on")
        if $!user != "" then {
                if $!id == "4634" then
                        set $!usr!type = "logoff";
                else if $!id == "4624" then
                        set $!usr!type = "logon";
                set $!usr!rcvdfrom = $!rcvdfrom;
                set $!usr!rcvdat = $!rcvdat;
                set $!usr!user = $!user;
                call output
        }
}
The third ruleset is for the log messages from Snare. As with the linux messages, we check the messages if they are non-lumberjack by using mmjsonparse. And again we will use mmnormalize and the given rulebase to parse the messages. The rest is like for the linux messages. The only difference is, that we have basically Windows messages and need to use the Event ID to determine if the message represents a logon or a logoff. So you can consider this part as a combination from both rulesets. And of course finally, we call the ruleset for the output.
6. Output
As mentioned before, there is a fourth ruleset in the configuration, which just handles the output.
ruleset(name="outwriter") {
        action(type="omfile" file="/var/log/logfile.csv" template="csv")
        action(type="omfile" file="/var/log/logfile.cee" template="cee")
}
This final ruleset provides us with our two outputs. They are both writing to disk. The only difference is, that they are using different templates as per the templates we defined earlier. So one file will hold the data in csv format whilst the other file holds the data in @cee format.
Final Thoughts
We have now our rsyslog configuration and our rulebase. The log messages will be parsed for the specific data we want from the different login log messages according to their specific format. And here is what the result might look like.
First in csv-format:
"Feb  5 14:19:00","win7fr","fr-win","logon"
"Feb  5 14:19:00","win7fr","fr-win","logoff"
"Jan 16 09:28:33","linuxvm","fr-lin","logon"
"Jan 16 09:28:33","linuxvm","fr-lin","logoff"
And in @cee-format:
@cee: { "type": "logon", "rcvdfrom": "win7fr", "rcvdat": "Feb  5 14:19:00", "user": "fr-win" }
@cee: { "type": "logoff", "rcvdfrom": "win7fr", "rcvdat": "Feb  5 14:19:00", "user": "fr-win" }
@cee: { "type": "logon", "rcvdfrom": "linuxvm", "rcvdat": "Jan 16 09:28:33", "user": "fr-lin" }
@cee: { "type": "logoff", "rcvdfrom": "linuxvm", "rcvdat": "Jan 16 09:28:33", "user": "fr-lin" }
So we now have two different formats, holding basically the same information. As you can see, we have now only the really necessary information of those log messages, namely the type of log message, the source system, the timestamp of this occurence and the user associated to this event.
Using MongoDB with rsyslog and LogAnalyzer
In this scenario we want to receive cee-formatted messages from a different system with rsyslog, store the messages with MongoDB and then display the stored messages with Adiscon LogAnalyzer. This is a very common use-case. Please read through the complete guide before starting.
We will split this guide in 3 main parts. These parts can consist of several steps.
- Setting up rsyslog
- Setting up MongoDB
- Setting up LogAnalyzer
This guide has been created with rsyslog 7.3.6 on ubuntu 12.04 LTS and Adiscon LogAnalyzer 3.6.3. All additional packages, services or applications where the latest version at that time.
Before you begin
Please note, there are many ways to distribute rsyslog. But, make sure that the platform you build rsyslog on is the same platform as where it should be used. You cannot build rsyslog on CentOS and use it on Ubuntu. The differences between the platforms are just to big. The same applies to different versions of the same platform. When building on a older platform and using it on a newer version, this may work, but with restrictions. Whereas building on a newer version and using it on a older version will probably not work at all. So, if you build rsyslog from Source and want to use it on another machine, make sure the platform is the same.
Step 1 – Setting up rsyslog
We need to setup rsyslog first. Not only do we need the core functionality, but several additional modules. For this case we want to receive the syslog messages via TCP, thus we need imtcp. For processing we need first mmjsonparse and ommongodb. Your configure should look like this.
./configure --prefix=/usr --enable-imtcp --enable-mmjsonparse --enable-ommongodb
The module mmjsonparse will be needed to verify and parse the @cee messages. Ommongodb will be used to write into the MongoDB. After the configure and installation, we can create our config. The config for our case looks like this:
module(load="imtcp")
module(load="mmjsonparse")
module(load="ommongodb")
input(type="imtcp" port="13514" Ruleset="mongodb")
template(name="mongodball" type="subtree" subtree="$!")
ruleset(name="mongodb") {
        action(type="mmjsonparse")
        if $parsesuccess == "OK" then {
                set $!time = $timestamp;
                set $!sys = $hostname;
                set $!procid = $syslogtag;
                set $!syslog_fac = $syslogfacility;
                set $!syslog_sever = $syslogpriority;
                set $!pid = $procid;
                action(type="ommongodb" server="127.0.0.1" db="logs" collection="syslog" template="mongodball")
                }
        }
As always, we first load the modules. The next part is the input. We need to receive tcp via imtcp. Please note, that we directly bind the input to a ruleset. The third part of the configuration is a template. We need it later when writing to MongoDB. Since we will automatically transform our @cee-message into json, we can use a subtree template. The template itself is basically the root of the subtree.
The last and most important part is the ruleset. Here all of our work is done. First, all messages are run through the mmjsonparse module. This will not only verify if we received a valid json message, but also transforms all the values into a json subtree. If the parsing was successful, we need to set several variables for the subtree. Information that is delivered in the syslog header will not be parsed into the subtree by mmjsonparse automatically. Thus we have to set subtree variables with the values of some default properties like timestamp, hostname and so on. After that we have basically all information from the complete syslog message in the subtree format. Finally a last action is needed. We need to write our log messages to MongoDB. In this example, MongoDB is installed on the same machine. We want to use the db “logs” and as collection we want to use “syslog”. And we use our subtree template to define the format that is written to MongoDB. Thus, all our parsed variables are stored separately. If we do not use this template, the @cee message gets written as it is into the msg field in MongoDB. But this is not what we want. We want all variables to be available separately.
That is basically it for rsyslog. You can now save the configuration and restart rsyslog. Though it won’t be able to be useful yet. We still need to install MongoDB.
Step 2 – Install MongoDB
Making a basic install for MongoDB is rather easy. Simply install the following packages:
mongodb
mongodb-server
php-pecl-mongo
libmongo-client
libglib2.0-dev
Please note, that package names may vary for different distributions.
After we have installed the packages, the MongoDB Server is already ready. By default, it is not secured by a user or password. Refer to the MongoDB manual for more information. Databases and collections (equivalent to tables) are created by rsyslog and do not need to be defined with the mongo shell. We will stick with the default setup to keep it simple.
Step 3 – Installing Adiscon LogAnalyzer
To run Adiscon LogAnalyzer, you need a webserver with PHP. The easiest way is to use apache2 and php5. To be able to access the MongoDB, we need to install an additional package. Run the following command
sudo pecl install mongo
You might need to install the package php-pear first, if it hasn’t been installed already with PHP.
After that, we need to put the following line into the file php.ini.
extension=mongo.so
Remember to restart your webserver after making changes to the php.ini. Without a lot of configuration, this should aready work.
We can now install Adiscon LogAnalyzer. Download the latest version from the Adiscon LogAnalyzer Download page and install it as it is described in the documentation.
The only difference we need to make is when setting up the log source in step 4.5. You need to set at least the following as shown in the screenshot:

Source Type: MongoDB Native
Table Type: MongoDB
Database Name: logs
Database Tablename: syslog
Database user: <clear this field>
The User and Password is of course needed, if you set it in your MongoDB setup.
After you have finished the installation of Adiscon LogAnalyzer, you should now be seeing the LogAnalyzer overview and the log messages in a table view (if you have already stored them in MongoDB). Now if you click on a specific message, you get to see the detail view of the log message.
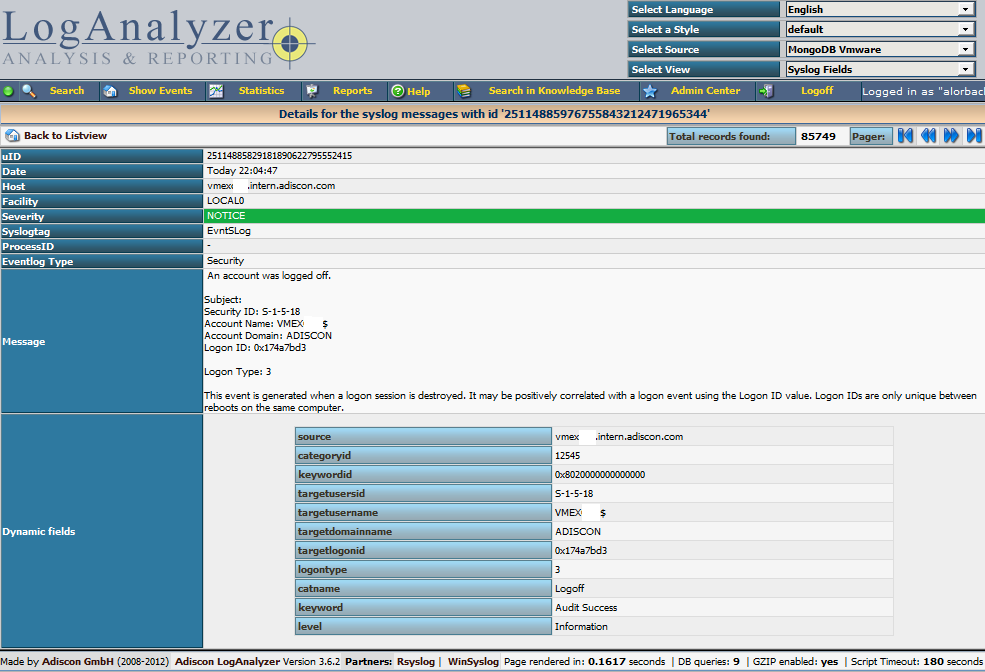
Click on the picture for a bigger size
As you can see, you get a list of dynamic fields. These fields where already sent in @cee format from the original source and were parsed by rsyslog and mmjsonparse and finally they were automatically filled into the MongoDB.
With this setup, you are independent of a fixed database structure. Fields are inserted dynamically into the database as they are available and they are dynamically display by Adiscon LogAnalyzer as well.
Normalizing Cisco ASA messages
This time, we want to parse log messages received from a Cisco ASA for specific parts. The log messages will be parsed by liblognorm and then they will be written into a specific file resembling the sent code.
This guide has been tested with v7.3.4 of rsyslog.
Things to think about
We basically need a receiver, the normalizer module mmnormalize, some templates and several actions. To keep the logs seperated from other log messages, we also will need a filter. But that is just valid for the rsyslog configuration.
We also need liblognorm installed and a rulebase to work with. The rulebase is needed for liblognorm to know what to do with the messages, so it knows, which part should be fed into a custom property and which to ignore.
Config Statements
We now have basically two parts to configure. The first part should be the rulebase which holds format representations of the expected log messages. For this example we will work with the following log line:
2012-11-23T10:47:42+01:00 0.0.0.0 : %ASA-3-313001: Denied ICMP type=8, code=0 from 77.2.2.2 on interface outside
The rulebase entry for this log line looks like this:
rule=: %date:word% %host:ipv4% : \x25ASA-%ddd:char-to:-%-%eee:number%: Denied ICMP type=%number2:number%, code=%number3:number% from %origin:ipv4% on interface outside
And here is the rsyslog configuration:
module (load="immark")
module (load="imuxsock")
module (load="imklog")
module (load="mmnormalize")
module (load="imudp")
input(type="imudp" port="514")
template(name="filename" type="string" string="/var/log/%$!ddd%-%$!eee%")
if $msg contains '%ASA' then{
 action(type="mmnormalize" userawmsg="off" rulebase="/path/to/rulebase.rb")
 action(type="omfile" DynaFile="filename")
}
How it works
The rulebase holds currently one rule. The rule is a representation of the above log message. For this case, we are only interested in the ASA code. The code identifies a specific message, thus, the message itself is not interesting. Though, we have to reflect complete message and put temporary variables, where the same message of a kind still has different values. These would be the timestamp, source, type and code the the IP which triggered the message. The problem is here, that we really only need two parts to be filled into a property, but other parts can be variable. The message format can be the same, but i.e. the IP from the source can vary. If you fill in a concrete value into the rule where such parts are, the message will only be parsed correctly if the message originates from the exact same IP.
The configuration itself isn’t very complicated. It loads several standard modules, which are mainly used to ensure local logging, as well as the UDP input module and the precious mmnormalize. The mmnormalize module will be later used as a output module. It handles the loading of the rulebase, as well as implements the normalization features of liblognorm.
After loading the modules, we have our single UDP input configured, which is necessary to receive the log messages from the Cisco ASA. Nothing fancy here, but a standard syslog receiver for UDP.
The next step is to create a template. The template is not for a message output format, but a file name format. It will help writing the messages into log files that reflect the ASA number in the filename.
Finally we will filter for “%ASA” in the message. That will ensure, that only ASA messages are processed by the following actions. The first action runs the message through mmnormalize, while using our rulebase. The messages will be parsed by liblognorm. If the messages do fit the rules in the rulebase, the parts we need will be put into properties. These properties come into play in the second action where we simply write the messages via Dynafile to disk. The template and our new properties will be used to define the filename.
Important
This configuration works or fails with the rulebase. All messages, that should be run through the normalizer must fit to a rule. If you are in doubt, that the rules are correct, follow the linked guide. It will show you how to create a output format that shows if a message has been parsed correctly or if and where the parsing broke.
Receiving CEE enhanced syslog in rsyslog
We want to receive syslog messages from another system that contain Windows Events. The messages are sent in the CEE enhanced format. The syslog messages should be stored in a database to be reviewed with Adiscon LogAnalyzer.
Things to think about
For the basics, we need at least a listener for UDP or TCP, depending on what you are using. We will configure both for now. As additional modules, we will need mmjsonparse, which has been introduced in v6. And in addition the output module for a MySQL database.
To enable the modules, we need some templates.
Note, that the receiver ports you specify must match the ports on the sending machines.
Config Statements
# modules
$ModLoad imuxsock # provides support for local system logging
$ModLoad imklog   # provides kernel logging support (previously done by rklogd)
$ModLoad immark  # provides --MARK-- message capability
$ModLoad mmjsonparse
$ModLoad ommysql
$ModLoad imudp
$ModLoad imtcp
# provides UDP syslog reception
$UDPServerRun 514
# provides TCP syslog reception
$InputTCPServerRun 10514
# templates
$template database,"insert into systemevents (DeviceReportedTime, FromHost, EventLogType, EventSource, EventID,
EventCategory, EventUser, Facility, Priority, Message) values ('%timereported:::date-rfc3339%', '%$!source%',
'%$!nteventlogtype%', '%$!sourceproc%', '%$!id%', '%$!categoryid%', '%$!user%', '%syslogfacility%',
'%syslogpriority%', '%$!msg:::space-cc%')",SQL
# actions *.* :mmjsonparse: & :ommysql:mysqlserver,database,user,password;database
How it works
First of all, we have the modules being loaded. In addition to the modules needed for local logging, we have loaded the input modules for UDP and TCP syslog.
The next part will enable the listeners. For UDP we use the default port 514. For TCP we use port 10514. Please note, that the senders MUST match the respective port.
The third step is to create a template. You can see it at as 4 lines here, but it really is a single line. mmjsonparse will take messages and process them. It will automatically detect the CEE enhanced json format an create custom properties with the name fields in the message and fill it the available content. But, to use it for a database insert, we need a custom insert statement. As you can see, the most important fields are present. These fields should already be available in the database that is used by Adiscon LogAnalyzer. We now only need to tell rsyslog, which database field will be filled with which field from the json message.
The format differences are important. Some fields will be filled with information from the syslog header, like the timestamp, facility and priority. Thus we can use the regular properties. The properties from the json message always need to start with “$!”. And for the msg property, we will additionaly use the space-cc option. This will strip line feeds from multiline messages.
Finally we have the actions. The first action “*.* :mmjsonparse:” will be applied to all messages here, though it will not be able to parse messages from the local log socket. This calls the mmjsonparse module to parse the message and fill the fields as mentioned before. The second line holds the output to mysql. We extended the chain of actions by “&” instead of a filter.
Important notes
The most crucial part is the template. If the template is not correct, the whole action chain will not work. Or it will work at least not correctly. Though, the above template should work fine with most Windows Events, it might be necessary to alter the template for other message types and database structures.
Storing and forwarding remote messages
In this scenario, we want to store remote sent messages into a specific local file and forward the received messages to another syslog server. Local messages should still be locally stored.
Things to think about
How should this work out? Basically, we need a syslog listener for TCP and one for UDP, the local logging service and two rulesets, one for the local logging and one for the remote logging.
TCP recpetion is not a build-in capability. You need to load the imtcp plugin in order to enable it. This needs to be done only once in rsyslog.conf. Do it right at the top.
Note that the server port address specified in $InputTCPServerRun must match the port address that the clients send messages to.
Config Statements
# Modules
$ModLoad imtcp
$ModLoad imudp
$ModLoad imuxsock
$ModLoad imklog
# Templates
# log every host in its own directory
$template RemoteHost,"/var/syslog/hosts/%HOSTNAME%/%$YEAR%/%$MONTH%/%$DAY%/syslog.log"
### Rulesets
# Local Logging
$RuleSet local
kern.*                                                 /var/log/messages
*.info;mail.none;authpriv.none;cron.none                /var/log/messages
authpriv.*                                              /var/log/secure
mail.*                                                  -/var/log/maillog
cron.*                                                  /var/log/cron
*.emerg                                                 *
uucp,news.crit                                          /var/log/spooler
local7.*                                                /var/log/boot.log
# use the local RuleSet as default if not specified otherwise
$DefaultRuleset local

# Remote Logging
$RuleSet remote
*.* ?RemoteHost
# Send messages we receive to Gremlin
*.* @@W.X.Y.Z:514
### Listeners
# bind ruleset to tcp listener
$InputTCPServerBindRuleset remote
# and activate it:
$InputTCPServerRun 10514

$InputUDPServerBindRuleset remote
$UDPServerRun 514
How it works
The configuration basically works in 4 parts. First, we load all the modules (imtcp, imudp, imuxsock, imklog). Then we specify the templates for creating files. The we create the rulesets which we can use for the different receivers. And last we set the listeners.
The rulesets are somewhat interesting to look at. The ruleset “local” will be set as the default ruleset. That means, that it will be used by any listener if it is not specified otherwise. Further, this ruleset uses the default log paths vor various facilities and severities.
The ruleset “remote” on the other hand takes care of the local logging and forwarding of all log messages that are received either via UDP or TCP. First, all the messages will be stored in a local file. The filename will be generated with the help of the template at the beginning of our configuration (in our example a rather complex folder structure will be used). After logging into the file, all the messages will be forwarded to another syslog server via TCP.
In the last part of the configuration we set the syslog listeners. We first bind the listener to the ruleset “remote”, then we give it the directive to run the listener with the port to use. In our case we use 10514 for TCP and 514 for UDP.
Important
There are some tricks in this configuration. Since we are actively using the rulesets, we must specify those rulesets before being able to bind them to a listener. That means, the order in the configuration is somewhat different than usual. Usually we would put the listener commands on top of the configuration right after the modules. Now we need to specify the rulesets first, then set the listeners (including the bind command). This is due to the current configuration design of rsyslog. To bind a listener to a ruleset, the ruleset object must at least be present before the listener is created. And that is why we need this kind of order for our configuration.
How to write to a local socket?
One member of the rsyslog comunity wrote:
I’d like to forward via a local UNIX domain socket, instead. I think I understand how to configure the ‘imuxsock’ module so my unprivileged instance reads from a non-standard socket location. But I can’t figure out how to tell my root instance to forward via a local domain socket.
I didn’t figure out a completely RSyslog-native method, but another poster’s message pointed me toward ‘socat’ and ‘omprog’, which I have working, now. (It would be really nice if RSyslog could support this natively, though.)
In case anyone else wants to set this up, maybe this will save you some effort. I’m also interested in any comments/criticisms about this method, I’d love to hear suggestions for better ways to make this work.
Also, I rolled it all up into a Fedora/EL RPM spec, and I’ll send it on to anyone who’s interested–just ask.
Setup steps:
- Install the ‘socat’ utility.
- Build RSyslog with the ‘–enable-omprog’ ./configure flag.
- Create two separate RSyslog config files, one for the ‘root’ instance (writes to the socket) and a second for the ‘unprivileged’ instance (reads from the socket).
- Rewrite your RSyslog init script to start two separate daemon instances, one using each config file (and separate PID files, too).
- Create the user ‘rsyslogd’ and the group ‘rsyslogd’.
- Set permissions/ownerships as needed to allow the user ‘rsyslogd’ to write to the file ‘/var/log/rsyslog.log’
- Create an executable script called
'/usr/libexec/rsyslogd/omprog_socat' that contains the lines:
#!/bin/bash
/usr/bin/socat -t0 -T0 -lydaemon -d - UNIX-SENDTO:/dev/log
- The ‘root’ instance config file should contain (modifying the output actions to taste):
 $ModLoad imklog
 $ModLoad omprog
 $Template FwdViaUNIXSocket,"<%pri%>%syslogtag%%msg%"
 $ActionOMProgBinary /usr/libexec/rsyslogd/omprog_socat
*.* :omprog:;FwdViaUNIXSocket - The ‘unprivileged’ instance config file should contain (modifying the output actions to taste):
 $ModLoad imuxsock
 $PrivDropToUser rsyslogd
 $PrivDropToGroup rsyslogd
 *.* /var/log/rsyslog.log
The ‘root’ daemon can only accept input from the kernel message buffer, and nothing else (especially not the syslog socket (/dev/log) or any network sockets). The unprivileged user will handle all of local and network log messages. To merge the kernel logs into the same data channel as everything else, here’s what happens:
[During the RSyslog daemons’ startup]
A) At startup, the ‘root’ daemon’s ‘imklog’ module starts listening for kernel messages (via ‘/prog/kmsg’), and its ‘omprog’ module starts an instance of ‘socat’ (called via the ‘omprog_socat’ wrapper), establishing a persistent one-way IO connection where ‘omprog’ pipes its output to the STDIN of ‘socat’.
- (Note that this same ‘socat’ instance remains running throughout the life of the RSyslog daemon, handling everything ‘omprog’ outputs. Contrast this, efficiency-wise, against the built-in ‘subshell’ module [the ‘^/path/to/program’ action], which runs a separate instance instance of the child program for each message.)
B) At startup, the ‘unprivileged’ daemon’s ‘imuxsock’ module opens the system logging socket (‘/dev/log’) and starts listening for incoming log messages from other programs.
- [During normal operation]1) The kernel buffer produces a message string on ‘/proc/kmsg’.2) The ‘root’ RSyslog daemon reads the message from ‘/proc/kmsg’, assigning it the priority number of ‘kern.info’ and the string tag ‘kernel’.3) The ‘root’ daemon prepends the priority number and tag as a header to the message string, and then passes it to the ‘omprog’ module for output (via persistent pipe) to the running ‘socat’ instance.4) The ‘socat’ instance receives the header-framed message and sends it to the system logging socket (‘/dev/log’).
5) The ‘unprivileged’ RSyslog daemon reads the message from ‘/dev/log’, assigning it the priority and tag given in the message header, plus all of the other properties (timestamp, hostname, etc.) a message object should have.
6) The ‘unprivileged’ daemon formats the message and writes it to the output file.
The only real difference I can see in the forwarded messages is that the ‘source’ property is set to ‘imuxsock’ instead of ‘imklog’. I don’t think that’s a real problem, though, since the priority and tag are still distinct.
Storing Messages from a Remote System into a specific File
This is a log-consolidation scenario. There exist at least two systems, a server and at least one client. The server is meant to gather log data from all the clients. Clients may (or may not) process and store messages locally. If they do, doesn’t matter here. See recipe Sending Messages to a Remote Syslog Server for how to configure the clients.
Messages from remote hosts in the 192.0.1.x network shall be written to one file and messages from remote hosts in the 192.0.2.x network shallbe written to another file.
Things to think about
TCP recpetion is not a build-in capability. You need to load the imtcp plugin in order to enable it. This needs to be done only once in rsyslog.conf. Do it right at the top.
Note that the server port address specified in $InputTCPServerRun must match the port address that the clients send messages to.
Config Statements
$ModLoad imtcp
 $InputTCPServerRun 10514
 # do this in FRONT of the local/regular rules
 if $fromhost-ip startswith '192.0.1.' then /var/log/network1.log
 & ~
 if $fromhost-ip startswith '192.0.2.' then /var/log/network2.log
 & ~
 # local/regular rules, like
 *.* /var/log/syslog.log
How it works
It is important that the rules processing the remote messages come before any rules to process local messages. The if’s above check if a message originates on the network in question and, if so, writes them to the appropriate log. The next line (“& ~”) is important: it tells rsyslog to stop processing the message after it was written to the log. As such, these messages will not reach the local part. Without that “& ~”, messages would also be written to the local files.
Also note that in the filter there is a dot after the last number in the IP address. This is important to get reliable filters. For example, both of the addresses “192.0.1.1” and “192.0.10.1” start with “192.0.1” but only one actually starts with “192.0.1.”!
Integration with “standard” syslogd
Many people call sysklogd that “standard” syslogd because it comes by default with many distributions. Well, more precisely we should say “it came by default”. Over time, rsyslog has replaced sysklogd in most Linux distributions (for example, Fedora, Debian and Ubuntu). So it may be worth checking if rsyslog is already the standard syslogd on a system in question.
Things to think about
In any case, rsyslogd can work well with sysklogd. However, there are a number of limitations, based in missing capabilities of sysklogd. Most importantly, sysklogd does not support tcp syslog or any other protocol but UDP. Note that UDP syslogd does not offer reliability. So some syslog messages will probably be lost, especially on a busy system and/or network. If this is not acceptable, sysklogd must be replaced.
Also, various implementations of legacy syslogd’s use somewhat malformed message formats (based on current standards). As such, rsyslog may not correctly interpret the messages. There are solutions for this problem, but this currently is out of scope for the cookbook-type approach of this book. If you need to deal with these issues, please look at the official reference documentation or ask on the rsyslog forum or mailing list.
Config Statements
You need to configure the legacy syslogd (sysklogd, for example) to send messages to the machine running rsyslogd. The syntax is somewhat similar to rsyslogd’s, but offers limited options. Only basic priority filters can be used, and ports, zip compression or templates can not be specified.
Let us assume that the rsyslogd runing on the machine 192.0.0.1 shall receive a copy of all messages and the rsyslgod running on machine maillog.example.net shall receive copy of all mail-related logs.
In legacy syslog you configure this as follows:
 *.*      @192.0.0.1
 mail.*   @maillog.example.net
On the rsyslog side, you need to set up UDP reception. For the machine that gathers all logs, rsyslog.conf may look like below. Note that the listening port must be 514 as legacy syslogd (usually) does not support any other.
 $ModLoad imudp
 $UDPServerRun 514
 # Log anything (except mail) of level info or higher.
 # Don't log private authentication messages!
 *.info;mail.none;authpriv.none;cron.none      /var/log/messages
 # The authpriv file has restricted access.
 authpriv.*                                    /var/log/secure
 # Log all the mail messages in one place.
 mail.*                                        /var/log/maillog
 # Log cron stuff
 cron.*                                        /var/log/cron
 # Everybody gets emergency messages
 *.emerg                                       *
 # Save news errors of level crit and higher in a special file.
 uucp,news.crit                                /var/log/spooler
 # Save boot messages also to boot.log
 local7.*                                      /var/log/boot.log
Note that this configuration will store both local and remote messages into the same files. This often is not desirable. Please refer to recipe 2.2.1 to see how to split local and remote logs to different files.