rsyslog 5.9.0 (devel)
Download file name: rsyslog 5.9.0 (devel)
rsyslog 5.9.0 (devel)
md5sum: 3047a43dc268d6e4eabb5b58ea0285de
Author: Rainer Gerhards (rgerhards@adiscon.com)
Version: 5.9.0 File size: 2.3 MB
Changelog for 5.9.0 (v5-devel)
Version 5.9.0 [V5-DEVEL] (rgerhards), 2011-06-08
- imfile: added $InputFileMaxLinesAtOnce directive
- enhanced imfile to support input batching
- added capability for imtcp and imptcp to activate keep-alive packets
at the socket layer. This has not been added to imttcp, as the latter is
only an experimental module, and one which did not prove to be useful.
reference: http://kb.monitorware.com/post20791.html - added support to control KEEPALIVE settings in imptcp
this has not yet been added to imtcp, but could be done on request. - $ActionName is now also used for naming of queues in impstats
as well as in the debug output - bugfix: do not open files with full privileges, if privs will be dropped
This make the privilege drop code more bulletproof, but breaks Ubuntu’s
work-around for log files created by external programs with the wrong
user and/or group. Note that it was long said that this “functionality”
would break once we go for serious privilege drop code, so hopefully
nobody still depends on it (and, if so, they lost…). - bugfix: pipes not opened in full priv mode when privs are to be dropped
- this begins a new devel branch for v5
- better handling of queue i/o errors in disk queues. This is kind of a
bugfix, but a very intrusive one, this it goes into the devel version
first. Right now, “file not found” is handled and leads to the new
emergency mode, in which disk action is stopped and the queue run
in direct mode. An error message is emited if this happens. - added support for user-level PRI provided via systemd
- added new config directive $InputTCPFlowControl to select if tcp
received messages shall be flagged as light delayable or not. - enhanced omhdfs to support batching mode. This permits to increase
performance, as we now call the HDFS API with much larger message
sizes and far more infrequently - bugfix: failover did not work correctly if repeated msg reduction was on
affected directive was: $ActionExecOnlyWhenPreviousIsSuspended on
closes: http://bugzilla.adiscon.com/show_bug.cgi?id=236
rsyslog 6.3.1 (devel) released
This is a first implementation of a full-blown DNS cache. While there were some optimizations for DNS queries in older releases, especially UDP sometimes suffered under slow DNS resolution performance.
This is solved with the new dnscache module. Note that the module will undergo some more enhancements in the next couple of weeks. Feedback on its effect would be deeply appreciated.
ChangeLog:
http://www.rsyslog.com/changelog-for-6-3-1-devel/
Download:
http://www.rsyslog.com/rsyslog-6-3-1-devel/
As always, feedback is appreciated.
Best regards,
Florian Riedl
rsyslog 6.3.1 (devel)
Download file name: rsyslog 6.3.1 (devel)
rsyslog 6.3.1 (devel)
md5sum: 802bbfa75c8daca0d3aff6ee622b9019
Author: Rainer Gerhards (rgerhards@adiscon.com)
Version: 6.3.1 File size: 2.4 MB
Changelog for 6.3.1 (devel)
Version 6.3.1 [DEVEL] (rgerhards), 2011-06-07
- added a first implementation of a DNS name cache this still has a couple of weaknesses, like no expiration of entries, suboptimal algorithms — but it should perform much better than what we had previously. Implementation will be improved based on feedback during the next couple of releases
Log normalization and the leading space
Log normalization is simple, but has its quirks. A common pitfall is syslog message format as induced by RFC3164. Let’s look at a common case: A log message has been sent to rsyslog. The message itself had no irregular characters. But, the message that should have been parsed by mmnormalize now has a leading space character. Basically, the message that should be parsed looks like this:
This is a test
Usually, one would think, that a simple parser can be used here. You might be correct, but there is a small caveat about this. The rulebase entry we currently have looks something like this:
rule=:%word1:word% %word2:word% %word3:word% %word4%
But strangely, rsyslog responds the following:
mmnormalize generated: {“originalmsg”: ” This is a test″, “unparsed-data”: ” This is a test″}How comes, that rsyslog cannot parse the message? Why is there a leading space character in from of the message? The answer is, that messages are processed as RFC3164. In this RFC it is defined, that everything after the “:” of the syslog header is to be considered as the message. Thus, the message has a leading space now.
How is this to be solved? Simply insert the space to your rules in the rulebase. This will lead to a rule like this:
rule=: %word1:word% %word2:word% %word3:word% %word4%
Please note, that there has just the space character been added. Further, this is really only a example. The rule will fit to all messages that are 4 words long, so it is really not very suitable to be adopted to your configuration.
rsyslog 6.3.0 (devel) released
The release of rsyslog 6.3.0 introduces a new major feature. With this release we introduce a new config system. You can find some information about the new config system in Rainer’s blog:
http://blog.gerhards.net/2011/06/new-rsyslog-config-system-materializes.html
ChangeLog:
http://www.rsyslog.com/changelog-for-6-3-0-devel/
Download:
http://www.rsyslog.com/rsyslog-6-3-0-devel/
As always, feedback is appreciated.
Best regards,
Florian Riedl
rsyslog 6.3.0 (devel)
Download file name: rsyslog 6.3.0 (devel)
rsyslog 6.3.0 (devel)
md5sum: f883d4b6105f97b55375768c7c1afcdf
Author: Rainer Gerhards (rgerhards@adiscon.com)
Version: 6.3.0 File size: 2.4 MB
new rsyslog config system materializes
The past weeks we have worked pretty hard on the new rsyslog config system. The legacy system was quite different from what you expect in modern software. Most importantly, the legacy system applied directives as the config file was read, which made it extremely hard to restructure the config file format. That also prevented features like privilege drop from working fully correct.
We have now basically changed the config system so that there is a clear difference between the config load phase and applying the config. Most importantly, this means privilege drop now works correctly in all cases. Other than that, there are no user-visible enhancements at the moment. However, the internal plumbing has changed dramatically and enables future change. Most importantly, this finally creates a path to a new config language, as we now have a clear interface as part of the in-memory representation of the config, which is config language agnostic.
With this initial release, there may still be some things inside the core that can be optimized. Right now, the system aims at the capability to have multiple config objects loaded (but not active) at the same time. However, there are some data instances where this is not cleanly followed in order to reuse some code. This is not a problem, because the rest of the rsyslog engine does not support dynamic config reload (and thus multiple configs at runtime) at all.
Also it must be noted that the current code is quite experimental. So there is some risk involved in running the initial 6.3.0 version. However, all dramatic changes were made to the config system. That means if the system initializes correctly, it will most probably run without any issues. The risk window is constrained to the initial startup, what should be quite controllable. Users that use privilege drop are advised to check that their configurations work as expected. The previous system did some initialization with full privileges. This is no longer the case, except for modules that actually require full privileges (e.g. imtcp to bind privileged ports). Most importantly, files are now created with dropped privileges right from the beginning. I expect that some (unclean) configurations will run into trouble with that. The good news about that is that they would run into trouble with older releases as well, but only after a HUP. Now things break immediately, what makes them much easier to diagnose.
Using rsyslog mmnormalize module effectively with Adiscon LogAnalyzer
Using the mmnormalize module in rsyslog is a bit complicated at first. We want to describe in this article how to set up the basic components for using log normalization. In addition to that we will show how to configure these components so messages will be split into pieces of information. These pieces of information should then be written into a database for review with Adiscon LogAnalyzer.
This guide has been tested with rsyslog v5.8.0 and liblognorm 0.3, libee 0.3.
The goal of this guide is to have a setup, that will have a message parsed by the normalizing tool, put some content of the message into specific properties. These properties will then be filled into a special database format, which will should be reviewed by Adiscon LogAnalyzer.
For using normalization we need the following:
- rsyslog
- liblognorm
- libee
- libestr
In the further process of the article we need additional elements:
- apache webserver with PHP5
- mysql database (usually with phpmyadmin)
- Adiscon LogAnalyzer
Step 1: Setting up rsyslog and log normalization
First of all we need to setup rsyslog for log normalization. So before installing rsyslog, we will install liblognorm, libee and libestr. They can be installed according to this guide. rsyslog can now be installed. We assume you have downloaded and extracted a tarball from the rsyslog download page. Change into the directory you installed rsyslog in. Now use the following commands to setup rsyslog correctly:
./configure --libdir=/lib --sbindir=/sbin --enable-mysql --enable-mmnormalize
make
make install
If everything is correct, the installation procedure should complete successfully. We can now start configuring rsyslog itself. We need a configuration that looks like this:
$ModLoad immark
$ModLoad imuxsock
$ModLoad imklog
$ModLoad mmnormalize
$ModLoad ommysql.so
$ModLoad imudp.so
$UDPServerRun 514
$mmnormalizeUseRawMSG 1
$mmnormalizeRuleBase /rsyslog/rulebase.rb
*.* :mmnormalize:
$template database,"insert into normalized (date, uhost, msgnumber, protocol, ipin, ipout, portin, portout)
values ('%$!date%', '%$!uhost%', '%$!msgnumber%', '%$!protocol%', '%$!ipin%', '%$!ipout%', '%$!portin%',
'%$!portout%')",SQL
*.* :ommysql:172.19.3.17,syslog, test, test;database
That is all for our rsyslog config. Looks pretty complicated right now. Basically, we load all necessary modules at the top. After that we start the UDP syslog server. It is needed to receive the messages. The next 3 lines are the parameters to initiate the normalization of messages. We declare, that the raw message should be used. Our rulebase for the normalization lies in the rsyslog directory (this path has to be changed if your directory lies somewhere else). And after that, we tell rsyslog to use normalization on all messages. The next line describes the template for the processed message. In the end, there should be a sql insert statement that puts all the parsed variables into their corresponding fields in the table “normalized”. The last line is finally the action that makes rsyslog write all messages (the ones created by the template – the sql statement – into a remote database.
After the configuration, we still need to setup a rulebase. This is done in a separate file. For our example, the rulebase should be the following file: /rsyslog/rulebase.rb
The file should look like this:
rule=:%date:date-rfc3164% %uhost:word% %tag:word%  %notused:char-to:x3a%: %msgnumber:char-to:x3a%: access-list
inside_access_in permitted %protocol:word% inside/%ipin:ipv4%(portin:number%) ->
outside/%ipout:ipv4%(portout:number%) %notused2:char-to:]%]
The rule is basically one line. It might be shown otherwise here due to restrictions of the webdesign. It is basically a format of a message. The different parameters of a rule are shown in a different guide. The rule we have here should resemble the following message:
May 16 07:23:09 BHG-FW : %ASA-4-106100: access-list inside_access_in  permitted tcp inside/10.200.22.183(2969) ->
outside/67.192.232.82(80)  hit-cnt 1 first hit [0x48e9c345, 0x386bad81]
If you want to have multiple messages, where the format differs, you need multiple rules as well of course. The rules must be as precise as possible to resemble the message. If a message does not fit any listed rules, it will not be processed further. Something else that needs to be pointed out, is to keep the rules variable enough as well. Like in our example, there are some parts that will be the same for every message of this kind. Other parts might be with different content. And even if we do not need the content further, it should be put into a variable. Else the message might again not fit to the rule.
Step 2: Setting up the database
We suppose, that you already have a server with a database and webserver installed. The installation of the components has to be made according to the instructions given by the manufacturer of the software. Therefore we cannot give any examples for that.
But we need a specific database scheme for our example here. So we need to show this at least. As you have seen before, we have some specific parts of the message filled into properties. These properties should be written to the database. So here is the basic SQL statement to create the table according to our needs:
CREATE TABLE normalize
(
ID int unsigned not null auto_increment primary key,
date datetime NULL,
host varchar(255) NULL,
msgnumber varchar(20),
protocol varchar(60) NULL,
ipin varchar(60) NULL,
ipout varchar(60) NULL,
portin int NULL,
portout int NULL
)
You can execute this statement as you like. It is currently designed for a MySQL database, so you might need to change some bits if you are using a different database.
3. Using Adiscon LogAnalyzer with this database
Adiscon LogAnalyzer can be used to review the data from this database. Installation of Adiscon LogAnalyzer is shown here. Please note, that we will need the admin center. So please think of creating a user database when installing.
Point your browser to your Adiscon LogAnalyzer installation. Now we need to go to the admin center. There we have to set some parts to fit our custom format.
Edit Fields
First, we need to add some Fields. We need to do this, so we can use the custom fields in our database with LogAnalyzer. By default, the list of fields only reflects basically the MonitorWare Database Scheme. When clicking on Fields in the Admin Center, a list of the currently available fields will be shown:
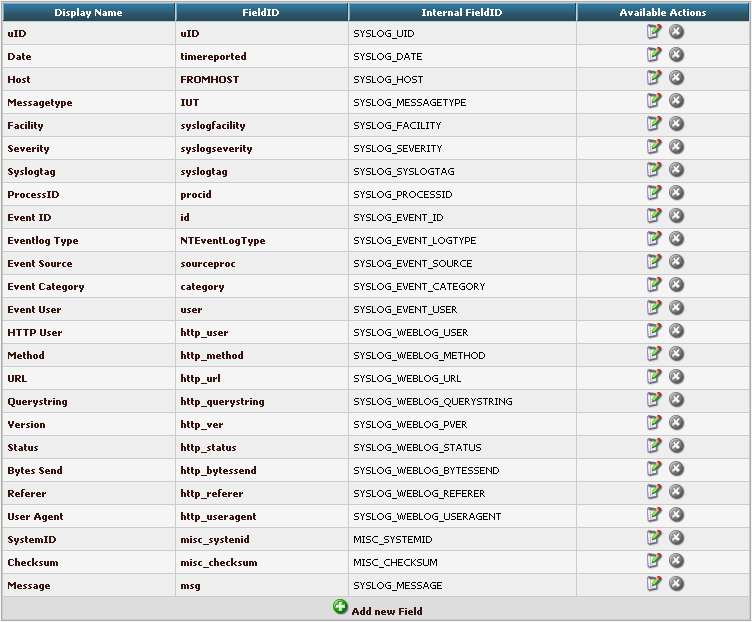
By clicking on Add new Field, we can create a new Field.
We need to create 7 new fields only, though we have 8 custom fields in the table. Since date is the same, we can use the already formatted field. So we only need to create the fields for host, msgnumber, protocol, ipin, ipout, portin and portout.
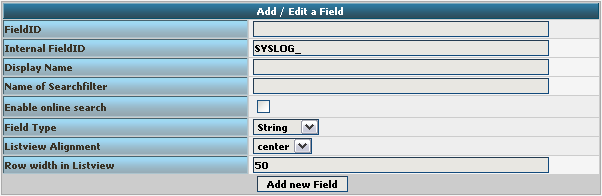
Basically, the Field details should look like this:
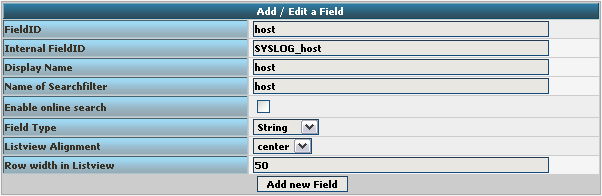
To finally create the Field, click on the button “Add new Field”. Now the list should appear again with the newly created Field. Repeat this step for the other fieldnames as well.
Edit DBMappings
In conjunction with the Fields which are only for the internal use in Adiscon LogAnalyzer, we need to create a custom database mapping. Therefore go to DBMappings in the Admin Center. You will see a list of the currently available database mappings.
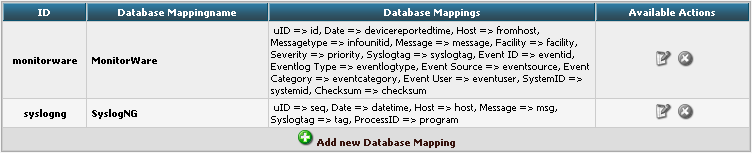
Click on Add new Database Mapping:
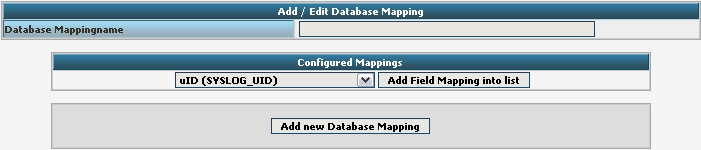
Here we need to tell Adiscon LogAnalyzer, which Field we created depends on which database field. Give your database mapping a name first. After that, choose the Fields we need from the dropdown menu and click on “Add Field Mapping into list”. The final step will be to enter the database field names into the list. It should now look like this now:
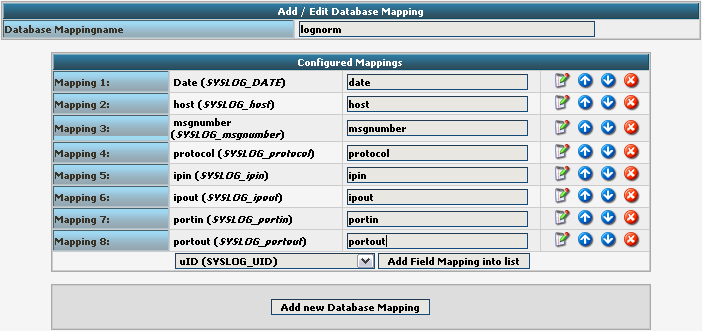
Finally click on “Add new Database Mapping”. This will save the mapping and get you back to the list of DBMappings.

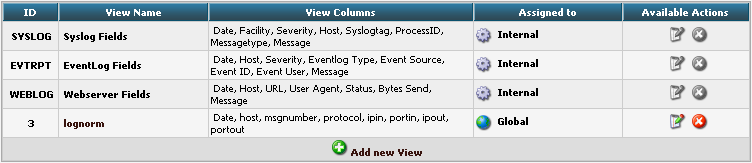
Edit Views
The next step we need to adjust is the Views. In Views you can configure, what LogAnalyzer should show. This is related to the data that is stored in the database. Basically, a View should represent the kind of logs that are stored. For example if you use the View for Windows Event Logs, but have a database where Linux syslog is stored, many Fields will be shown as empty, because they are not filled like from Windows Event Logs. Therefore we need a custom view.
You will get there by clicking on Views in the Admin Center.

There are already pre-configured Views for Windows EventLog, Syslog and Webserver Logs. We need a completely different View though. A new View can be configured by clicking on “Add new View” at the bottom of the list.
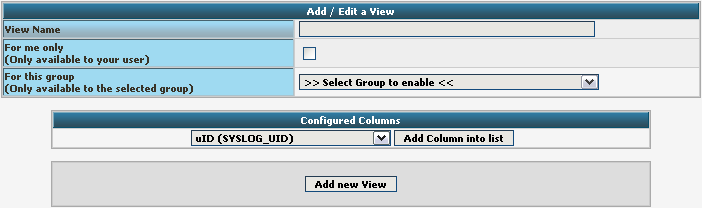
You need to give your view a name. If you want, you can restrict the use of this view to certain users or groups, but we will skip that for now. The most important part is to select the Fields that should be displayed. This is done at “Configured Columns”. Before clicking on “Add new View” it should look like this:
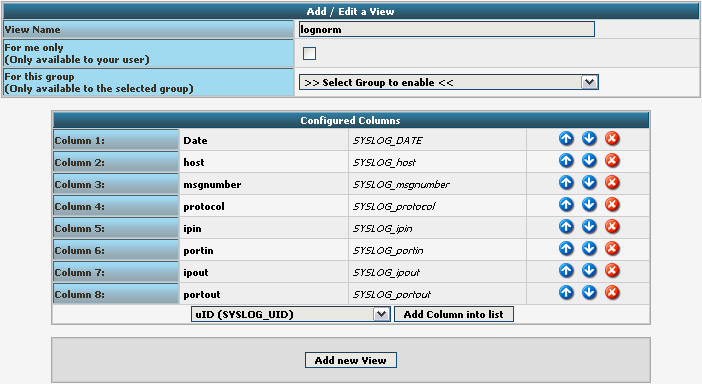
After clicking the button, the new View should appear in our list.
Edit Sources
Finally, we need to create a Source. When installing Adiscon LogAnalyzer, you can already configure a Source. For our example, we need to create another Source. Therefore go to Sources in the Admin Center.

You will see a list of the configured Sources. It currently holds one Source. By clicking on Add new Source you can create another one.
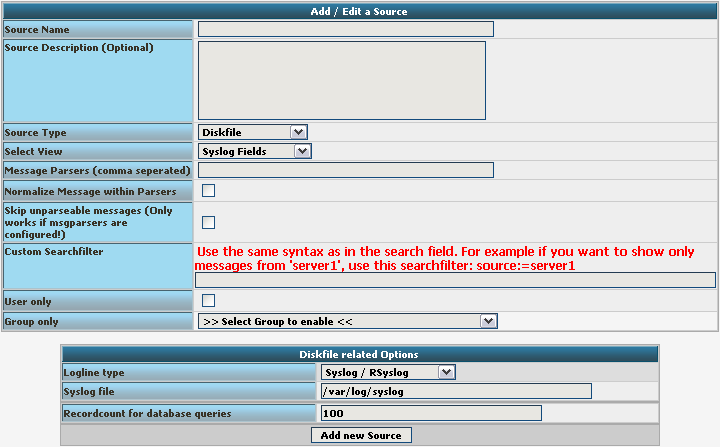
Basically, we need to insert a Source Name. If you want, you can also create a description. Change the Source Type to MYSQL Native. You can also select a default View. Choose our lognorm View we created earlier. No more general options need to be set. If you want, you can again restrict the source to a user or group.
We still need to change the database Type options. As you can see, the fields have changed by setting the Source Type to MYSQL Native. As table type choose the lognorm type we created before. Insert the details as your database needs them. The complete form should look like this now:
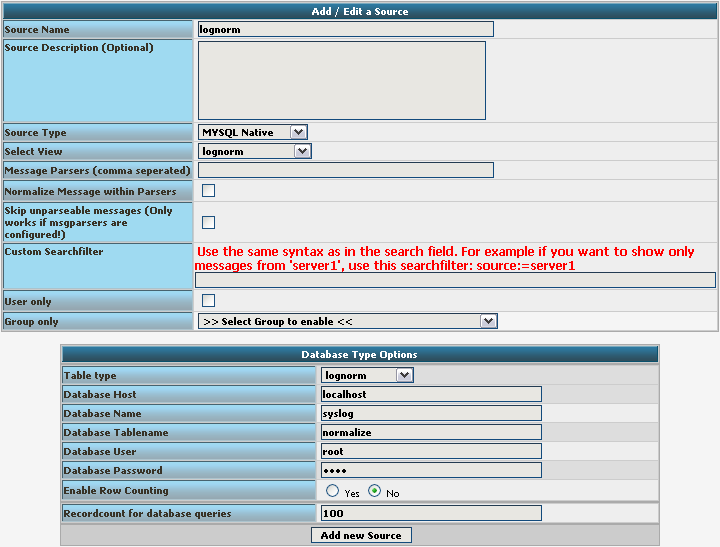
Finish the new Source by clicking on Add new Source. It should now appear in the list.

Final Thoughts
Though this scenario seems very complex it shows in the end how easy some things can be afterwards. This setup shows exactly, how different products from the Adiscon product line can work together. And we have a good example for how normalizing works.