RSyslog Windows Agent and CEE
The Rsyslog Windows Agent comes with support for the new CEE enhanced format out of the box. It is designed to work flawlessly with all components from the Adiscon product lines and other CEE enhanced-enabled products. And it is one of the first products to support the Project Lumberjack at all. If you do not know what CEE enhanced is good for, it might be wise to watch our introduction into CEE.
In this guide, we will show the necessary steps to create a configuration for the RSyslog Windows Agent to output CEE enhanced conform log messages. The setup itself is very simple and does not differ a lot from other basic setups. In the end we will have a configuration, that will poll Windows EventLogs and forward them via syslog in CEE enhanced format to another syslog server.
Step 1: Setting up the ruleset and action.
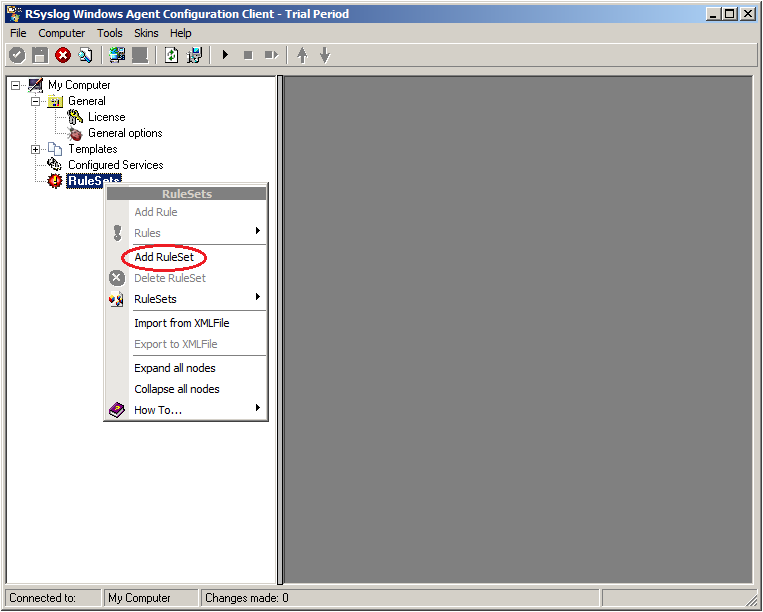
1. First we define a new rule set. Right-click “Rulesets”. A pop up menu will appear. Select “Add Rule Set” from this menu.
2. Then, a wizard starts. Change the name of the ruleset to whatever name you like. We will use “Forward syslog” in this example. The screen looks as follow:
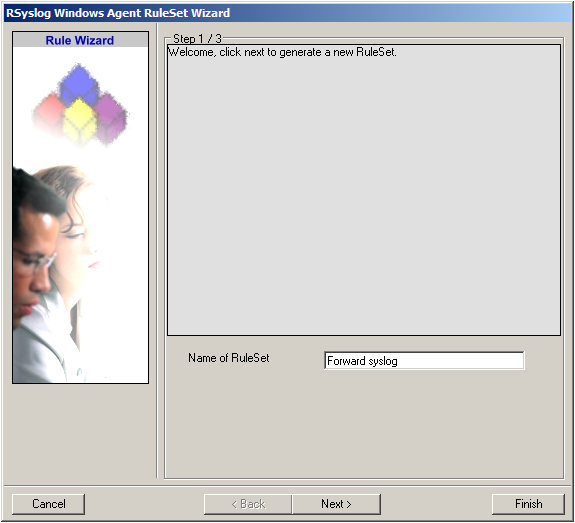
Click “Next” to go on with the next step.
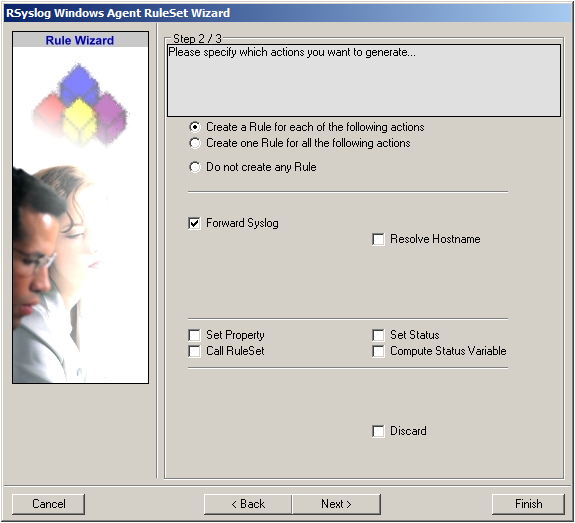
3. Select only Forward via Syslog. Do not select any other options for this sample. Also, leave the “Create a Rule for each of the following actions” setting selected. Click “Next”. You will see a confirmation page. Click “Finish” to create the rule set.
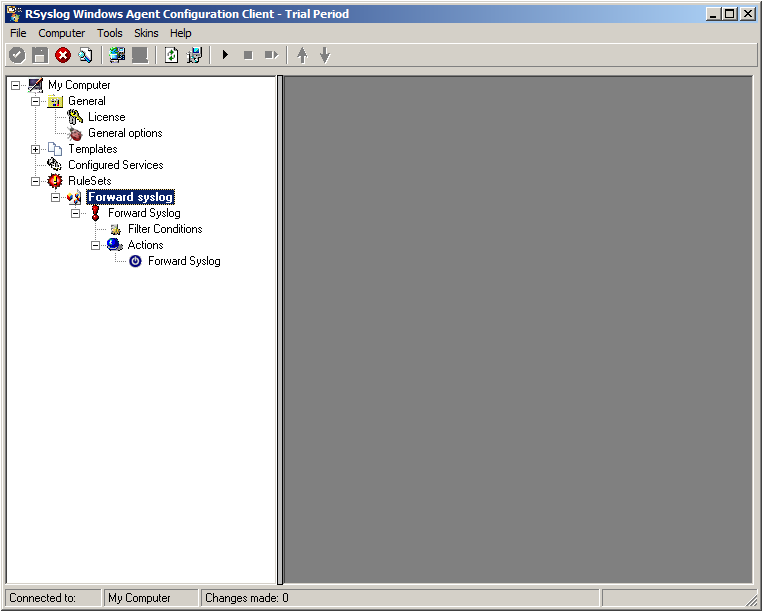
4. As you can see, the new Rule Set “Forward syslog” is present. Please expand it in the tree view until the action level of the “Forward syslog” Rule and select the “Forward syslog” action to configure.
5. Configure the “Forward via Syslog” Action
Insert the IP of your syslog server into the field “Syslog Server”. You can change the port if needed as well. We will keep it on the default port 514. You could also change to protocol type to TCP for example. Attention RSyslog Windows Agent and your syslog server must use the same port and the same protocol.
But you need to change the “Used Message Format”. Click on the dropdown menu to see the options and choose “Use CEE enhanced Syslog Format”.
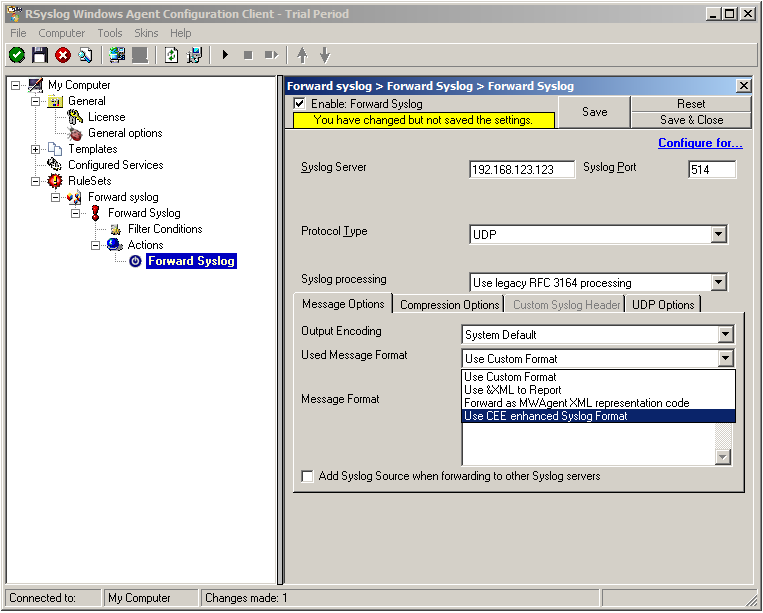
The configuration for syslog forwarding should now look like this:

6. Finally, make sure you press the “Save” button – otherwise your changes will not be applied.
Step 2: Setting up the EventLog Monitor V2.
Note: This guide explains how to set up the EventLog Monitor V2 Service for Windows Vista/z/2008. These steps are not applicable if you are using Windows XP/2000/2003. In that case, please use the regular EventLog Monitor.
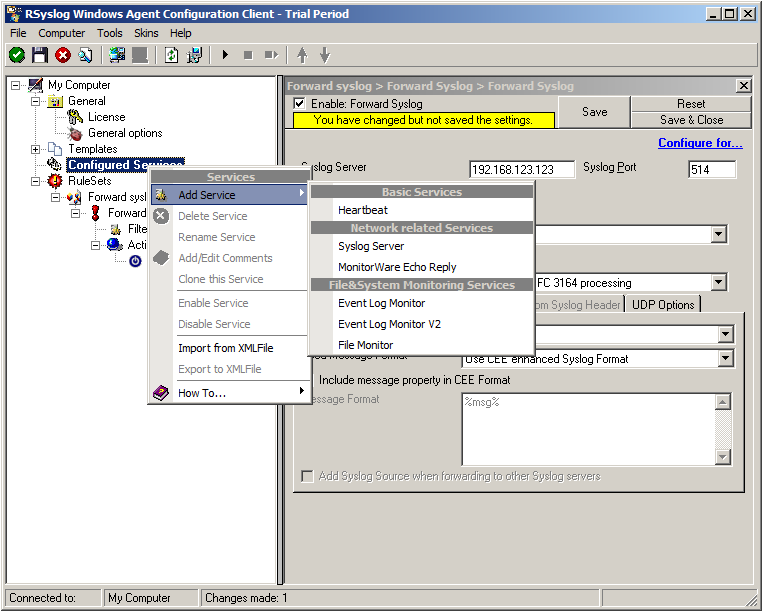
1. First, right click on “Services”, then select “Add Service” and then “Event Log Monitor V2”:
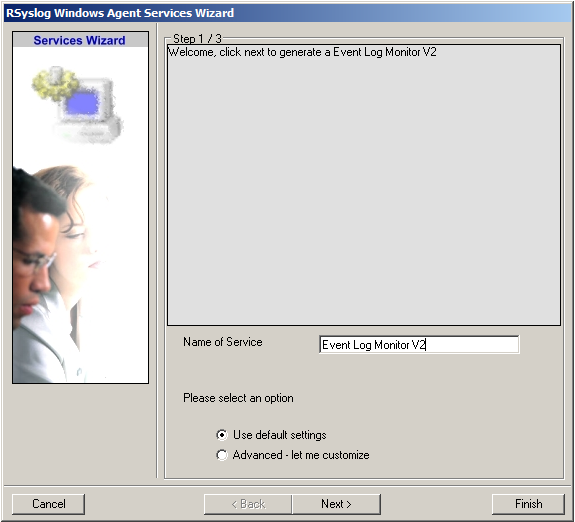
Again, you can use either the default name or any one you like. We will use the default name in this example. Leave the “Use default settings” selected and press “Finish”, as we are not changing any other settings right now.
2. Now, you will see the newly created service beneath the “Services” as part of the tree view. To check its parameters, select it:

As you can see, the service automatically checks for all present EventLogs. You can now select or disable certain logs or change some of their properties.
Note: The ruleset “Forward Syslog” has been automatically assigned as the ruleset to use. By default, the wizard will always assign the first rule set visible in the tree view to new services.
Step 3: Starting the Service.
5. The last step is to save the changes and start the service. This procedure completes the configuration of the syslog server.
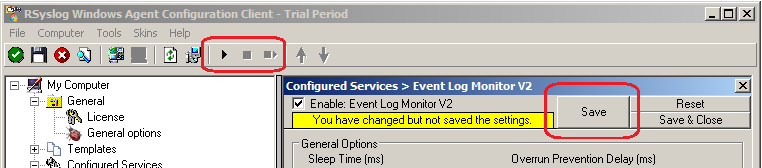
The Service cannot dynamically read changed configurations. As such, it needs to be restarted after such changes. In our sample, the service was not yet started, so we simply need to start it. If it already runs, you need to restart it.
We are now finished. You should now receive the Eventlog messages on your syslog server in CEE enhanced format.
What is CEE-enhanced syslog?
In this (~5 minutes) Video Rainer Gerhards describes what cee-enhanced syslog actually is and how it works. This format will probably become very important in the future. Continue reading “What is CEE-enhanced syslog?”
TCP syslog / RFC5424 log4j appender
As part of a training project, we created a small log4j appender supporting TCP syslog and RFC5424. Most importantly, it is capable of formatting stack traces as a single syslog messages (NOT the usual bunch of multiple malformed messages). The work is based on the syslog4j implementation, which did not work for us (our fault? ;)) and so we extended this framework. Note that the code has never been used in practice by us, so there may be some risk associated – but that should be fairly easy to asses, given that the source is pretty small.
The download of the RFC5424 syslog tcp appender contains it all: doc, jar files as well as the source.
Feedback and usage reports are appreciated, please send mail to ugerhards@adiscon.com (if you run into troubles, you can also use the same email address to discuss the problem!).
Using TLS for receiving log messages
In this guide, we want to describe, how to use the RSyslog Windows Agent with TLS encrypted syslog. This specific part will describe the setup steps for receiving syslog from a Linux rsyslog installation. First, as a preliminary, you should read the guide from the rsyslog documentation for “Encrypting Syslog Traffic with TLS (SSL)”. It describes in details the overall setup, how certificates are generated and how the clients and server need to be set. It is strongly suggested to be read as a whole.
Since we will receive syslog messages via TLS and we can only forward messages via syslog (with TLS or without) the whole setup will basically resemble what we described in our guide for a syslog relay. Therefore, we will only show how to setup the syslog service.
Step 1: Machine certificates
The easiest way to create the machine certificates is as described in the Linux guide above. So please create a machine certificate as described here: Generating Machine Certificates
Please provide your Windows machine with those certificates. Make sure, that they are safe and cannot get into someones’ hands.
Step 2: Setting up the ruleset and action.
Usually we start by creating the ruleset, rule and action. The reason lies in the configuration structure. So we will first create the mentioned items. In the end, we will have a basic rule with no particular filter and a forward via syslog action. That means, that all messages will be forwarded to a central host.
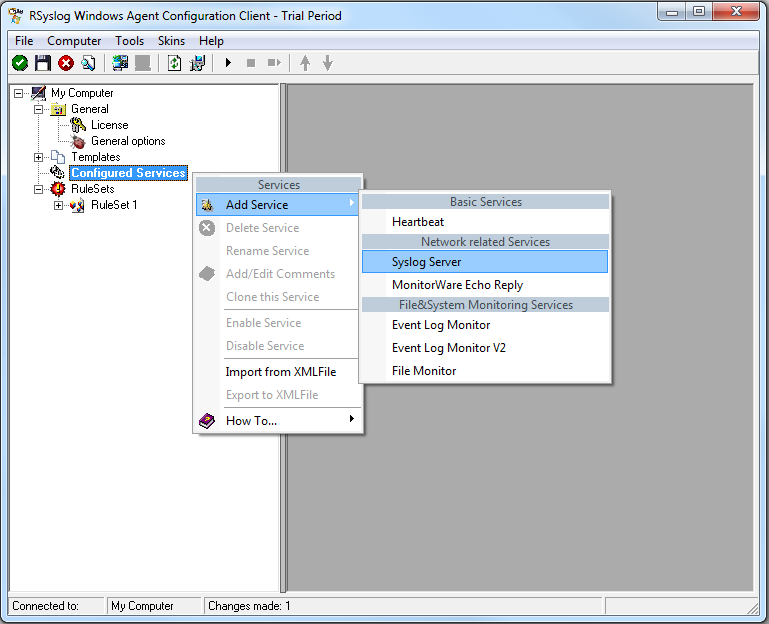
Step 3: Create a Syslog Server Service
Now we need to create a syslog server service.
To create it, right click on “Services”, then select “Add Service” and the “Syslog Server”:
Once you have done so, a new wizard starts:
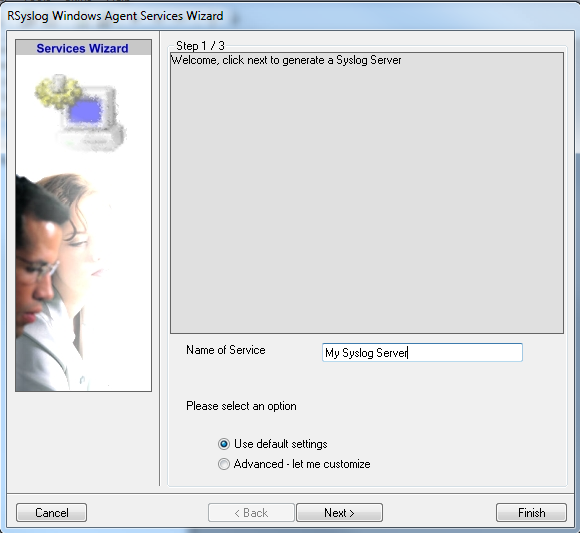
Again, you can use either the default name or any one you like. We will use “My Syslog Server” in this example. Leave the “Use default settings” selected and press “Next”:
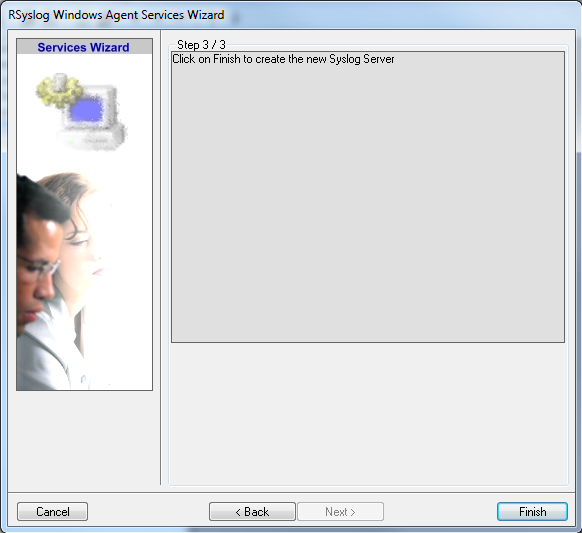
As we have used the default, the wizard will immediately proceed with step 3, the confirmation page. Press “Finish” to create the service. The wizard completes and returns to the configuration client. There, you will see the newly created service beneath the “Services” part of the tree view:
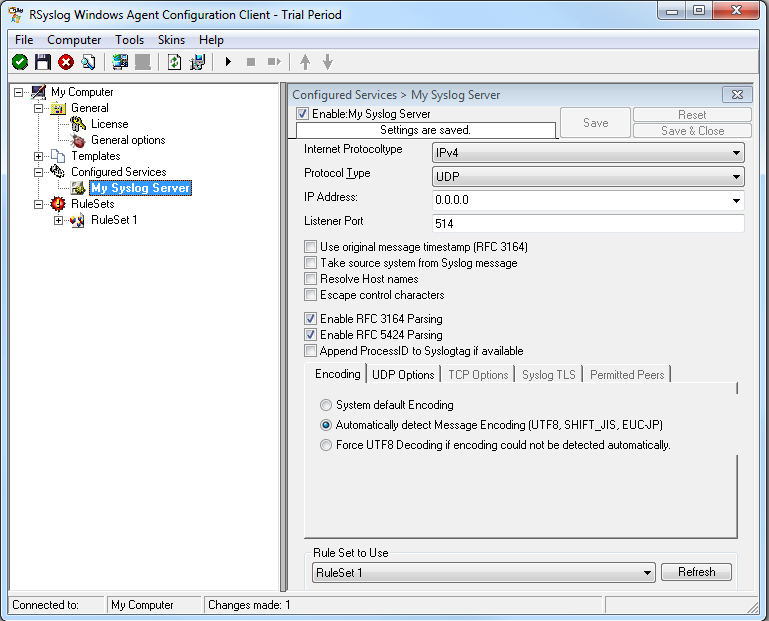
As you can see, the service has been created with the default parameters. As such, it operates as a RFC compliant standard Syslog server. But, we still need to make some changes so we can receive TLS syslog.
Step 4: Changing to TLS
First we need to change the protocol type. Change it to TCP. TLS syslog is not available with UDP. If you want, you can change the port to what your clients use for sending.
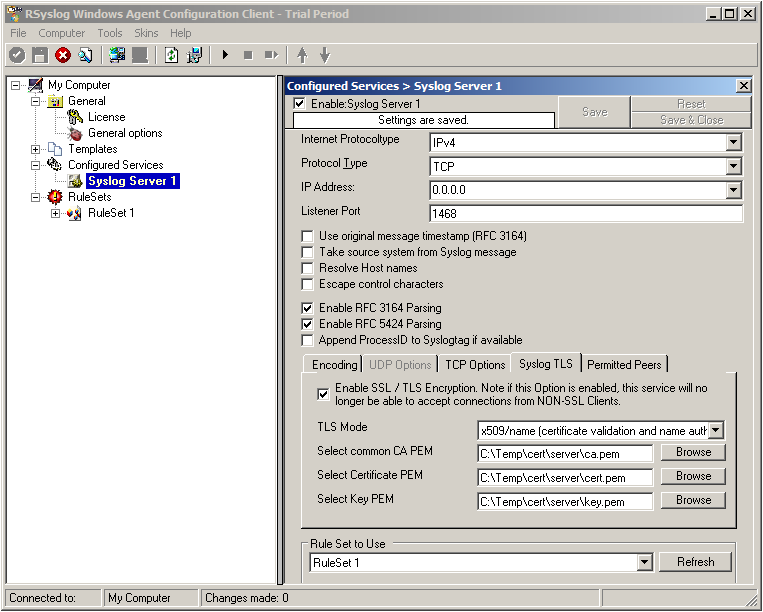
Now in the lower part of the configuration window click on the tab Syslog TLS. This is where the important TLS settings will be made.
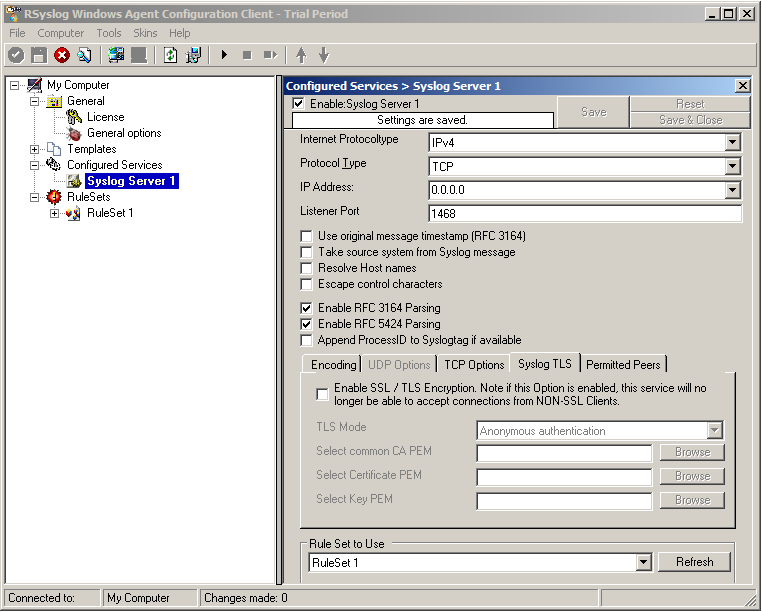
Now check the box for “Enable SSL / TLS Encryption”. The other options become available now. We suggest using x509/name mode, which is obviously the most secure of the available modes.
Below, select your PEMs that you created in Step 1 and submitted to the machine. It should look something like this, though your paths and certificate names might be different.
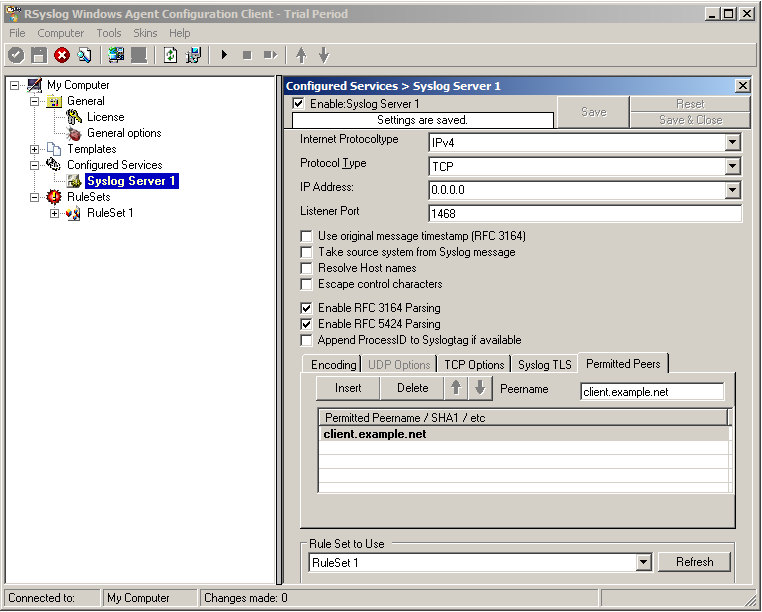
Now we can go on to the Permitted Peers tab. Here we define the systems that are allowed to send their syslog messages to our relay host. You could also use wildcards for the peers, like *.example.net. Just look below:
That is basically what we need to set up when receiving syslog via TLS.
Final Thoughts
That is just the setup need for receiving syslog via TLS in RSyslog Windows Agent. This is, as we already mentioned before, for a setup where the RSyslog Windows Agent is used as a relay. You could also apply TLS syslog to the outgoing syslog traffic, but that is not what we wanted to show here.
Sending messages with tags larger than 32 characters
The relevant syslog RFCs 3164 and 5424 limit the syslog tag to 32 characters max. Messages with larger tag length are malformed and may be discarded by receivers. Anyhow, some folks sometimes need to send tags longer than permitted.
To do so, a new template must be created and used when sending. The simplest way is to start with the standard forwarding template. The standard templates are hardcoded inside rsyslog. Thus they do not show up in your configuration file (but you can obtain them from the source, of course). In 5.8.6, the forwarding template is defined as follows:
template (name="ForwardFormat" type="string" string="<%PRI%>%TIMESTAMP:::date-rfc3339% %HOSTNAME%
%syslogtag:1:32%%msg:::sp-if-no-1st-sp%%msg%")
NOTE: all templates are on one line in rsyslog.conf. They are broken here for readability.
This template is RFC-compliant. Now look at the part in red. It specifies the tag. Note that, via the property replacer, it is restricted to 32 characters (from position 1 to position 32 inclusive). This is what you need to change. To remove the limit … just remove it ;-) This leads to a template like this:
template (name="LongTagForwardFormat" type="string" string="<%PRI%>%TIMESTAMP:::date-rfc3339% %HOSTNAME%
%syslogtag%%msg:::sp-if-no-1st-sp%%msg%")
Note that I have renamed the template in order to avoid conflicts with build-in templates. As it is a custom template, it is not hardcoded, so you need to actually configure it in your rsyslog.conf. Then, you need to use that template if you want to send messages to a remote host. This can be done via the usual way. Let’s assume you use legacy plain TCP syslog. Then the line looks as follows:
action(type="omfwd"
Target="server.example.net"
Port="10514"
Protocol="tcp"
Template="LongTagForwardFormat"
)
This will bind the forwarding action to the newly defined template. Now tags of any size will be forwarded. Please keep in mind that receivers may have problems with large tags and may truncate them or drop the whole message. So check twice that the receiver handles long tags well.
Rsyslog supports tags to a build-defined maximum. The current (5.8.6) default is 511 characters, but this may be different if you install from a package, use a newer version of rsyslog or use sources obtained from someone else. So double-check.
Changelog for 4.6.8 (v4-stable)
Version 4.6.8 [v4-stable] (rgerhards), 2011-09-01
- bugfix/security: off-by-two bug in legacy syslog parser, CVE-2011-3200
- bugfix: potential misadressing in property replacer
- bugfix: memcpy overflow can occur in allowed sender checking if a name is resolved to IPv4-mapped-on-IPv6 address
Found by Ismail Dönmez at suse - bugfix: The NUL-Byte for the syslogtag was not copied in MsgDup (msg.c)
Using a strgen module to write into a database
In many cases, log messages have to be transformed. This can be done in various ways with the property replacer for example. But processing messages this way can be rather slow, since the transformation part is no native code. In this case, strgen (string generator) is the way to go. A string generator is a separate plugin, that will be loaded in rsyslog. It provides a native C interface for template generation and thus speed up message transformation. String generators are not a very easy thing to create yourself. But Adiscon happily offers this as paid service to support the rsyslog project.
A string generator usually takes a message, that is in a certain format and transforms it into another format. That is where the speed bonus comes into play, since there is no dynamic message transformation.
In this example we want to show how a string generator is used that has been created for a customer. Basically, the string generator takes a message and transforms it into a specific MySQL INSERT statement to write the message into a database with a different database scheme. The database scheme is customer specific as well, so this is rather not usable by someone else. But the steps shown can be applied to every other strgen as well.
To test the correct transformation of messages, we can write messages into a file as well. But, this is in this case just to check the correct output. The file should then hold a SQL INSERT statement for every message that has been sent.
What we need
Basically we need a linux system. The steps will be described with a installation of Fedora 13. If another system is being used, some paths need to be changed. Please note, that rsyslog is already the default syslog daemon here. But we need a newer version. If the sysklogd or another syslog daemon is still present on the system you are using, you need to permanently disable it.
The setup
Our setup should reflect a configuration of rsyslog, which is able to receive syslog via UDP. The messages that are received should be “filtered” for several IP addresses. The message with IPs that evaluate the filter to true will be discarded (description in the configuration part). All other messages should be transformed into SQL statements via the strgen plugin and then injected into a MySQL database on the same system.
On this system we need the usual suspects.
git
mysql-devel
pkgconfig
libtool
libxml2-devel
zlib-devel
These are most likely needed and should be installed. Further, you need a server that holds the MySQL database. Perhaps you have this installed on the same server. In that case, you need to check the MySQL documentation for instructions. We will only describe the installation of rsyslog here. For our example, the MySQL server will be on the same system.
Please note, that the syslog messages that can be processed by the strgen plugin are very specific and the created INSERT statements do only fit a certain database scheme.
Setting up rsyslog
Basically, we need to set up rsyslog. The strgen plugin we will use is called “sm_cust_bindcdr”. It has been released in the rsyslog v5.8.0 stable release. But, due to some changes afterwards, we need to use the latest v5-stable version from the git repository. Assuming the above mentioned packages are installed we will start directly.
Open up a terminal with root permission and change to the folder which should later hold the rsyslog files. In our case we will install rsyslog directly in the user directory, though this is not recommended. When you have switched to that folder, type the following:
git clone git://git.adiscon.com/git/rsyslog.git
You will see, that the current state of rsyslog development will be downloaded from the git repository into a folder rsyslog. By default, the downloaded git repository does reflect the current master branch (v6-devel currently). Therefore we need to switch to the newly created folder rsyslog and change the branch by doing the following:
git checkout v5-stable
You should get a confirmation message, that the branch has been switched accordingly. Now we can start installing rsyslog. This is done by using the following commands one after another:
autoreconf-vfi
./configure --libdir=/lib --sbindir=/sbin --enable-mysql --enable-smcustbindcdr
make
make install
Basically, we have rsyslog v5.8.0 stable now installed.
Configuring rsyslog
We are now ready to configure rsyslog. Open the configuration file for rsyslog. It is located here:
/etc/rsyslog.conf
Usually, this is a basic configuration that has been shipped with the operating system. In the end, our configuration should look somehow like this (the minimum for our scenario):
$ModLoad imudp.so
$ModLoad ommysql
$ModLoad sm_cust_bindcdr

$UDPServerRun 514
$sgcustombindcdrallowedip 10.0.0.51
$sgcustombindcdrallowedip 10.0.0.52
$sgcustombindcdrallowedip 10.0.0.53
$template sm,=Custom_BindCDR,sql
*.* :ommysql:127.0.0.1,Data,test,pass;sm
At the top, we have the modules loaded which we need. The first module is for receiving UDP syslog. The second module handles the MySQL capabilities of rsyslog. The third module is our custom string generator plugin.
After that, the UDP receiver is enabled. We will use the default UDP port 514.
Now we define the “filters”. We will use the configuration $sgcustombindcdrallowedip for this. This directive is included in the strgen plugin and only available if the plugin was loaded. Basically we define a IP, which will be compared to the IP in the syslog message. If the IP is the same, the message will be discarded. If the IP is different, the message will be further processed. Behind this is a system where some service is offered. Some IPs are allowed to do that for free, others are not. Those which are not allowed to use the service for free are collected in the database for later billing. This directive can be used multiple times with different IPs. Basically the only limit for the amount of filters is either the address space or the main memory of the machine.
After the filters, we define a template which is used for the final processing. Basically, this works like a regular template. We define a custom name for the template (“sm” in this case) and after the comma we tell the template what it looks like. In this case, we use the template name of the strgen plugin – “Custom_BindCDR,sql”. The name is introduced by “=”. This is very important. If this is missed out, the template will not know, that it has to get the format information from the plugin. You could also say, that you call a template in a template.
Finally, we have our action. This is the last part of the configuration. Basically, we want to forward all messages (“*.*”) to our MySQL server. We access the server by defining its address, the database name, user and password. The final part of this statement is “;sm” which calls the template.
That’s it. Save the configuration file now and exit your editor.
Getting rsyslog to run
We have rsyslog installed and configured now. The only thing left to do is to restart rsyslog. Right now, the old version is still running. When we restart rsyslog, the new installation with our new configuration file will be loaded. Now use the following command to stop and start rsyslog:
service rsyslog restart
This works at least in Fedora. If it does not work for you, you can as well use this:
/etc/init.d/rsyslog restart
Final thoughts
We have now achieved what we wanted. We can receive our messages, filter and transform then and inject them into our database. The important thoughts were on the string generator. The format of the messages cannot be changed later. The problem in this case is the common use, which is virtualy not possible. The module will only work with messages of a certain format and create a INSERT statement that has a very customer specific form as well. So it will only work if the correct messages are received and the database scheme fits as well. All other mesages will be dropped.
Storing and forwarding remote messages
In this scenario, we want to store remote sent messages into a specific local file and forward the received messages to another syslog server. Local messages should still be locally stored.
Things to think about
How should this work out? Basically, we need a syslog listener for TCP and one for UDP, the local logging service and two rulesets, one for the local logging and one for the remote logging.
TCP recpetion is not a build-in capability. You need to load the imtcp plugin in order to enable it. This needs to be done only once in rsyslog.conf. Do it right at the top.
Note that the server port address specified in $InputTCPServerRun must match the port address that the clients send messages to.
Config Statements
# Modules
$ModLoad imtcp
$ModLoad imudp
$ModLoad imuxsock
$ModLoad imklog
# Templates
# log every host in its own directory
$template RemoteHost,"/var/syslog/hosts/%HOSTNAME%/%$YEAR%/%$MONTH%/%$DAY%/syslog.log"
### Rulesets
# Local Logging
$RuleSet local
kern.*                                                 /var/log/messages
*.info;mail.none;authpriv.none;cron.none                /var/log/messages
authpriv.*                                              /var/log/secure
mail.*                                                  -/var/log/maillog
cron.*                                                  /var/log/cron
*.emerg                                                 *
uucp,news.crit                                          /var/log/spooler
local7.*                                                /var/log/boot.log
# use the local RuleSet as default if not specified otherwise
$DefaultRuleset local

# Remote Logging
$RuleSet remote
*.* ?RemoteHost
# Send messages we receive to Gremlin
*.* @@W.X.Y.Z:514
### Listeners
# bind ruleset to tcp listener
$InputTCPServerBindRuleset remote
# and activate it:
$InputTCPServerRun 10514

$InputUDPServerBindRuleset remote
$UDPServerRun 514
How it works
The configuration basically works in 4 parts. First, we load all the modules (imtcp, imudp, imuxsock, imklog). Then we specify the templates for creating files. The we create the rulesets which we can use for the different receivers. And last we set the listeners.
The rulesets are somewhat interesting to look at. The ruleset “local” will be set as the default ruleset. That means, that it will be used by any listener if it is not specified otherwise. Further, this ruleset uses the default log paths vor various facilities and severities.
The ruleset “remote” on the other hand takes care of the local logging and forwarding of all log messages that are received either via UDP or TCP. First, all the messages will be stored in a local file. The filename will be generated with the help of the template at the beginning of our configuration (in our example a rather complex folder structure will be used). After logging into the file, all the messages will be forwarded to another syslog server via TCP.
In the last part of the configuration we set the syslog listeners. We first bind the listener to the ruleset “remote”, then we give it the directive to run the listener with the port to use. In our case we use 10514 for TCP and 514 for UDP.
Important
There are some tricks in this configuration. Since we are actively using the rulesets, we must specify those rulesets before being able to bind them to a listener. That means, the order in the configuration is somewhat different than usual. Usually we would put the listener commands on top of the configuration right after the modules. Now we need to specify the rulesets first, then set the listeners (including the bind command). This is due to the current configuration design of rsyslog. To bind a listener to a ruleset, the ruleset object must at least be present before the listener is created. And that is why we need this kind of order for our configuration.
Using the syslog receiver module
We want to use rsyslog in its general purpose. We want to receive syslog. In rsyslog, we have two possibilities to achieve that.
Things to think about
First of all, we will determine, which way of syslog reception we want to use. We can receive syslog via UDP or TCP. The config statements are each a bit different in both cases.
In most cases, UDP syslog should be fully sufficient and performing well. But, you should be aware, that on large message bursts messages can be dropped. That is not the case with TCP syslog, since the sender and receiver communicate about the arrival of network packets. That makes TCP syslog more suitable for environments where log messages may not be lost or that must ensure PCI compliance (like banks).
Config Statements
module(load="imudp") # needs to be done just once
input(type="imudp" port="514")
and
module(load="imtcp") # needs to be done just once
input(type="imtcp" port="514")
How it works
The configuration part for the syslog server is pretty simple basically. Though, there are some parameters that can be set for both modules. But this is not necessary in most cases.
In general, first the module needs to be loaded. This is done via the directive module().
module(load="imudp / imtcp")
The module must be loaded, because the directives and functions rely on it. Just by using the right commands, rsyslog will not know where to get the functionality code from.
And next is the command that runs the syslog server itself is called input().
input(type="imudp" port="514")
input(type="imtcp" port="514")
Basically, the command says to run a syslog server on a specific port. Depending on the command, you can easily determine the UDP and the TCP server.
You can of course use both types of syslog server at the same time, too. You just need to load both modules for that and configure the server command to listen to specific ports. Then you can receive both UDP and TCP syslog.
Important
In general, we suggest to use TCP syslog. It is way more reliable than UDP syslog and still pretty fast. The main reason is, that UDP might suffer of message loss. This happens when the syslog server must receive large bursts of messages. If the system buffer for UDP is full, all other messages will be dropped. With TCP, this will not happen. But sometimes it might be good to have a UDP server configured as well. That is, because some devices (like routers) are not able to send TCP syslog by design. In that case, you would need both syslog server types to have everything covered. If you need both syslog server types configured, please make sure they run on proper ports. By default UDP syslog is received on port 514. TCP syslog needs a different port because often the RPC service is using this port as well.